LDC pricing product
The LDC pricing product defines how a gas company calculates the customer bill by combining fixed and variable pricing components. Fixed fees include delivery and service charges, while variable costs depend on the actual gas consumption. These elements are determined according to government-approved rates to ensure accuracy, fairness, and compliance in billing.
Prerequisites
Before setting up an LDC pricing product, make sure all prerequisites outlined in the configuration requirements article are met.
Procedure to configure an LDC pricing product
Step 1: Navigate to LDC pricing product screen
- Log in to the nGenue application.
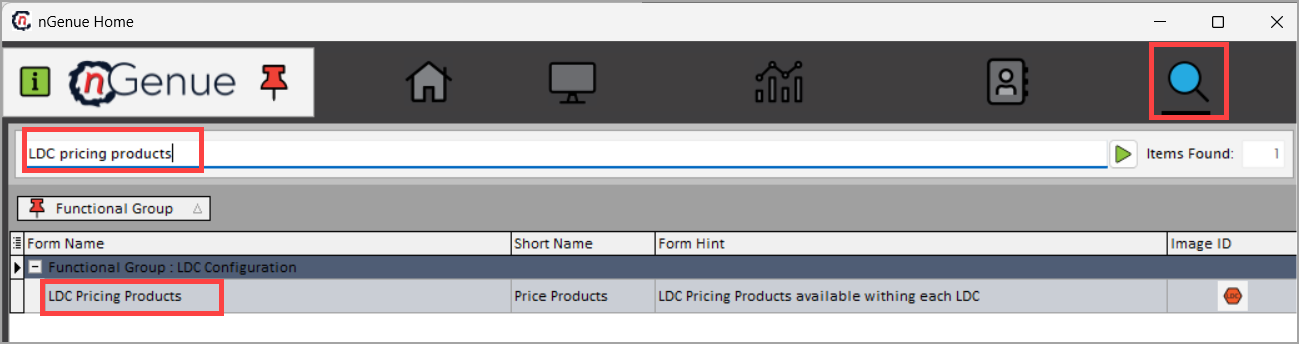
- Click on the Search icon and enter LDC pricing products in the search bar.
-
Double-click the LDC pricing products from the search result to open the LDC pricing products screen.
-
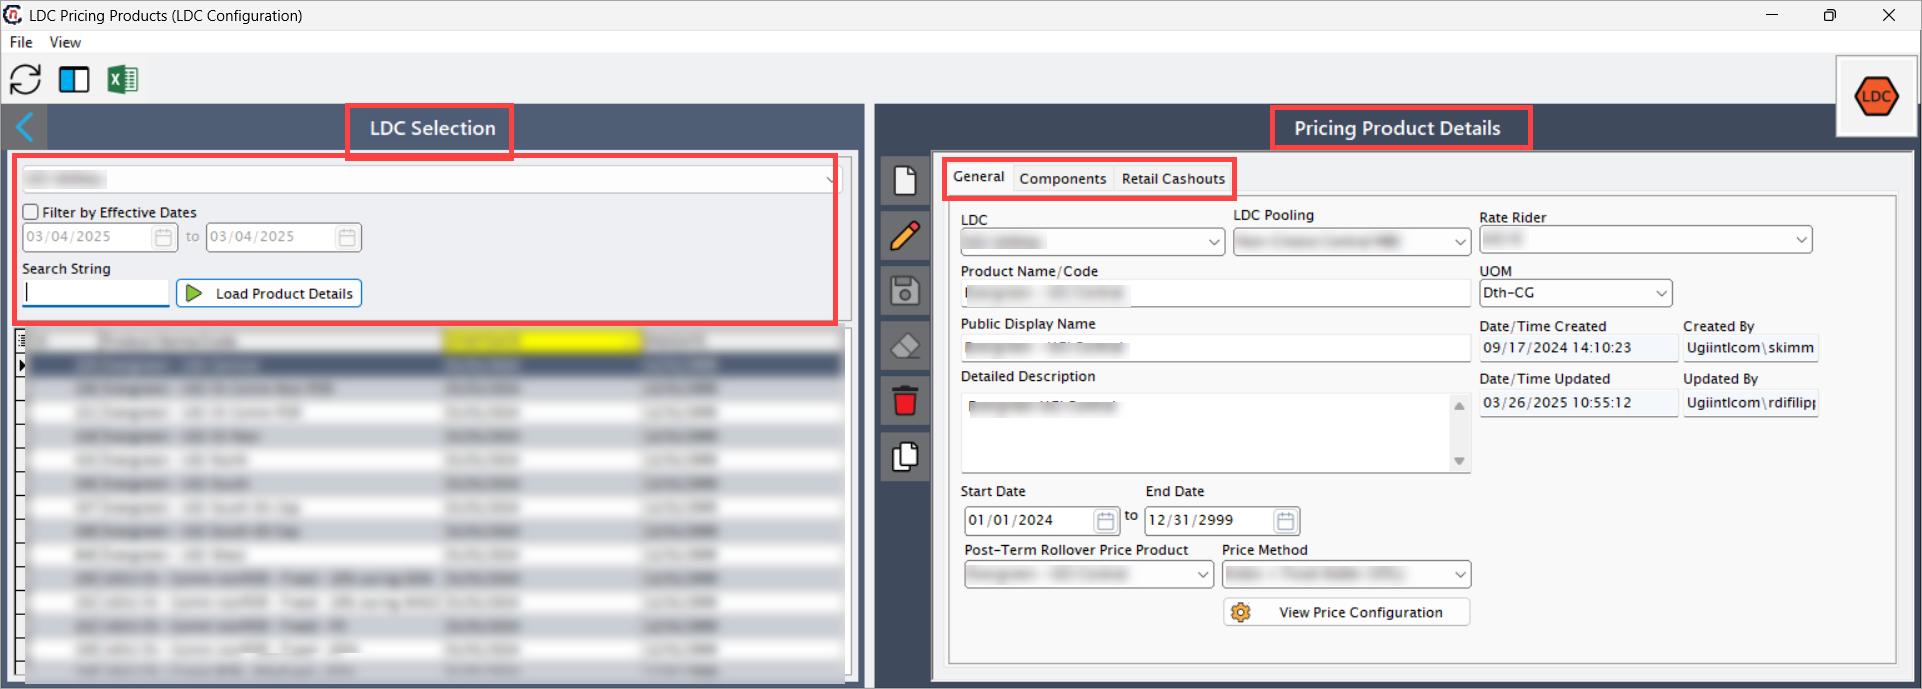
The LDC pricing products screen has two sections:
- LDC selection: This section displays the already configured LDC pricing product details.
-
Pricing product details: This section allows to configure LDC pricing product and helps to manage associated pricing components and cashout records.
- General: Configure basic details of the LDC pricing product.
- Components: Add, edit, or manage pricing components.
-
Retail cashouts: Manage cashout records associated with the LDC pricing product.
Step 2: Preview existing LDC pricing products
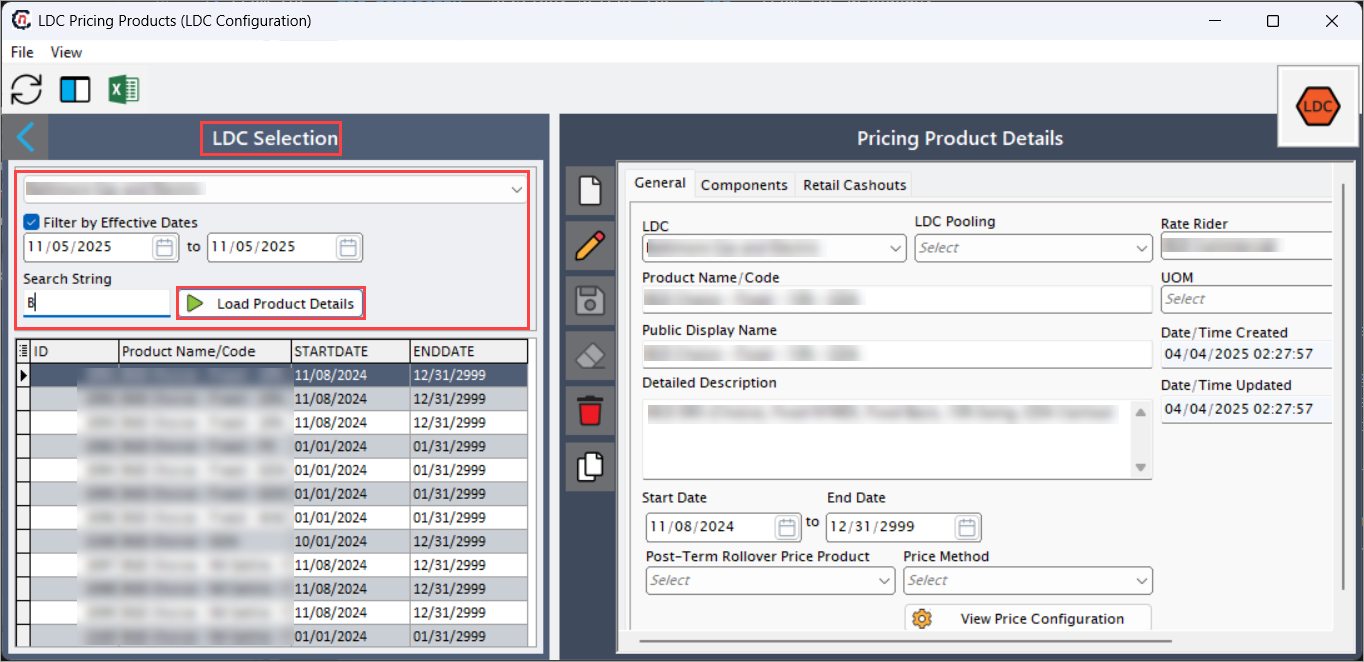
- From the LDC selection section, select the LDC from the dropdown.
- Enable the Filter by effective dates option and select the date range.
- To find existing LDC pricing product records, enter the relevant characters or name in the Search string field.
-
Click Load product details to fetch the existing LDC pricing product data.
Step 3: Configure an LDC pricing product
- From the Pricing product details section, click Add a LDC pricing record to create new pricing product.
-
In the General tab, fill in the details as mentioned in the table below:
Fields Description LDC Select the relevant LDC from the dropdown, which identifies the utility company responsible for delivering gas to the end user and ensures the correct regional pricing and billing rules are applied. LDC pooling Select the appropriate pooling option that groups customers under the same pricing structure. Pooling helps manage supply, nominations, and settlements efficiently by consolidating end users with similar delivery or rate characteristics. Rate rider Select the rate rider from the dropdown. A rate rider is an additional charge or credit applied to a customer's bill that accounts for regulatory adjustments, or cost parameters defined by LDC. Product name/Code Enter a unique name or code that identifies the product or defines the product name based on the configuration. Units of Measure (UOM) Refers to the standard measurement used to quantify the natural gas billed or tracked. Common units include:
• Hundred cubic feet (CCF)
• Thousand cubic feet (MCF)
• Million British thermal units (MMBtu)
• Million cubic feet (MMCF)
• British thermal unit (energy) (BTU)
• Therm: 100,000 BTUsPublic display name Enter the public display name in this field. Detailed description Add a short description explaining the pricing product’s purpose and key details. Start date/End date Specify the start and end date for a pricing product. Post-Term rollover price product Select a post-term rollover price product (Evergreen) to ensure uninterrupted service after an agreement expires. When no active agreement exists but reads continue from the utility, the system automatically applies this rollover configuration and generates a new price agreement based on it. Price method Select the pricing method from the dropdown tto define how the system calculates gas prices in the agreement. The selected method determines whether pricing is fixed, floating, or a mix of both, and how it interacts with WACOG and other pricing components. -
After entering all mandatory fields in the General tab, click the View price configuration button.
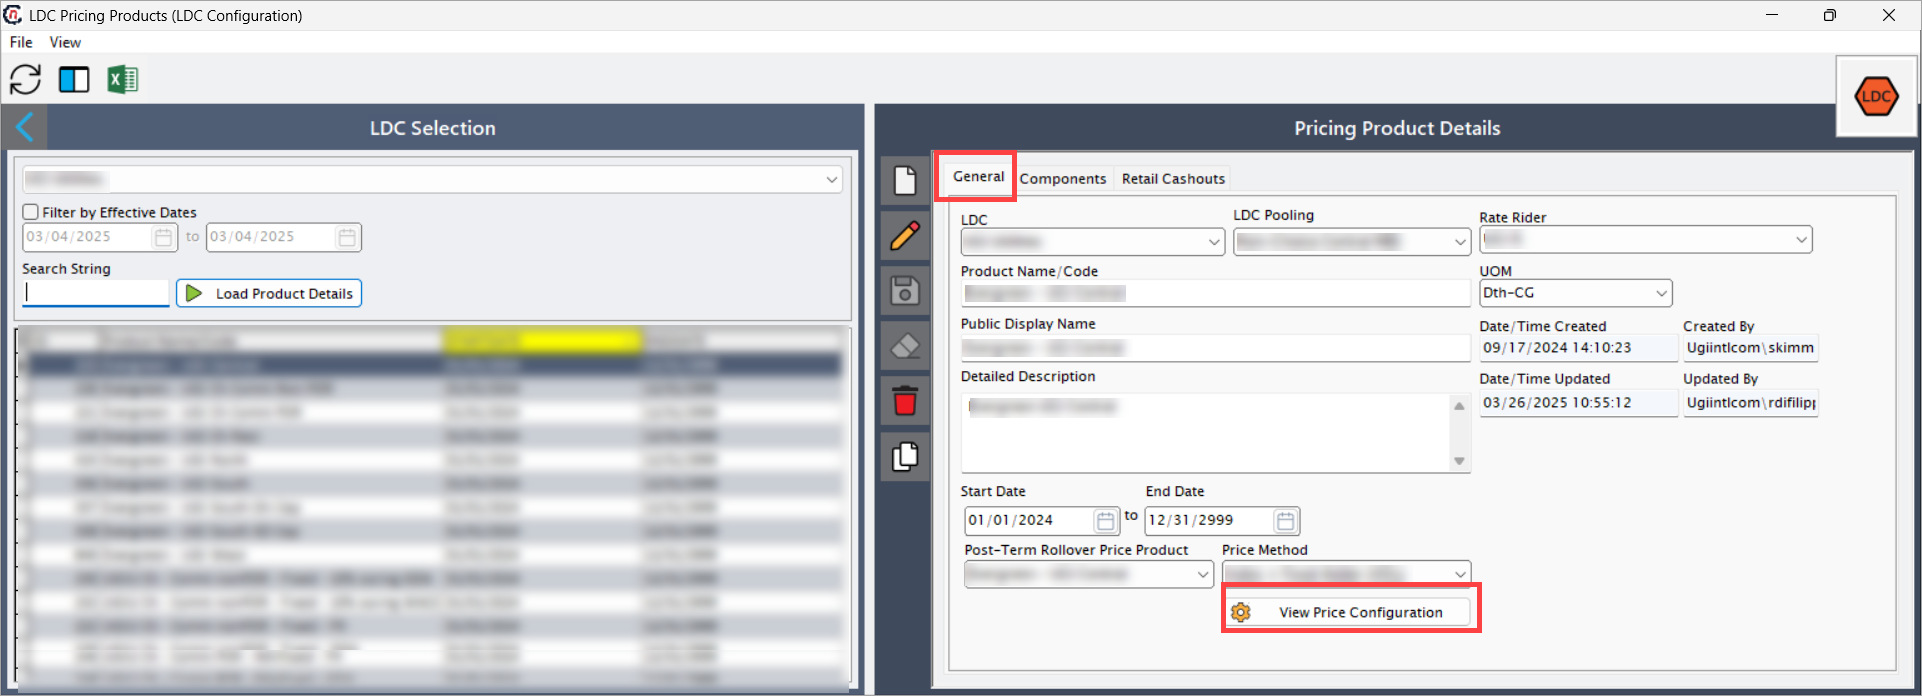
-
The system will redirect to the Price template configuration screen, where you can configure the price method, volume, commodity and basis configurations, and tiers lock configuration.
Note
Critical validations for configuring components:
- Enabling WACOG: Ensure components marked as "part of WACOG" for any component which is required to be part of WACOG, and they will be shown under WACOG = Y in Quote customization.
- Price agreement derivation: Verify WACOG and compute price align with the quote’s configured components.
- Basis mandatory: If commodity is floating, basis must be configured (fixed or floating).
Step 4: Configure components
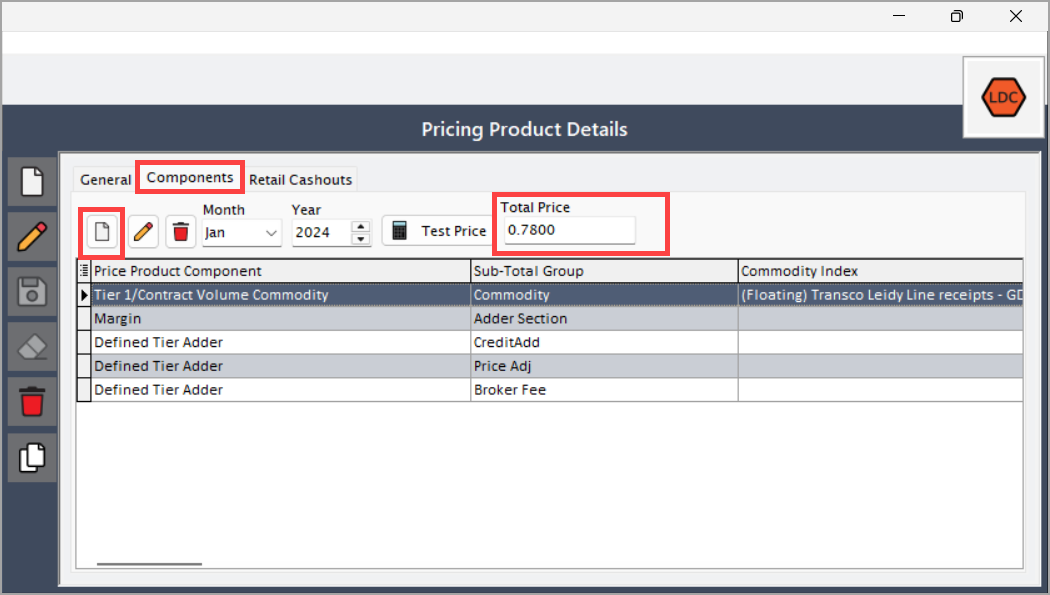
Components tab allows to define different price components. Following are the steps to create pricing components:
-
In the Components tab, select the Month and Year for the Pricing product.
-
Click on the Add pricing component icon; it will populate the Pricing component configuration screen.
Note
The Total price is calculated by adding up the prices of all the individual price product components (Sum of all pricing components).
-
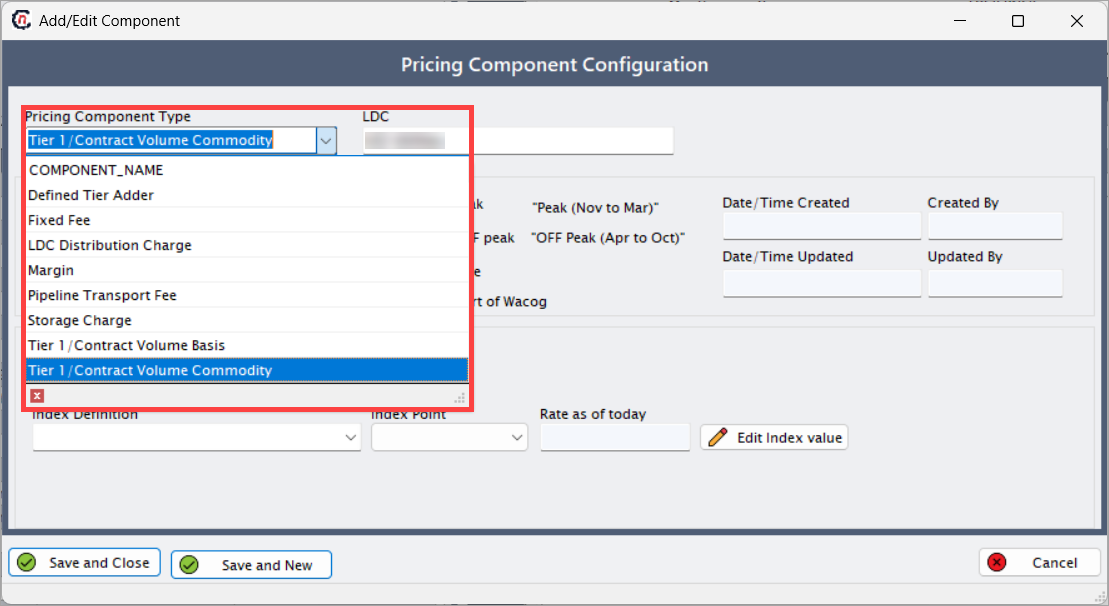
Under Pricing component configuration, you can configure different types of Pricing component types such as:
- Defined tier adder
- Fixed fee
- LDC distribution charge
- Margin
- Pipeline transport fee
- POR (Purchase of Receivables)
- Storage charge
- Tier-1/Contract volume basis
-
Tier-1/Contract volume commodity
-
Enable the following common checkboxes when creating a new pricing product:
Checkbox Description Applies to peak If enabled, this will be implemented for Peak months (November to March). Applies to off-peak If enabled, this will be implemented for Off-Peak months (April to October). Allow override Enables users to manually adjust or modify the default value of the pricing component, if necessary. Can override in the Quote. Include as part of WACOG Specifies whether the pricing component should be included in the Weighted Average Cost of Gas (WACOG) calculation for the commodity.
Step 4.1: Fixed fee
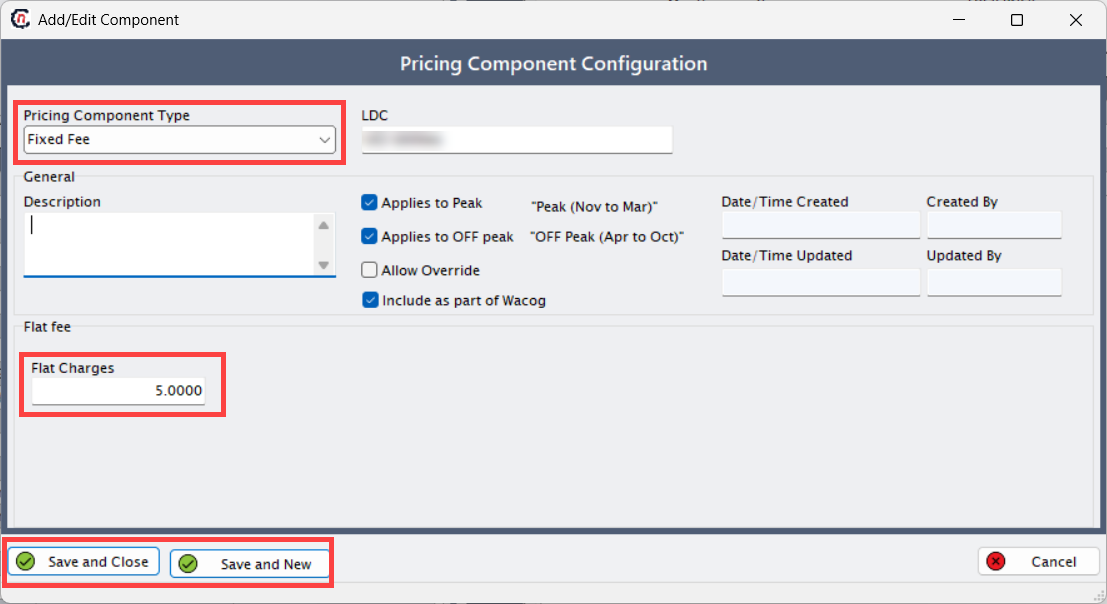
A fixed fee is a constant charge applied for a defined period or volume of natural gas, regardless of actual consumption. It helps cover routine service costs while ensuring predictable billing for both the utility and the end user. Following are the steps to create fixed fee component:
- Select Fixed fee from the dropdown list as a pricing component type.
-
Fill in the fields as shown in the table below:
Fields Description LDC Select the LDC from the dropdown. Description Description of the fixed fee component. Date/Time The date and time when the pricing component is defined. Created by Name of the person who defined the pricing component. Updated by Initially matches created by. Updates automatically when changes are made. Flat charges Enter the flat/fixed charges. Save and close Saves the information and closes the add or edit Component screen. Save and new Saves the current component and opens a new one for configuration. -
Click Save and close to save the fixed fee component configuration.
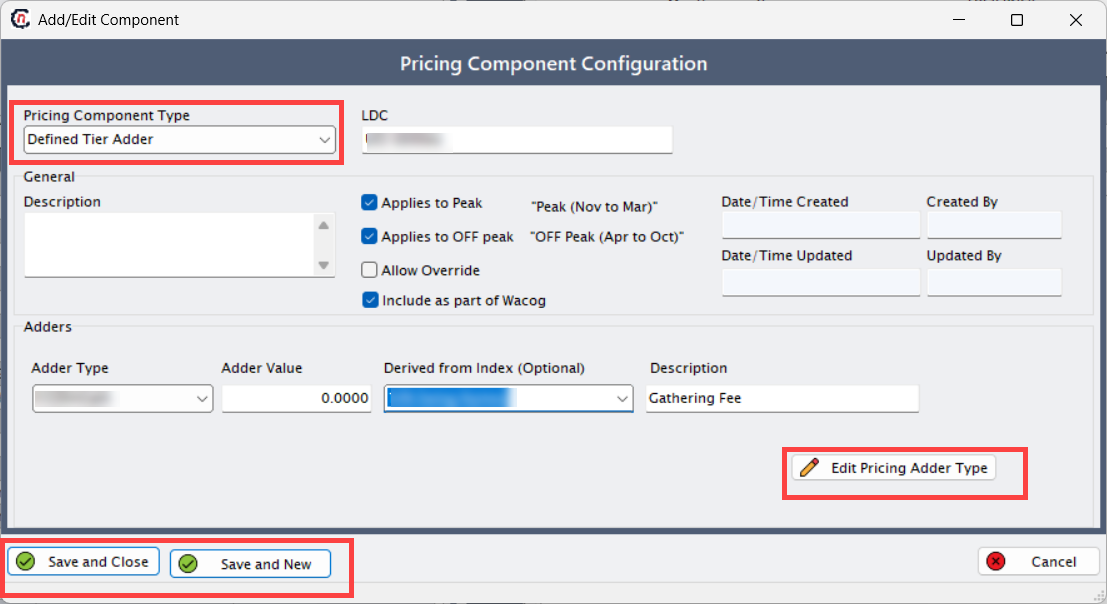
Step 4.2: Defined tier adder
A defined tier adder is an additional charge applied to specific usage tiers within a pricing structure. It allows different price adjustments for varying consumption levels, ensuring that higher or lower usage volumes are billed accurately according to pre-set tier rules. Following are the steps to create defined tier adder:
- Select Defined tier adder from the dropdown list as a pricing component Type.
-
Fill the following fields:
Fields Description LDC Select the LDC from the dropdown. Description Description of the defined tier adder component. Date/Time The date and time when the pricing component is defined. Created by Name of the person who defined the pricing component. Updated by Initially matches created by. Updates automatically when changes are made. Adder type Select the adder type from the dropdown. Adder value Enter the price for the adder type. If a default value is provided, it will be pre-filled in the Adder value field. The user can modify this value as required. Save and close Saves the information and closes the add or edit Component screen. Save and new Saves the current component and opens a new one for configuration. -
Click Edit pricing adder type to add or modify adder types and default charge values.
- Click Add a adder types record icon to create a new adder type (if required).
-
If no changes are needed, click Save and close.
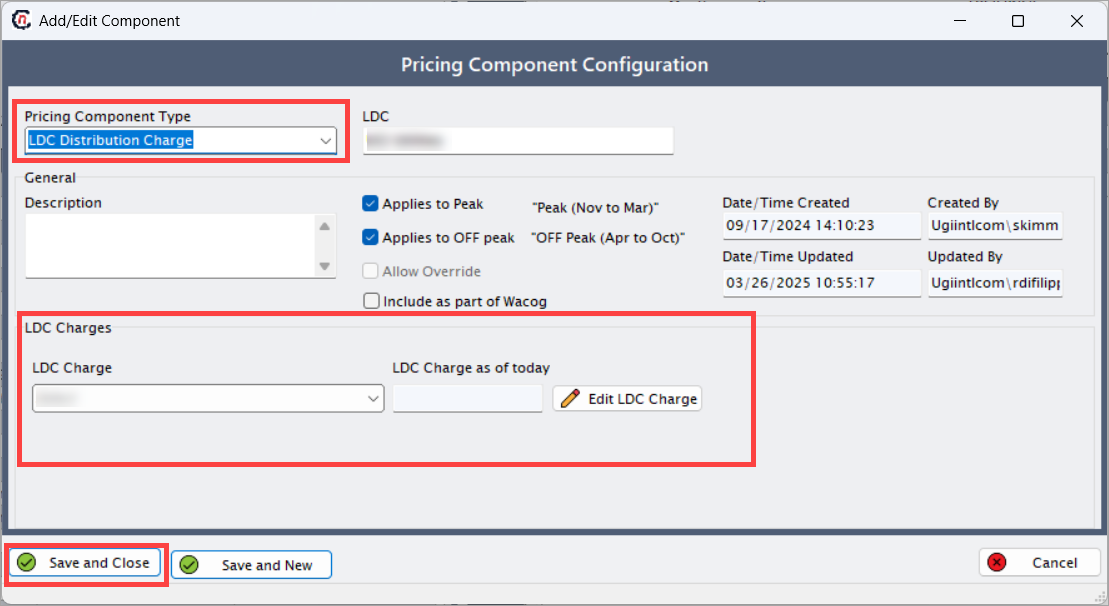
Step 4.3: LDC distribution charge
The LDC distribution charge represents the fee collected by the LDC for delivering gas to the end user. It covers costs associated with operating, maintaining, and upgrading the gas distribution infrastructure used to transport natural gas from the main pipeline to the end user’s premises. Following are the steps to create LDC distribution charge component:
- Select LDC distribution charge from the dropdown list as a pricing component type.
-
Fill in the following fields:
Fields Description LDC Select the LDC from the dropdown. Description Description of the LDC distribution charge component. Date/Time The date and time when the pricing component is defined. Created by Name of the person who defined the pricing component. Updated by Initially matches created by. Updates automatically when changes are made. LDC charge Defined in the monthly LDC charge value screen. DQ values are mandatory, and in the LDC rate class, the daily value must exactly match the corresponding value in the DQ values tab of the Prospect information screen. LDC charge as of today The active LDC gas delivery rate as of today. Save and close Saves the information and closes the Add or edit component screen. Save and new Saves the current component and opens a new one for configuration. -
Click Edit LDC charge to add or modify default charge values.
- In Tier 1 rate field, define the LDC charges for each month.
- The Filter by month option allows users to search for charges applicable to a specific month.
-
If no changes are needed, click Save and close to save the configuration.
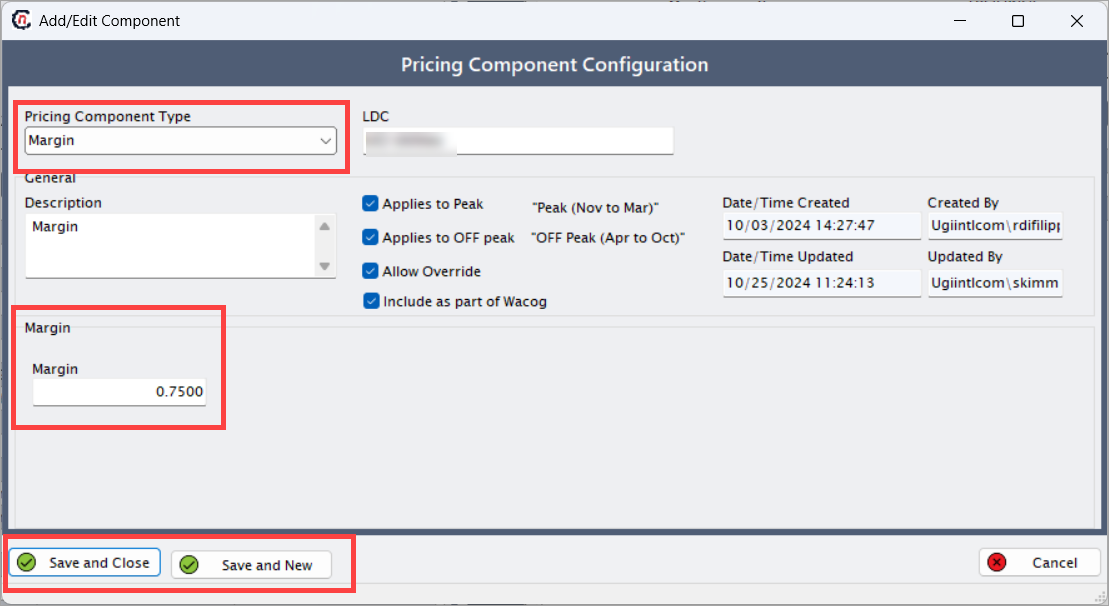
Step 4.4: Margin
Margin is the difference between the supplier’s cost to provide natural gas and the selling price charged to the end user. It represents the supplier’s profit and accounts for overhead, risk, and administrative expenses while ensuring sustainable business operations. Following are the steps to create margin component:
- Select Margin from the dropdown list as a pricing component type.
-
Fill in the following fields:
Fields Description LDC Select the LDC from the dropdown. Description Description of the margin component. Date/Time The date and time when the pricing component is defined. Created by Name of the person who defined the pricing component. Updated by Initially matches created by. Updates automatically when changes are made. Margin Enter the margin charge. Save and close Saves the information and closes the Add or edit component screen. Save and new Saves the current component and opens a new one for configuration. -
Click Save and close to save the margin component configuration.
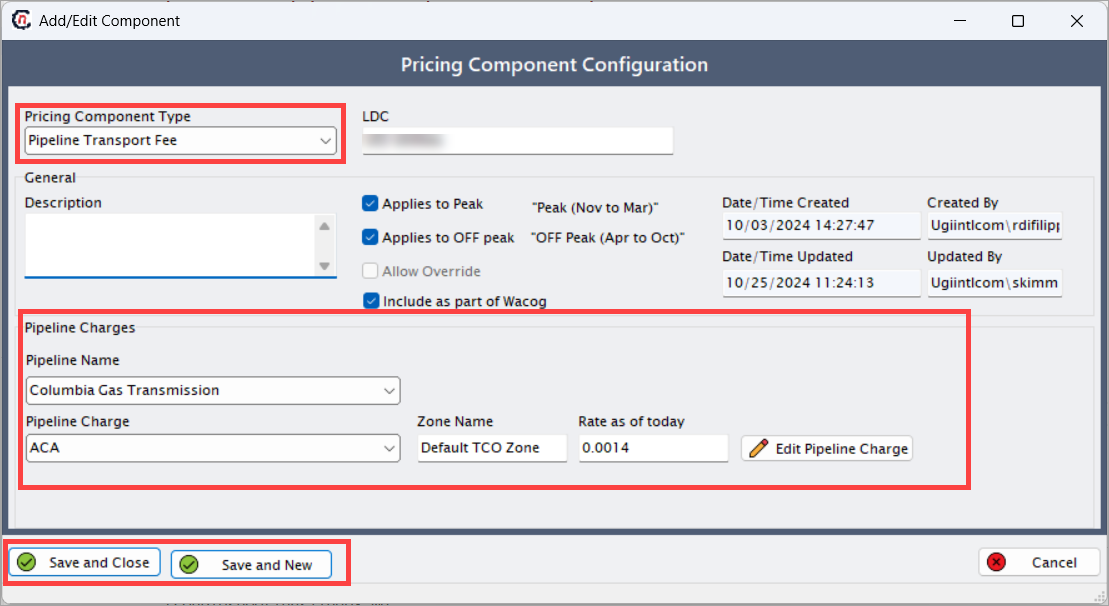
Step 4.5: Pipeline transportation fee
The pipeline transportation fee is the charge for moving natural gas through interstate or intrastate pipelines from the supply source to the LDC delivery point. It includes costs related to pipeline capacity, fuel loss, and transportation tariffs set by the pipeline operator. Ensure that end date is specified in the LDC charge configuration screen for the system to display the pipeline values in the quote. Following are the steps to create pipeline transportation fee component:
- Select Pipeline transportation fee from the dropdown list as a pricing component type.
-
Fill in the following fields:
Fields Description LDC Select the LDC from the dropdown. Description Description of the pricing component. Date/Time The date and time when the pricing component is defined. Created by Name of the person who defined the pricing component. Updated by Initially matches created by. Updates automatically when changes are made. Pipeline component type Enter the pipeline component type. Pipeline name Select the pipeline name from the dropdown. Pipeline charge Select the charge from the dropdown. Zone name Enter the name of the applicable zone. Rate as of today Update with current rates to determine pipeline transport fees. Save and close Saves the information and closes the Add or edit component screen. Save and new Saves the current component and opens a new one for configuration. -
Click Edit pipeline charge to manually adjust the rate. Modify pipeline details if required.
-
Click Save and close to save the configuration.
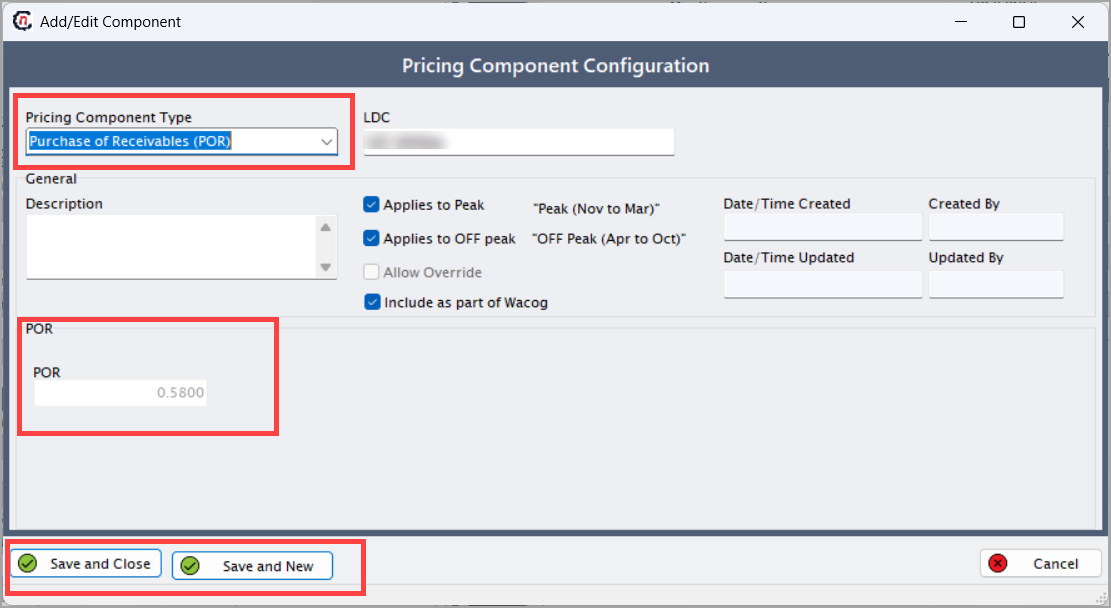
Step 4.6: Purchase of Receivables (POR)
Purchase of Receivables is a financial arrangement where the utility purchases the supplier’s end user receivables at a discounted rate. The utility then bills and collects payments from the end user directly, ensuring timely cash flow to the supplier while retaining a small percentage as a service fee. Ensure POR is enabled in the LDC rate class screen. If not enabled, it will not appear in the component type. Following are the steps to create POR component:
- Select POR from the dropdown list as a pricing component type.
-
Fill in the following fields:
Fields Description LDC Select the LDC from the dropdown. Description Description of the POR component. Date/Time The date and time when the pricing component is defined. Created by Name of the person who defined the pricing component. Updated by Initially matches created by. Updates automatically when changes are made. POR Non-editable; values are derived from the LDC rate class. Save and close Saves the information and closes the Add or edit component screen. Save and new Saves the current component and opens a new one for configuration. -
Click Save and close to save the POR component configuration.
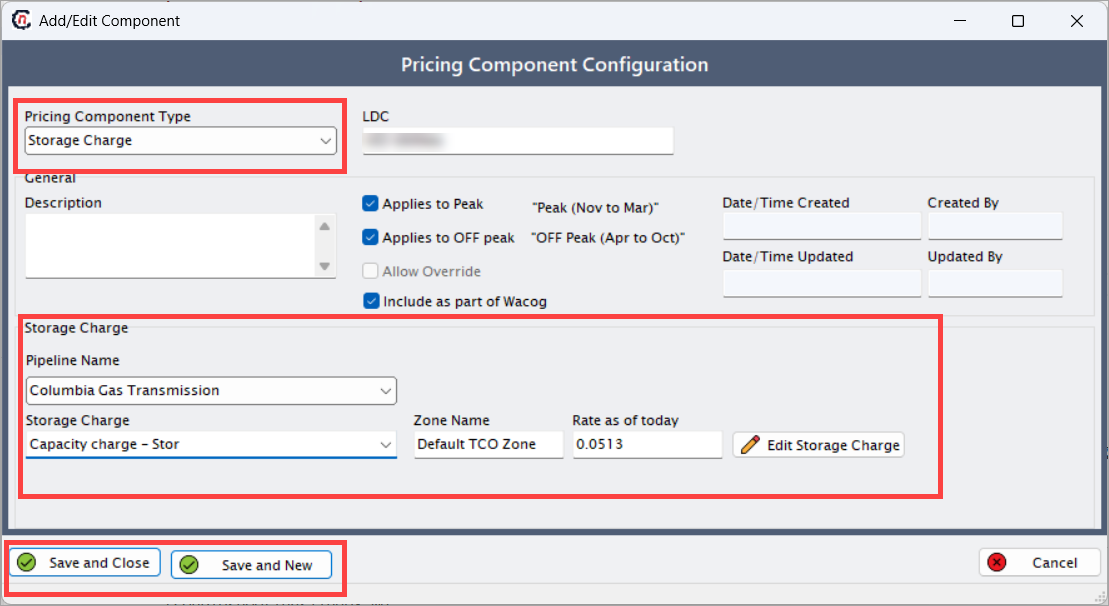
Step 4.7: Storage charge
A storage charge applies to the cost of storing natural gas in underground or above-ground facilities to ensure supply reliability during peak demand periods. It helps balance seasonal consumption variations and guarantees consistent gas availability for end users. Ensure that end date is specified in the LDC charge configuration screen for the system to display the storage charge values in the quote. Following are the steps to create storage charge component:
- Select Storage charge from the dropdown list as a pricing component type.
-
Fill in the following fields:
Fields Description LDC Select the LDC from the dropdown. Description Description of the storage charge component. Date/Time The date and time when the pricing component is defined. Created by Name of the person who defined the pricing component. Updated by Initially matches created by. Updates automatically when changes are made. Pipeline component type Enter the pipeline component type. Pipeline name Select the pipeline name from the dropdown. Storage charge Select the charge from the dropdown. Zone name Enter the name of the applicable zone. Rate as of today Update with current rates to determine storage fees. Save and close Saves the information and closes the Add or edit component screen. Save and new Saves the current component and opens a new one for configuration. -
Click Edit storage charge to manually adjust the rate.
- Update storage fees if required.
- Click Save and close to save the configuration.
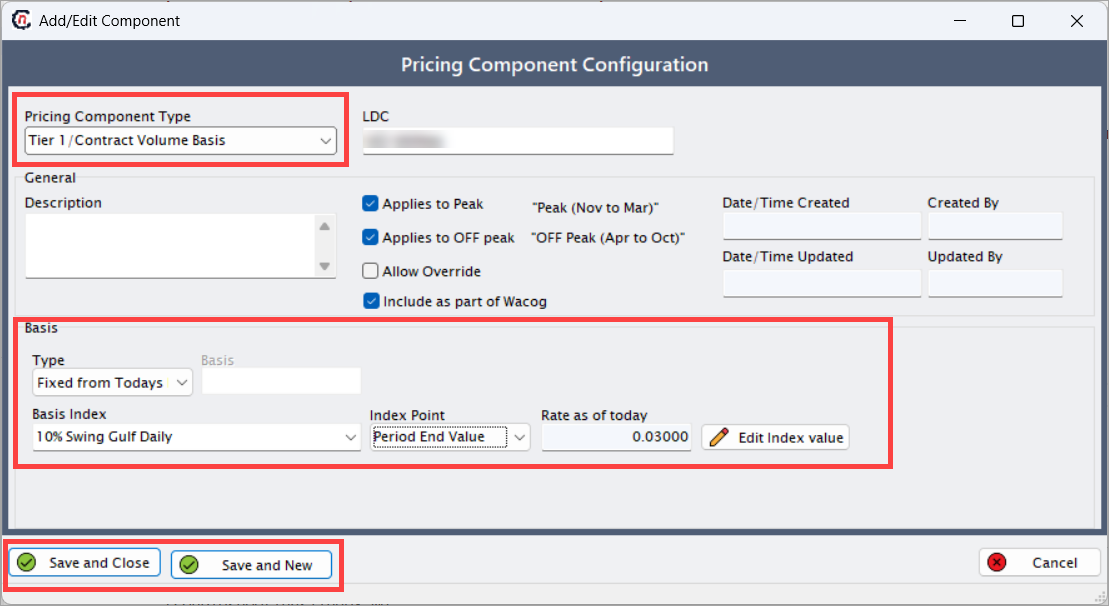
Step 4.8: Tier-1/Contract volume basis
The Tier-1 or contract volume basis charge applies a fixed or index-based price to a contracted gas volume. The rate remains consistent for the agreed-upon quantity regardless of actual usage, offering cost stability and predictable billing for the end user under long-term agreements. Following are the steps to create Tier-1/contract volume basis component:
- Select Tier-1/Contract volume basis from the dropdown list as a pricing component type.
-
Fill in the following fields:
Fields Description LDC Select the LDC from the dropdown. Description Description of the component. Date/Time The date and time when the pricing component is defined. Created by Name of the person who defined the pricing component. Updated by Initially matches created by. Updates automatically when changes are made. Type Select from:
• Fixed: A constant price that remains unchanged throughout the contract, offering stability and predictability.
• Floating: A variable price that changes with market indices, reflecting market ups and downs.
• Fixed from today's index: A fixed price set using the current market index rate at the time of agreement.Basis Specify the charge for the selected pricing basis. Basis index Select the Basis index from the dropdown. Index point Choose the appropriate index point. Rate as of today Update with current rates. Save and close Saves the information and closes the Add or edit component screen. Save and new Saves the current component and opens a new one for configuration. -
Click Edit index value to manually adjust values.
- In the Index curve definition screen, input charges monthly or daily.
-
Click Save and close to save the configuration.
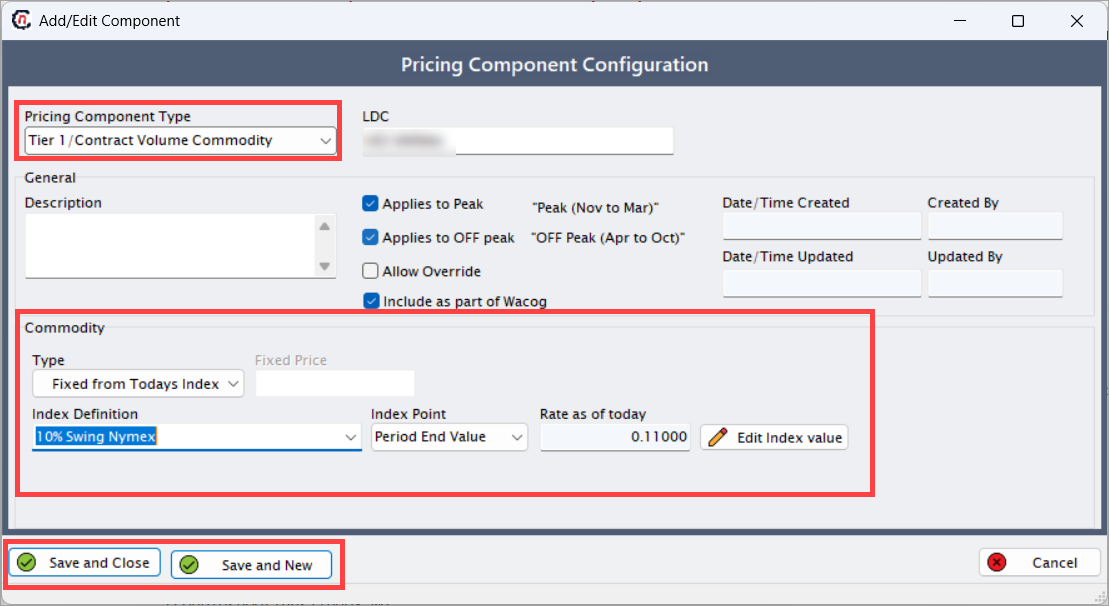
Step 4.9: Tier-1/Contract volume commodity
The Tier-1 or contract volume commodity charge defines the cost of gas based on the commodity market value. It can be configured as fixed, floating, or fixed from today’s index rate, ensuring accurate pricing that reflects current market or indexed gas costs within the contracted volume for the end user. Following are the steps to create Tier-1/contract volume commodity component:
- Select Tier-1/Contract volume commodity from the dropdown list as a pricing component type.
-
Fill in the following fields:
Fields Description LDC Select the LDC from the dropdown. Description Description of the component. Date/Time The date and time when the pricing component is defined. Created by Name of the person who defined the pricing component. Updated by Initially matches created by. Updates automatically when changes are made. Type Select from:
• Fixed: A constant price that remains unchanged throughout the contract, offering stability and predictability.
• Floating: A variable price that changes with market indices, reflecting market ups and downs.
• Fixed from today's index: A fixed price set using the current market index rate at the time of agreement.Fixed price Specify the charge for the selected pricing basis. Index definition Select the index definition (created in Index curve definition). Index point Choose the appropriate index point. Rate as of today Update with current rates. Save and close Saves the information and closes the Add or edit component screen. Save and new Saves the current component and opens a new one for configuration. -
Click Edit index value to manually adjust values.
- In the Index/Curve values screen, input charges monthly or daily.
-
Click Save and close to save the configuration.
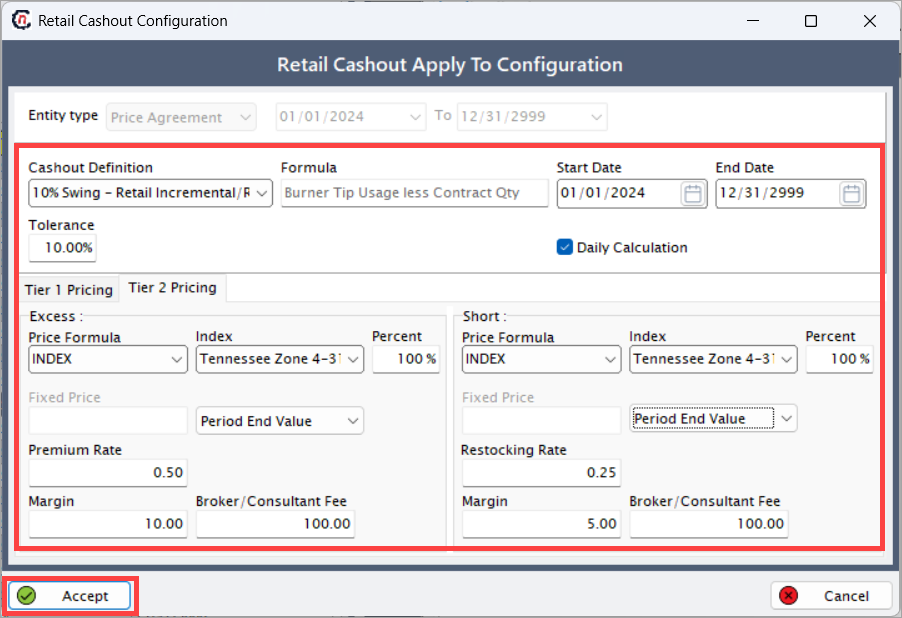
Step 5: Configure retail cashouts
- Navigate to the Retail cashouts tab.
-
Click Add new cashout.
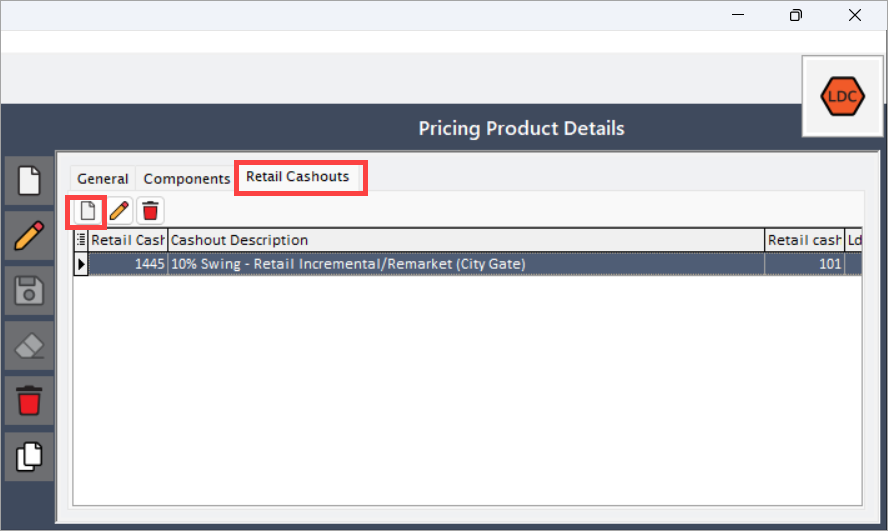
-
Select the Cashout definition from the drop-down.
Note
Cashout definition configured in the Retail cashout definition screen. Common scenarios:
• 0% swing: No deviation allowed. Penalties apply immediately.
• 10% swing: Permits up to 10% over-usage before penalties. -
Set the Tolerance level, which defines the allowable range for operational variances, enabling automatic adjustments without penalties.
- Select the Start date and end date.
- Enable Daily calculation (checkbox).
-
Click on the Tier 1 pricing or Tier 2 pricing tabs, which is categorized into two scenarios:
a. Excess: Charges for usage above the contracted quantity.
b. Short: Charges for usage below the contracted quantity.Excess section
Fields Description Price formula Method to calculate cashout charges (e.g., fixed, index). Index (if applicable) Use a market-based rate. Percent Weight applied to the index (100% = full index value). Fixed price Flat rate per unit for excess usage. Premium rate Additional charge per unit for excess usage. Margin/Broker fee Extra costs added to the total cashout amount. Short section
Fields Description Price formula Method to calculate cashout charges. Index (if applicable) Use a market-based rate. Percent Weight applied to the index. Fixed price Flat rate per unit for under-usage. Restocking rate Fee per unit for under-usage. Margin/Broker fee Extra costs added to the total cashout amount. -
Click Accept to save the configuration.