Configuring budget billing
This article provides step-by-step instructions for configuring and managing budget billing in nGenue. Budget billing helps allocate a fixed monthly amount for end users based on their historical or estimated commodity consumption. By establishing a predictable billing amount, customers can manage their utility expenses more effectively and avoid large fluctuations in their bills.
Prerequisites
Before configuring budget billing, ensure that the following prerequisites are met:
- The Local Distribution Company (LDC) is already created and configured.
- The user have the add or modify permissions for the Budget billing screen.
- LDC pool, and End user configurations are completed, with the Budget billing option enabled under the End user Configuration tab.
- You are aware of applicable tax rates, calculation methods, and effective dates.
Procedure to configure budget billing
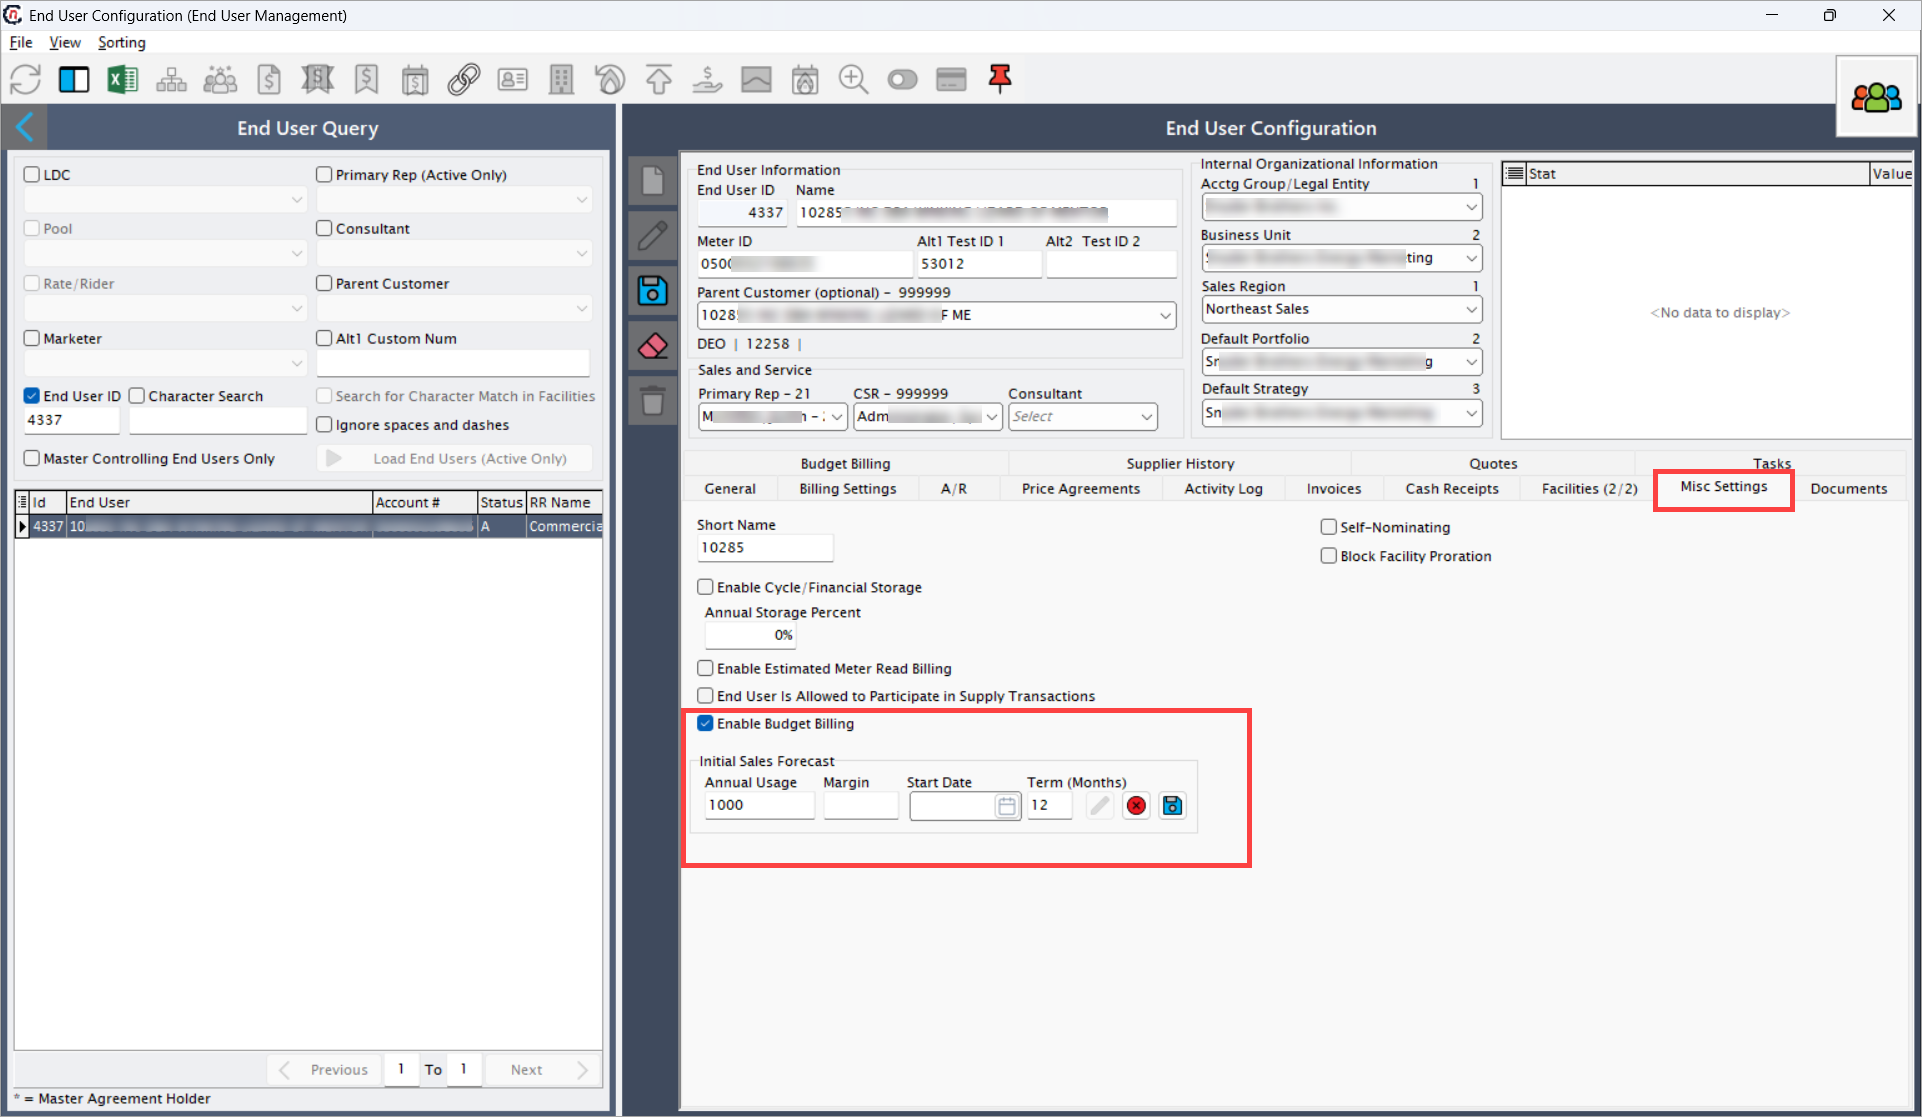
Step 1: Enable budget billing checkbox for the end user
Before creating a budget bill record:
- Navigate to the End user configuration > Misc settings tab.
- Enable the checkbox: Enable budget billing.
-
Enter the Annual Usage and Term (months) values.
-
Click Save to store the configuration.
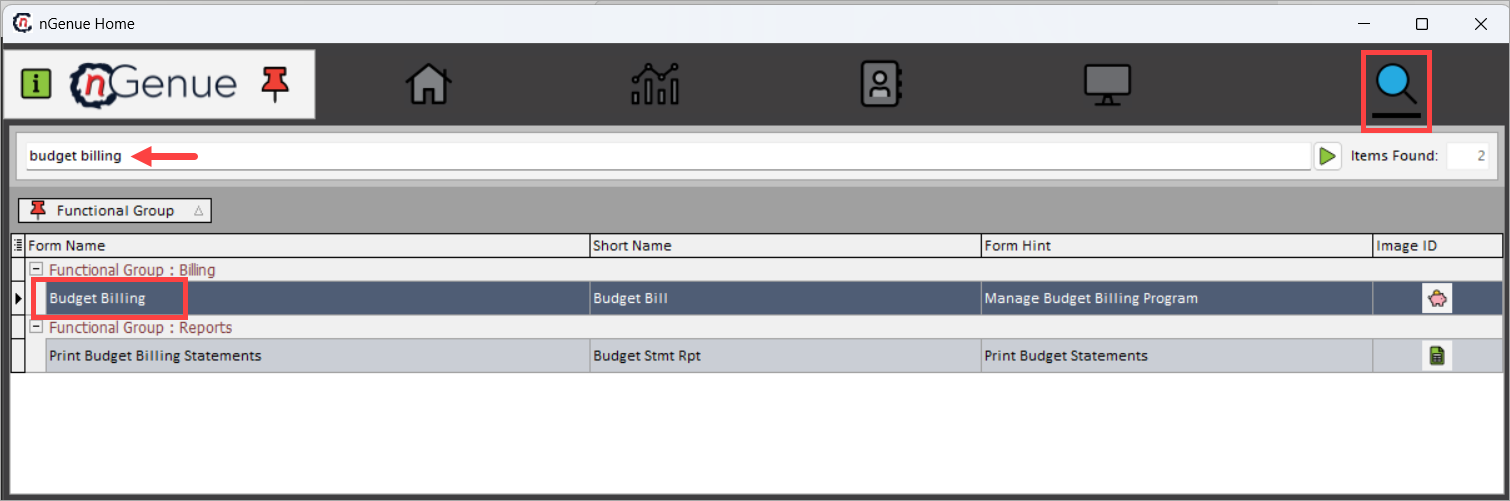
Step 2: Navigate to the Budget billing screen
- Log in to the nGenue application.
-
Click Search and enter budget billing in the search bar.
-
Double-click Budget billing to open the Budget billing (billing) screen.
-
The screen is divided into two main sections:
- Budget bill query section
- Budget bill records section
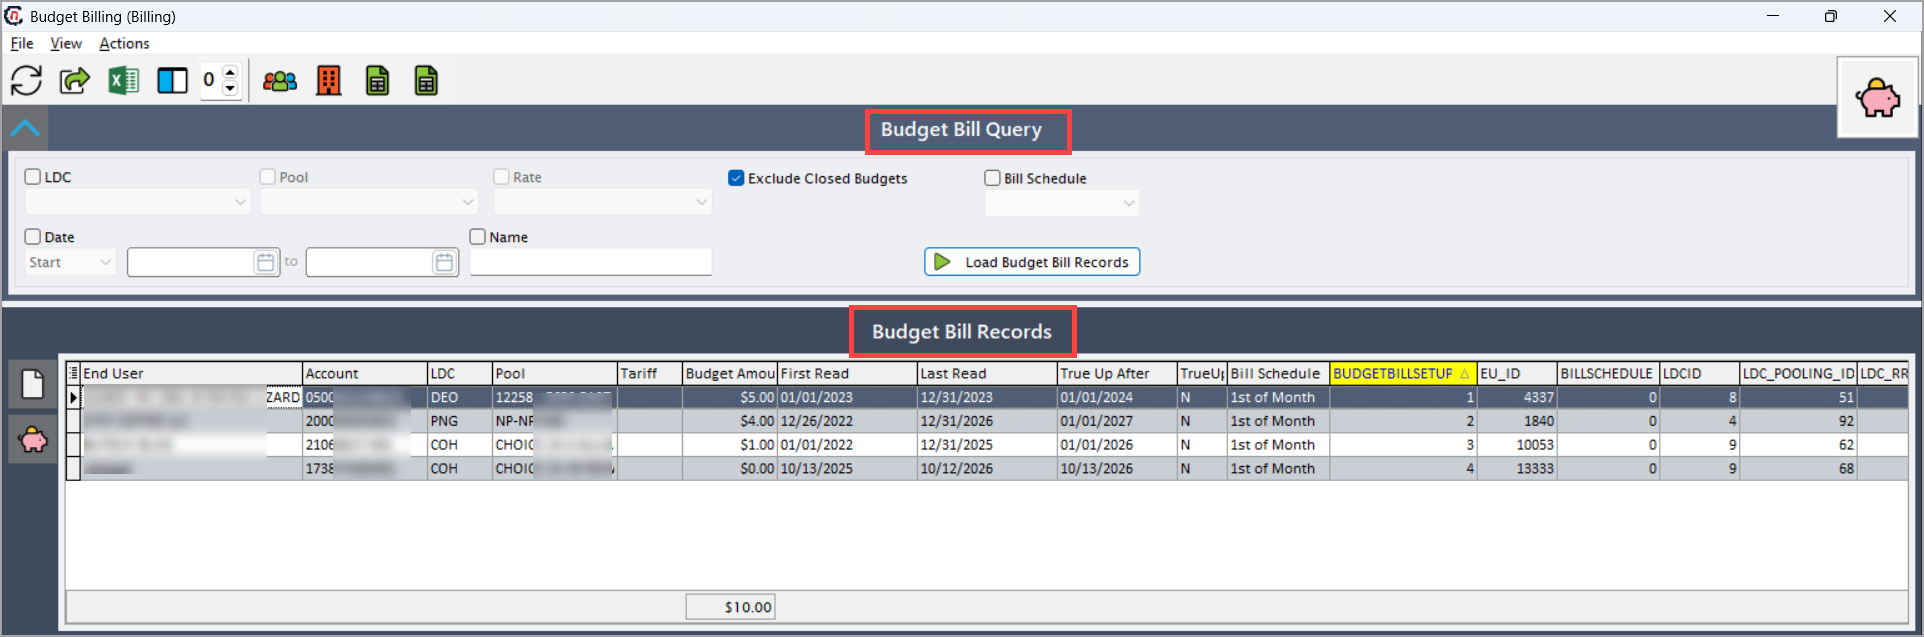
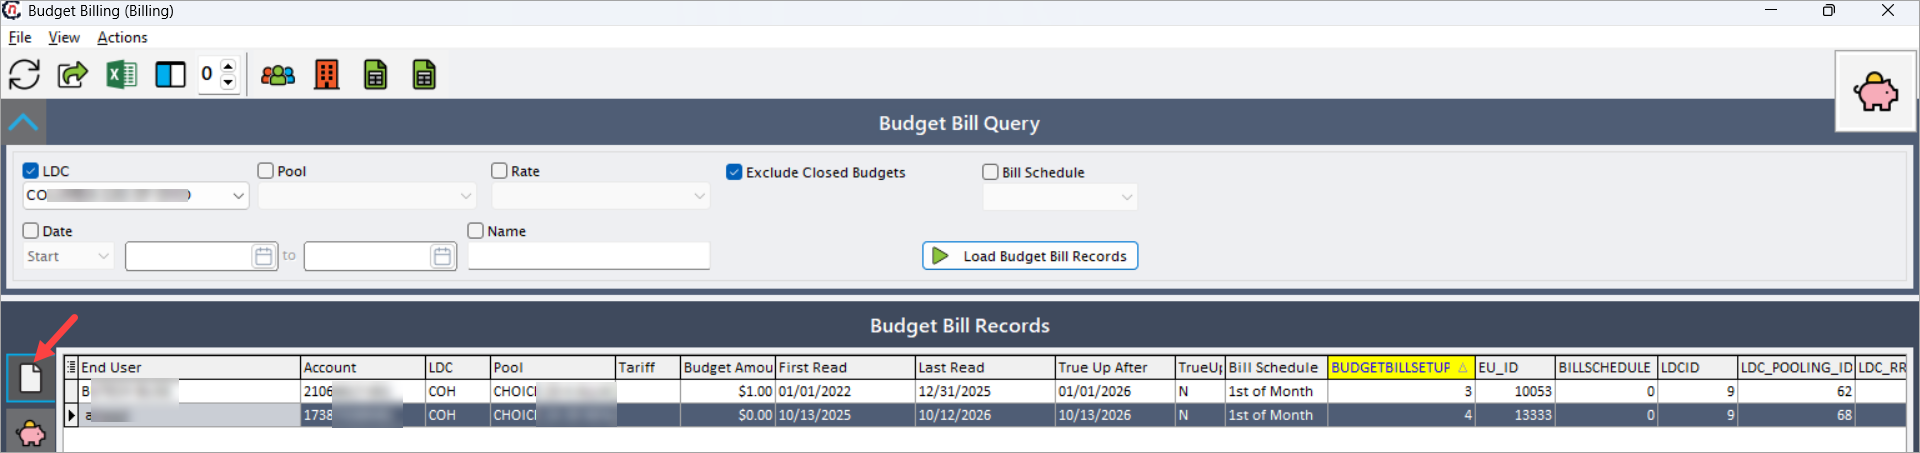
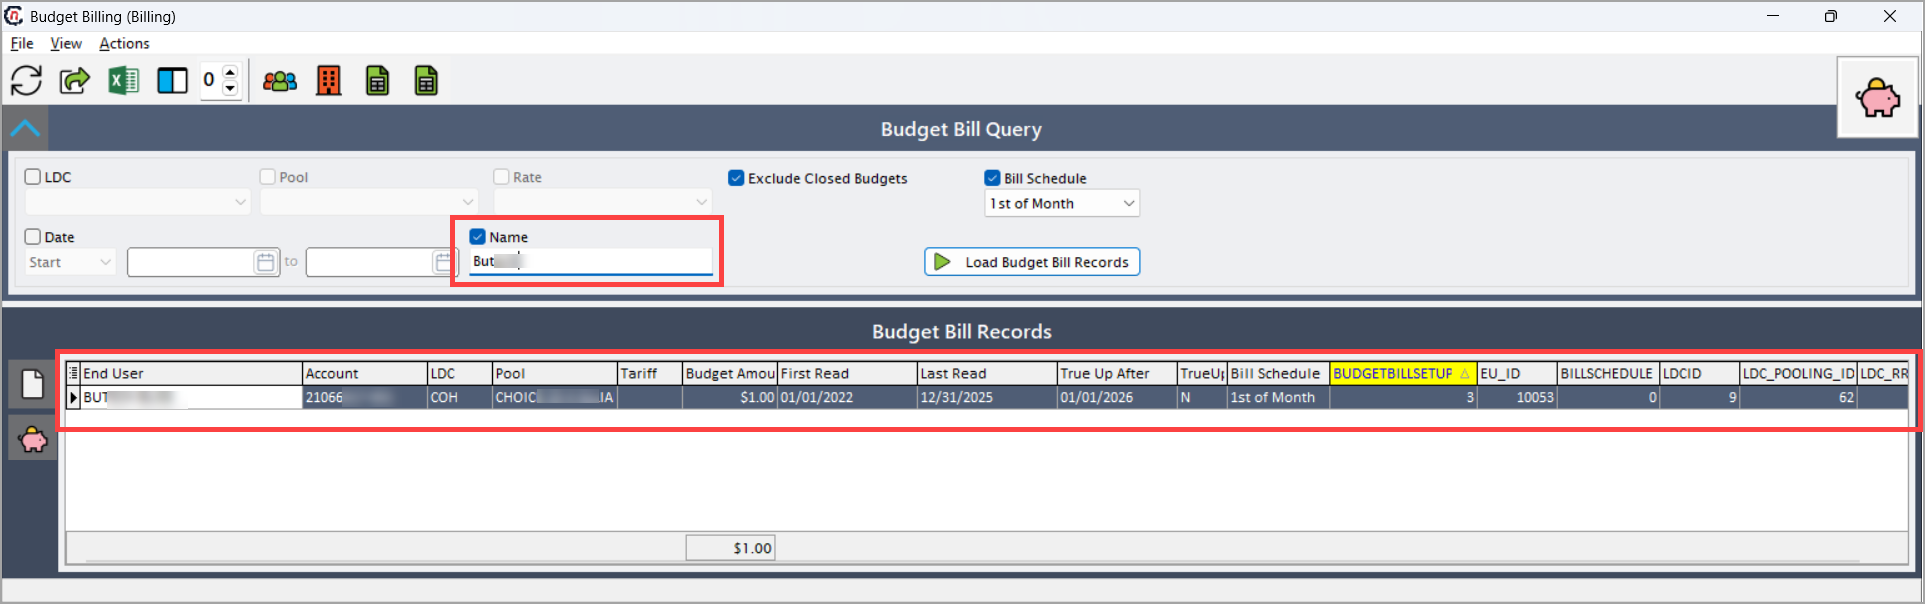
Budget bill query section
The Budget bill query section allows users to filter data based on specific criteria to retrieve relevant budget billing records.
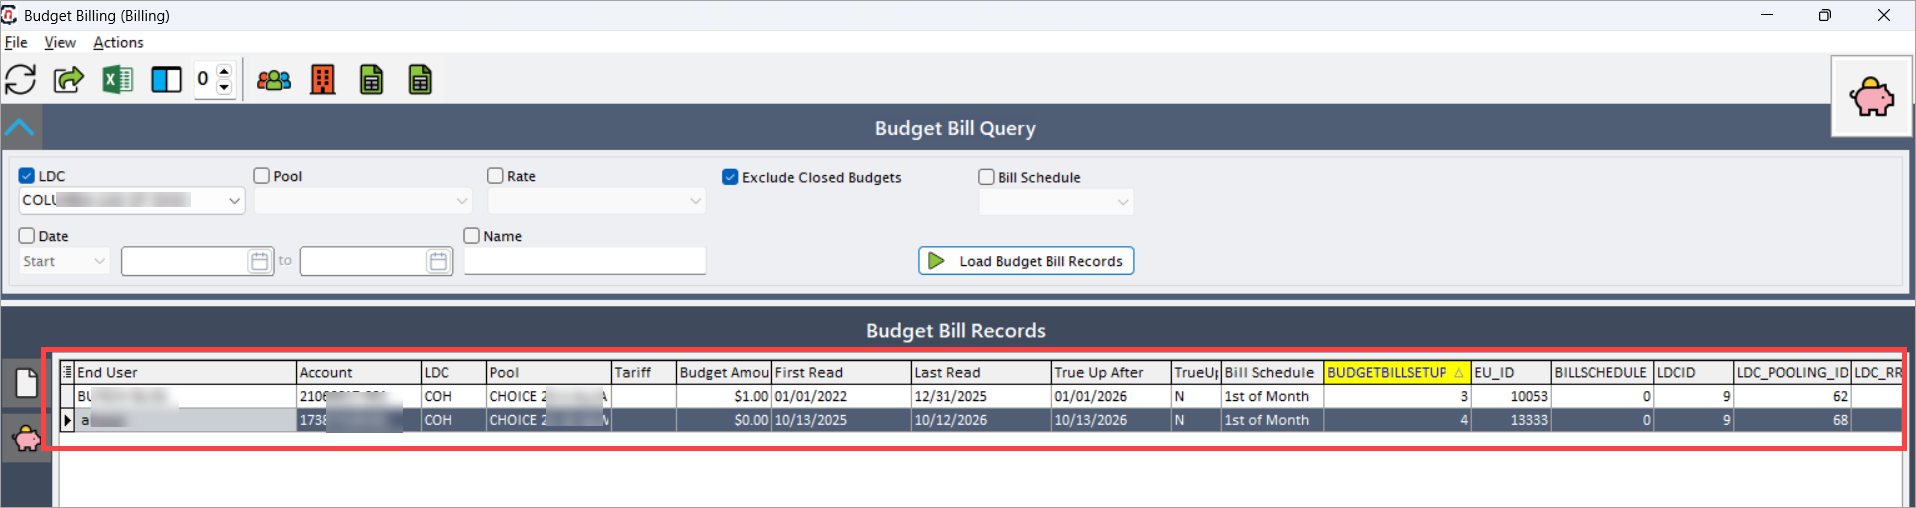
Filters Description LDC Displays the ldc managing the billing account. Data for this dropdown is fetched from the LDC configuration screen. Selecting an LDC filters records for that utility provider. Pool Represents a logical grouping of end users or meters, used to filter data for a specific portfolio or region. Rate Indicates the tariff type (e.g., Residential, Commercial, or Industrial). Filters records based on the selected rate schedule. Exclude closed budgets A checkbox that hides closed or finalized budget billing accounts from search results. When checked, only active budget billing records are displayed. Bill schedule Represents the billing frequency or schedule (e.g., 1st of month, 15th of month). Filters records according to the billing cycle. Date A date-based filter used to find records from specific billing or creation periods. Name Allows searching budget billing records by end user name or account holder. Once filters are set, click on Load budget bill records to display matching records in the Budget bill records section for review or configuration.

Budget bill records section
The Budget bill records section displays the budget billing records that match the selected filters. Each record corresponds to a specific end user, billing period, and budget amount configuration.
Step 3: Create a new budget bill record
- Open the Budget billing screen.
- In the Budget bill records section, click New.
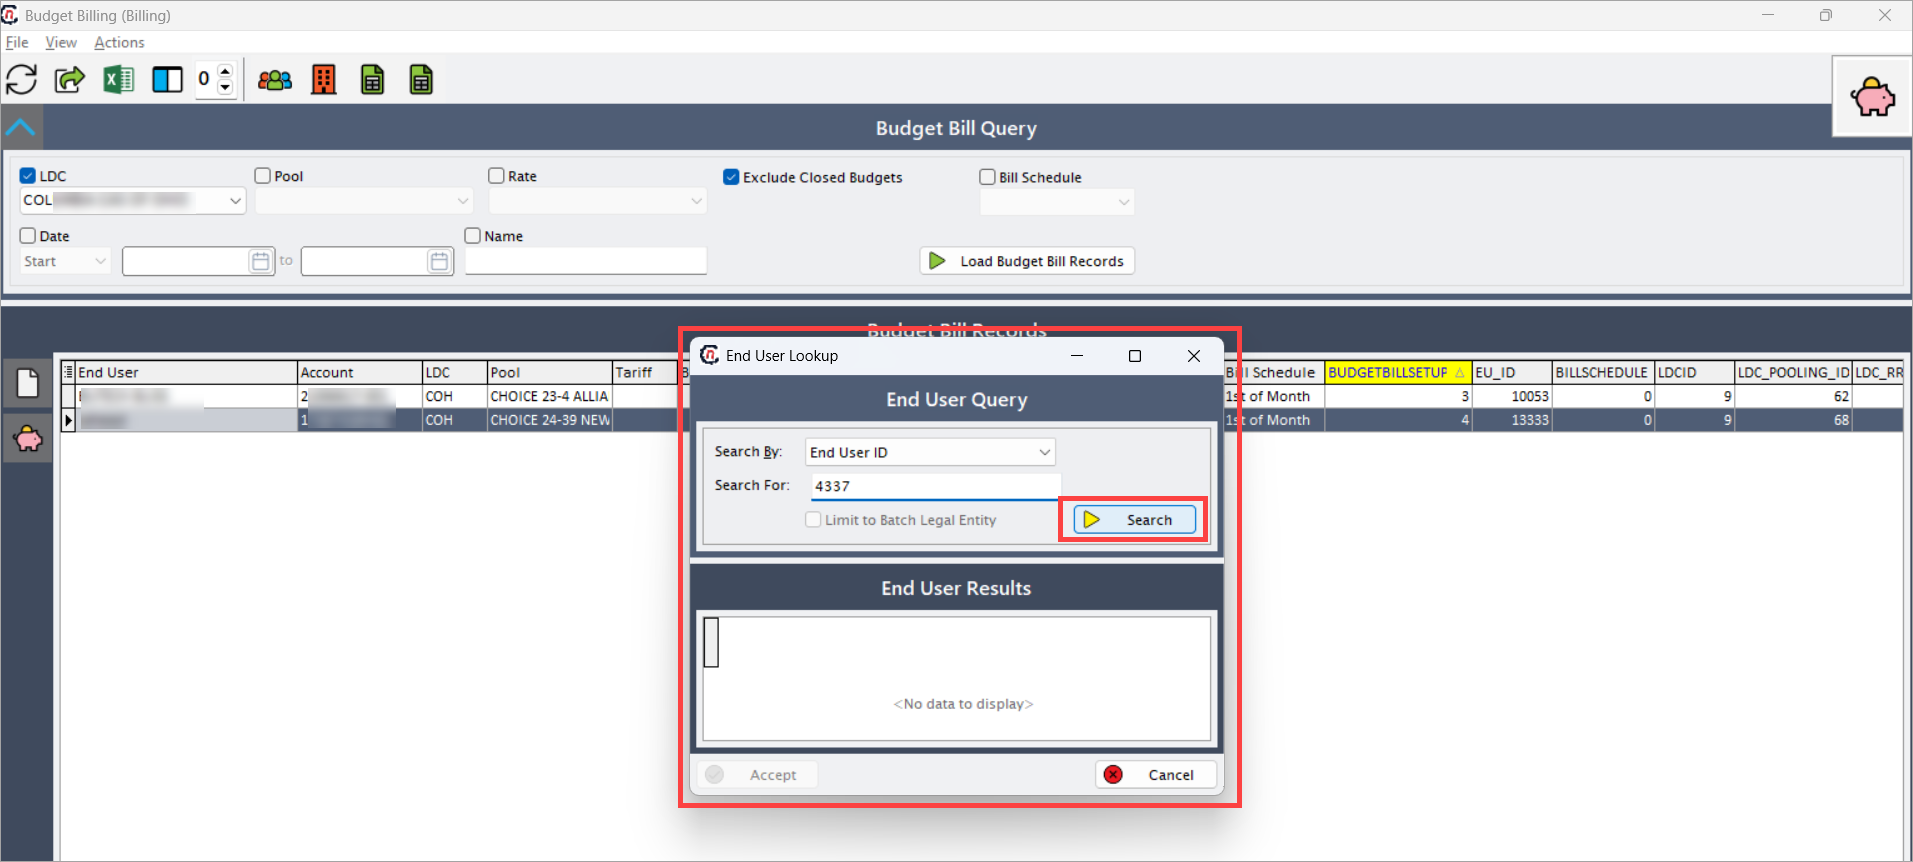
- The End user lookup window appears.
- In the End user lookup screen, use the End user query section to search for an end user.
-
Available search parameters include:
- Invoice number
- End user name
- Account number
- LDC account number
- End user ID and more..
-
Select the Search by option, enter a value, and click Search.
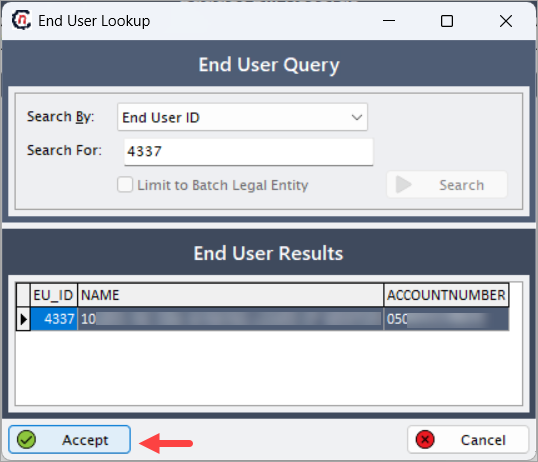
- The End user results section displays all matching records.
- Select the desired end user and click Accept to proceed.
Step 4: Add or edit budget bill setup
After selecting the end user, the Add/Edit budget bill setup screen appears.
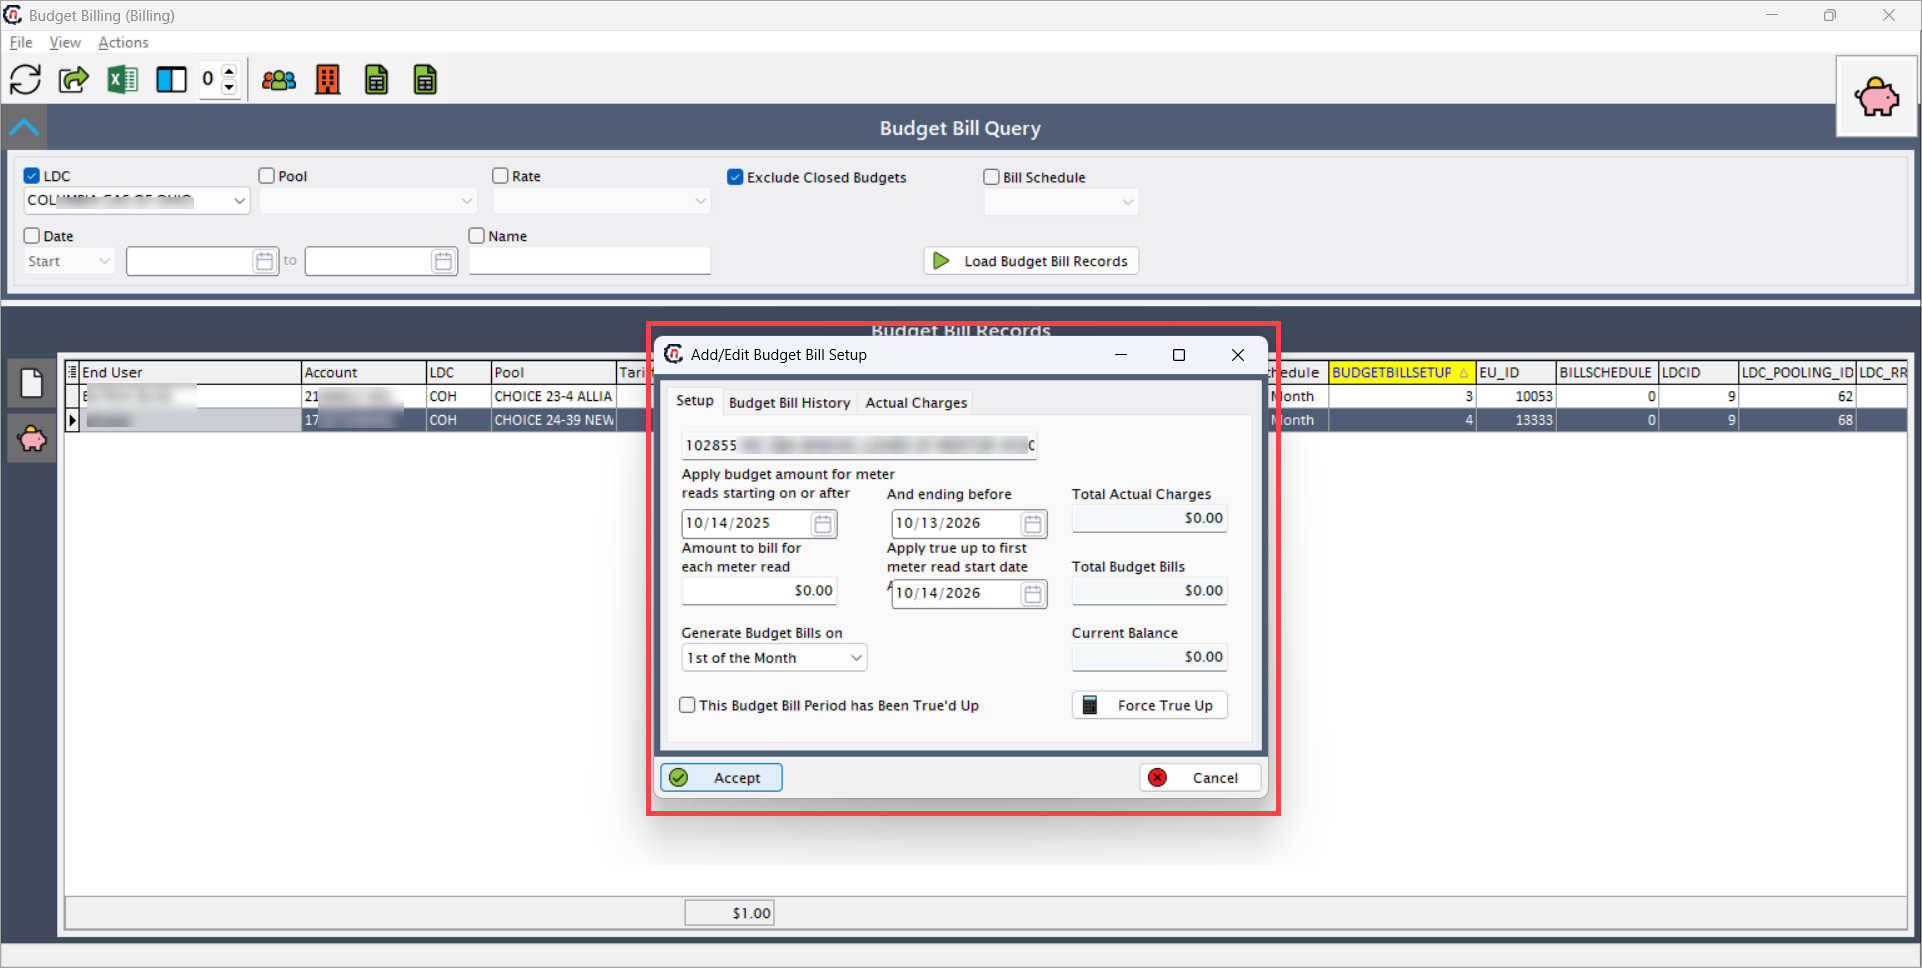
This screen contains three tabs:
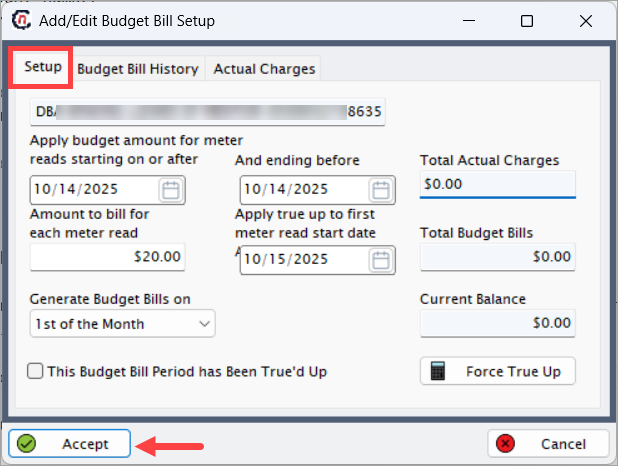
a. Setup tab
The Setup tab defines the parameters for the selected end user’s budget billing plan.
| Fields | Description |
|---|---|
| End user | Displays the name of the selected customer or account automatically. This field is non-editable and is used to confirm that the record is being configured for the correct end user. The value is fetched from the End user lookup screen. |
| Date range | Specifies the effective billing period for which the budget billing applies. It consists of two subfields: • Apply Budget Amount for Meter Reads Starting On or After: The start date of the billing period. The budget billing calculation begins with this date. • Ending Before: The end date that defines when the current budget billing period stops being active. This ensures the system accurately applies the billing amount within the defined period and prevents overlapping records. |
| Amount to bill for each meter read | Defines the fixed amount or rate that should be billed for each meter read within the defined period. This field is crucial because it determines the periodic billing amount applied to the customer’s account. Example: If an end user consumes 500 units annually and you set $0.20 as the amount to bill for each meter read, the system calculates total budgeted bills based on that rate. This helps maintain a consistent monthly billing amount, reducing variations from fluctuating usage. |
| Apply true-up to | Indicates the meter read date to which the true-up adjustment applies. True-up is a process used to reconcile differences between estimated (budgeted) and actual charges once real consumption data is available. This field ensures the true-up is correctly mapped to the relevant billing period, allowing accurate financial reconciliation. Example: If the budget period ends in December, you may apply true-up to the first meter read of January. |
| Total budget bills | Displays the system-calculated total billing amount for the defined period. It is calculated as: Total budget bills = Annual usage × Amount to bill per meter read This field is auto-populated and cannot be edited manually. It provides an overview of the total expected charge based on the configured budget parameters. Example: If annual usage = 500 and rate = $0.20, total budget bills = $100. |
| Actual charges | Displays the cumulative actual charges recorded for the selected end user and billing period. The data in this field is automatically fetched from the Actual charges tab, which contains system-generated or imported actual meter read data. This field enables comparison between forecasted and actual costs. |
| Current balance | Represents the difference between the Total actual charges and Total budget bills. It helps determine whether the end user has overpaid or underpaid relative to actual consumption. Calculated as: Current balance = Total actual charges – Total budget bills Example: If actual charges are $120 and budget bills total $100, the current balance is $20, indicating an under-billed amount. |
| True-up checkbox | A confirmation control used to indicate whether the true-up process for the selected budget period has been completed. When checked, it confirms that actual charges have been reconciled against budgeted amounts and no further adjustments are pending. This checkbox is often used during end-of-period reconciliation to finalize billing records. |
Formula references:
- Total budget bills = Annual usage × Amount to bill for each meter read
- Current balance = Total actual charges – Total budget bills
After entering all required details, click Accept to save the record.
The newly created budget bill record appears in the Budget bill records section.

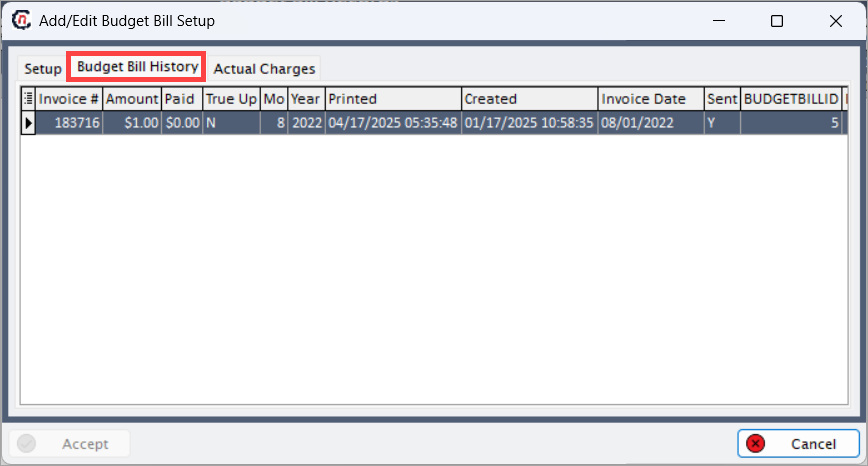
b. Budget bill history tab
The Budget bill history tab;
- Displays historical data of previously created budget bill records for the same end user.
- When history exists, the related data (e.g., billing periods, billed amounts, true-up adjustments) is automatically displayed.
- Helps track the evolution of billing adjustments and plan renewals.
c. Actual charges tab
The Actual charges tab;
- Displays the actual meter read charges for the selected end user and billing period.
- The total from this tab is automatically populated in the Actual charges column of the Add/Edit budget bill setup popup window.
- Used during the true-up process to reconcile differences between budgeted and actual charges.
Step 5: Viewing and filtering records
- Once budget bill records are created, use available filters such as Date range, End user, or Status to narrow results.
- Click Load budget bill records to refresh and display only relevant records.
- Review records periodically for accuracy and update as required.
Example scenario
Example:
- Annual usage:
500(defined in the End user configuration screen) - Amount to bill per meter read:
$0.20(entered in the Add/Edit budget billing setup screen)
Calculation:
Total budget bills = 500 × 0.20 = $100
This value is auto-calculated and displayed in the Total budget bills column.
As actual charges are recorded, the Current balance field reflects the difference between Total actual charges and Total budget bills.
Summary
The Budget billing screen in nGenue enables utilities to create, manage, and monitor predictable monthly billing plans for customers.
By configuring budget billing correctly, users can:
- Provide consistent and manageable billing amounts for end users.
- Improve cash flow predictability for utilities.
- Ensure transparency and reduce billing-related disputes.
- Simplify true-up and reconciliation processes at the end of each billing period.
Regular monitoring, data validation, and timely reconciliation help maintain the accuracy and reliability of budget billing operations in nGenue.