Adding a LDC record
A Local Distribution Company (LDC) represents a regulated utility that transports and distributes natural gas to end users. Setting up an LDC correctly ensures accurate nomination processing, storage management, and billing.
This article outlines the step-by-step process to create and configure an LDC in nGenue.
Prerequisites
-
You must have the requisite add or modify permissions in the LDC configuration screen.
-
The following fields are required and must be configured before saving the LDC:
- Business unit: A business unit represents a distinct operational or financial division within your organization. It is typically aligned with a legal entity or a specific line of business and is used to track financial transactions, reporting, and operational responsibilities.
- Supply region: A supply region defines the geographical area where the gas is physically supplied or delivered. It is used to group customers and contracts based on their physical delivery zones.
-
Sales region: A sales region represents a commercial or marketing territory used to manage and track sales activities. You can configure a new one in the Sales Area screen within the nGenue application.
Each of these fields must be pre-configured in their respective screens.
Procedure to add a LDC record
Step 1: Navigate to the LDC configuration screen
- Log in to the nGenue application.
- Click the Search icon and enter LDC configuration in the search bar.
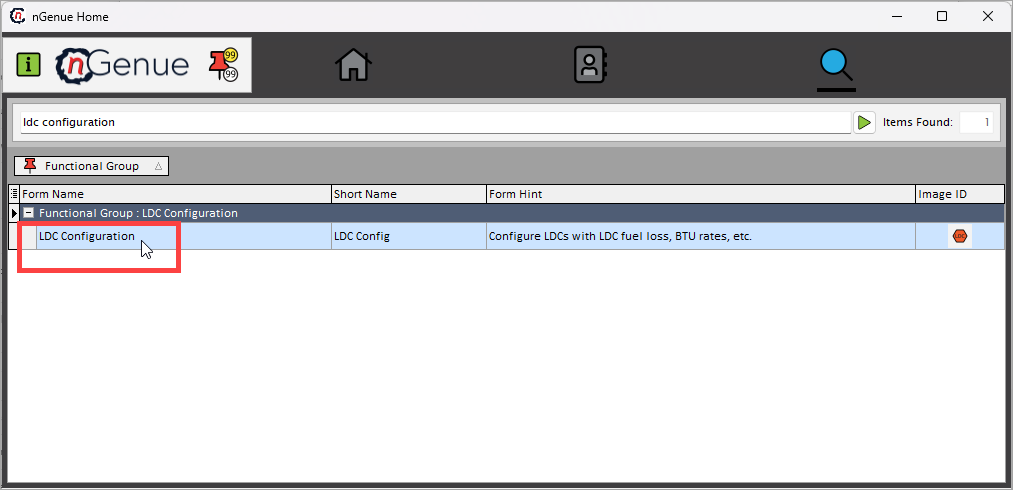
- Double-click LDC configuration to open the respective screen.
- The LDC Configuration screen is designed to help you manage LDC within the system. It is divided into two main sections: LDC selection and LDC configuration.
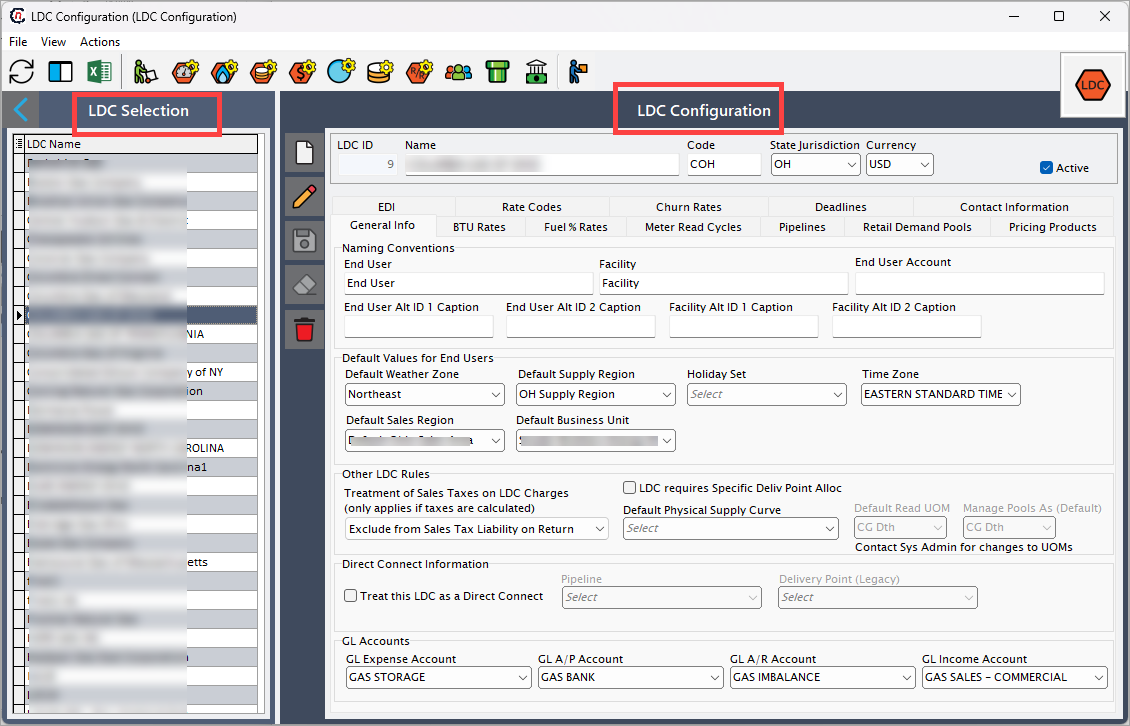
- LDC selection: LDC selection displays a list of all existing LDC and users can select an LDC to view or modify its configuration.
-
LDC configuration: When you select an LDC from the selection panel, its detailed configuration is displayed in this section. This includes attributes like LDC name, code, description, associated pipeline paths, rate schedules, storage options, and any other relevant setup details.
The configuration panel allows you to view, update, or fine-tune the settings of the selected LDC. The table below describes the available icons and their functions:Icons Description 
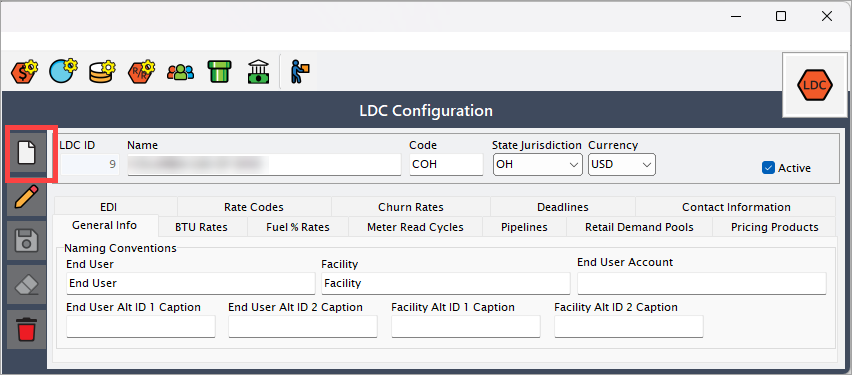
Add a new LDC record 
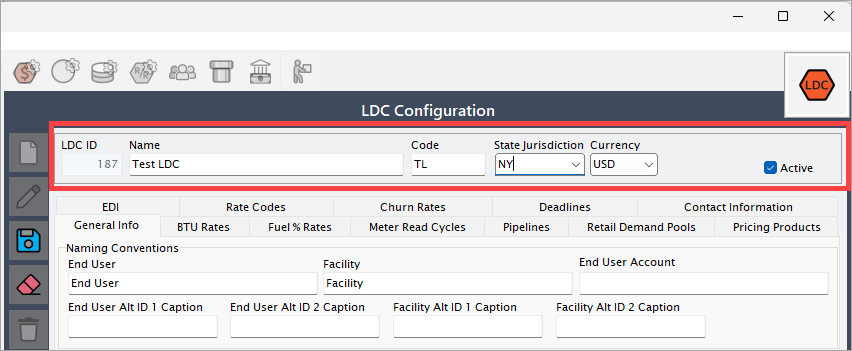
Edit the LDC record detail. 
Save the LDC record. 
Cancel the updates being made to the LDC record. 
Delete a LDC record.
Step 2: Enter the basic LDC details
-
In the LDC configuration section, click on the Add button.
-
You’ll need to provide the following information:
- Name: Enter the full name of the LDC.
- Code: Provide a short, unique code to identify the LDC within the system.
- State jurisdiction: Select the state or regulatory jurisdiction under which this LDC operates. This ensures correct tax rates, tariffs, and regulatory compliance are applied.
- Currency: Choose the currency in which transactions or rate schedules related to this LDC will be maintained. For example: USD, CAD, MXN.
- Active (checkbox): Check this box if the LDC is active and should be available for use in the system. If left unchecked, the LDC is created in an inactive state and will not appear in operational workflows.
-
The LDC configuration screen is also divided into multiple tabs, each designed to capture specific details required to manage a LDC in the system. These tabs collectively help define operational, financial, compliance, and contact-related information for an LDC, ensuring smooth gas distribution, billing, and reporting processes.
Below is a detailed explanation of each tab:
1. General info tab
The General info tab is the foundation of LDC setup. It captures the core identification and operational status of the LDC. The fields in this section ensure the system correctly identifies and recognizes the LDC across different modules and workflows.
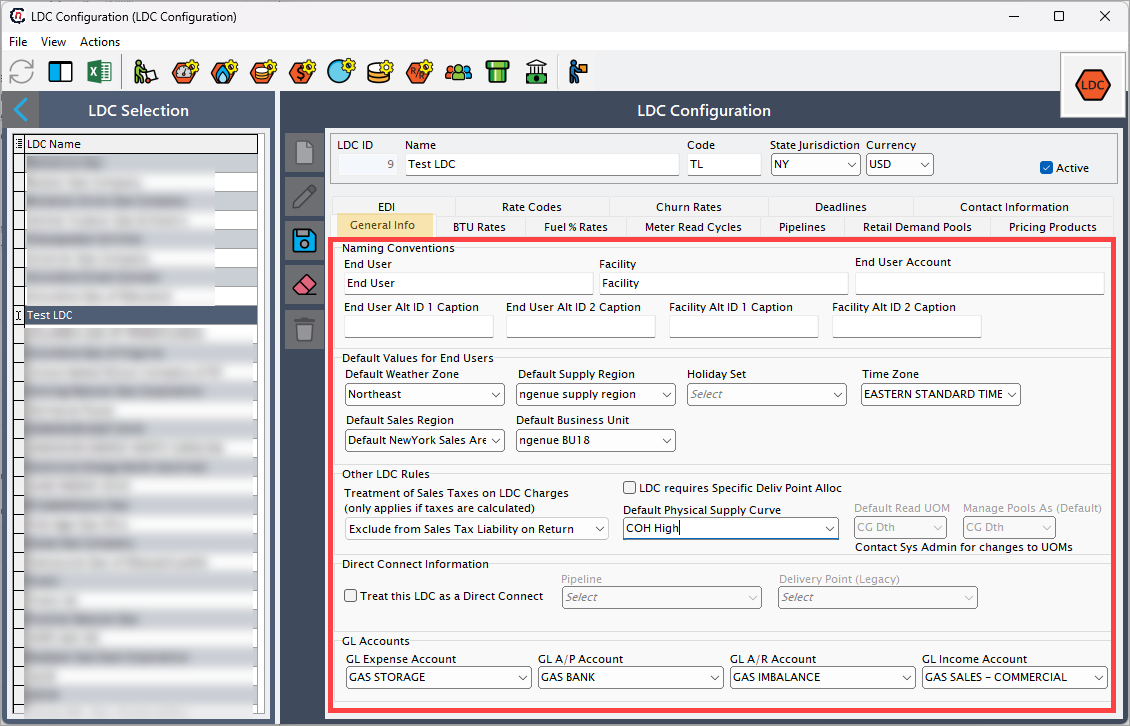
Naming conventions
The Naming conventions configuration allows you to customize the labels that appear across the nGenue application (for example, on the End user or Facility screens). This ensures the system aligns with your organization’s business terminology.
| Fields | Description |
|---|---|
| End user | Defines the display name for an end user. By default, it is End user. If changed (example, to Customer or Client), the new name is reflected in the End user configuration screen. |
| Facility | Defines the display name for a facility. By default, it is Facility. You can change it to terms like Plant or Site, which will then display across the Facility screen. |
| End User account | Defines the label for accounts associated with an end user. For example, you can rename it to Meter account or Service account. |
| End user Alt ID 1 caption | Lets you assign a custom label to the first alternate identifier for an end user (e.g., Customer number, External ID). |
| End user Alt ID 2 caption | Lets you assign a custom label to the second alternate identifier for an end user (e.g., Tax ID, Reference code). |
| Facility Alt ID 1 caption | Lets you assign a custom label to the first alternate identifier for a facility (e.g., Plant code, Meter ID). |
| Facility Alt ID 2 caption | Lets you assign a custom label to the second alternate identifier for a facility (e.g., Region code, Substation ID). |
When you update a naming convention, the label automatically changes across the application wherever the field is referenced. This makes it easier to align the system’s terminology with your organization’s language.
Suppose your organization uses different terminology and you update the same in the naming conventions:
- End user → Customer
- Facility → Plant
- End user account → Service account
- End User Alt ID 1 caption → Customer number
- Facility Alt ID 1 caption → Plant code
Result:
- On the End User configuration screen, the End user field now displays as Customer, End user account as Service account and End User Alt ID 1 caption field as Customer number.
- On the Facility screen, the Facility field now displays as Plant and Facility Alt ID 1 caption field as Plant code. The Facility Alt ID 2 caption field remains unchanged to Facility Alt ID 1 caption.
Reports, search filters, and dropdowns also reflect these changes. This flexibility ensures that the system matches your company’s terminology and helps users easily understand the labels in context.
Default values for end users
| Fields | Description |
|---|---|
| Default weather zone | Pre-defined weather zone for new end users, used in forecasting and analysis. You can configure or add a new weather zone from the Weather zone screen. |
| Default supply region | Default supply region automatically assigned to end users unless overridden. |
| Holiday set | Defines the default set of holidays used for billing cycles and other date-based calculations. This is configured in the Holiday set screen. |
| Time zone | Default time zone that applies to the end users and their transactions. |
| Default sales region | Sales region automatically assigned for new end user accounts. You can configure sales region from the Sales area screen. |
| Default business unit | The business unit that will be pre-selected for new end users under this LDC. |
Other LDC rules
The Other LDC rules section defines how specific billing, allocation, and operational rules are applied for a given LDC. These settings directly influence how invoices are generated, how meter data is processed, and how sales tax and allocations are treated within ngenue workflows.
| Fields | Description |
|---|---|
| Treatment of sales taxes on LDC charges | Determines how sales taxes calculated on LDC charges are handled. This applies only if taxes are being calculated by the system. If selected, taxes are applied as per the chosen option (for example, included in sales tax liability or excluded from tax return calculations). If not selected, sales taxes on LDC charges are ignored in liability or return calculations. This configuration is applied during billing and tax reporting processes to ensure correct accounting treatment of LDC-related charges. |
| LDC requires specific delivery point allocation | Indicates whether this LDC mandates allocations at a specific delivery point level rather than aggregated. If selected, allocations must be entered and reconciled at delivery point granularity. If not selected, allocations can be managed at a broader level such as pool or zone. This is applied in scheduling, balancing, and allocation workflows to meet LDC operational requirements. |
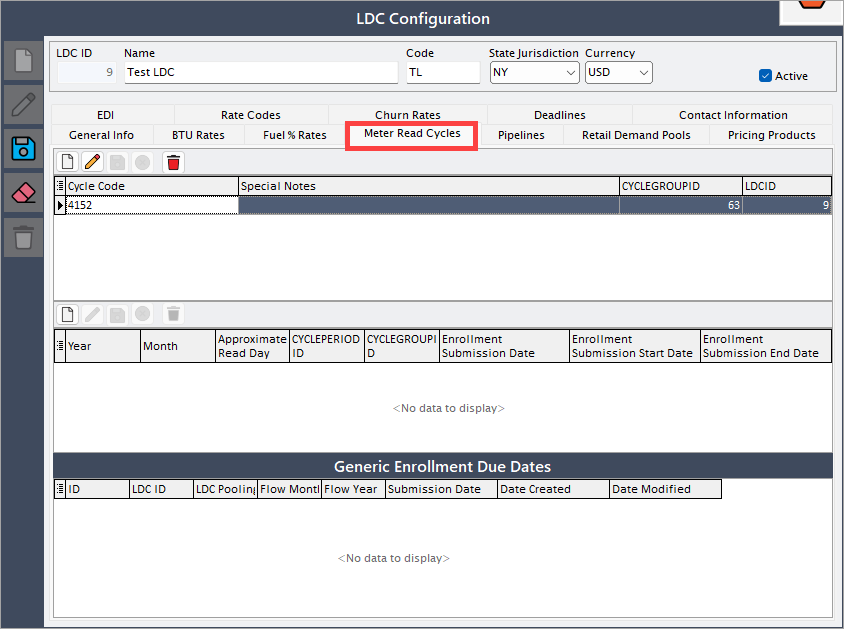
| Enable meter read cycles | Enables processing of meter reads according to defined billing cycles such as monthly or bi-monthly. If selected, the Meter read cycles tab is enabled and the system expects meter data to be processed in cycles and billing aligns with those cycles. If not selected, meter reads are processed on an ad-hoc or transaction basis without strict cycle enforcement. This is applied in billing generation workflows to ensure invoices follow LDC’s meter read schedules. |
| Default physical supply curve | Defines the default physical supply curve used for forecasting, balancing, and risk reporting. If selected, the chosen curve is applied automatically to this LDC’s transactions unless overridden. If not selected, no default curve is applied and users must manually assign it. This is applied in supply forecasting, pricing, and risk management for consistency in reporting. |
| Default read UOM | Defines the unit of measure in which meter data is read (such as dth or mcf). If selected, all meter reads default to this Unit of Measure (UOM) unless explicitly changed. If not selected, users must specify a UOM for each read, which increases the risk of inconsistencies. This is applied in meter data imports and billing conversions to ensure standardization. |
| Manage pools as (default) | Defines the default way pools are managed for this LDC. If selected, pools are organized and processed using the specified method. If not selected, pools must be managed manually for each transaction. This is applied in pool management, balancing, and billing workflows to streamline LDC operations. |
Direct connect information
| Fields | Description |
|---|---|
| Treat this LDC as a direct connect | Specifies whether the LDC should be treated as a direct connect, meaning the supplier directly interfaces with the LDC for scheduling and billing without intermediaries. If selected, the LDC is flagged as direct connect and additional fields such as pipeline and delivery point become active. If not selected, the LDC follows standard processing methods. This is applied in scheduling, billing, and integration workflows to reflect the nature of LDC connectivity. |
| Pipeline | Pipeline selection used when the direct connect checkbox is enabled. |
| Delivery point | Delivery point selection used when the direct connect checkbox is enabled. |
GL accounts
The GL accounts section defines how financial transactions related to a given LDC are mapped into the organization’s general ledger (GL). These accounts ensure that all billing, payments, expenses, and income are recorded in the correct financial categories for accounting, auditing, and reporting purposes.
Note
The fields in the GL accounts section are configured in the GL transactions screen.
| Fields | Description |
|---|---|
| GL expense account | The GL account used to record expenses incurred from this LDC. These expenses may include transportation charges, balancing fees, or other costs passed from the LDC to the supplier. If configured, all LDC-related expenses flow into this account automatically during posting. If not configured, expenses may be left unmapped, leading to reconciliation issues in financial reports. |
| GL A/P account | The GL account used to track accounts payable obligations associated with this LDC. This includes payments owed to the LDC for transportation, distribution, or service charges. If configured, invoices from the LDC automatically generate a payable entry in this account. If not configured, accounts payable may not reflect LDC obligations accurately, causing inconsistencies in liability reporting. |
| GL A/R account | The GL account used to track accounts receivable amounts from end-users tied to this LDC. This covers billed amounts awaiting payment from retail or wholesale customers served under the LDC. If configured, customer invoices are posted to this account for tracking collections. If not configured, receivables will not flow into the ledger correctly, impacting aging reports and cash flow management. |
| GL income account | The GL account used to record income generated from customers through this LDC. This typically includes margin on gas sales, service fees, or other revenue streams. If configured, revenue is posted to this account during billing runs. If not configured, revenue recognition may be incomplete or misclassified, impacting P&L and compliance with accounting standards. |
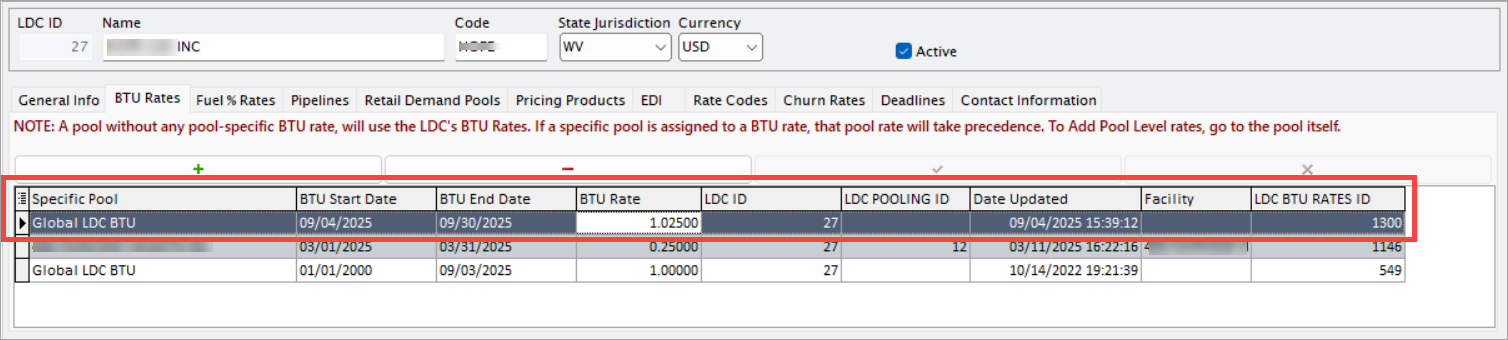
2. BTU rates tab
The BTU rates tab is used to configure and manage the British Thermal Unit (BTU) conversion factors. Since natural gas is typically measured in volume (e.g., MCF or Dth) but billed or balanced in energy terms, BTU rates are essential for converting volumes into consistent energy values. This ensures accurate billing, balancing, forecasting, and regulatory reporting.
If a pool-specific BTU rate is not defined, the default LDC BTU rate will automatically apply. However, if a pool-specific BTU rate is configured, it overrides the default LDC rate for that pool.
To add a global level LDC BTU rates, click on the Insert record (+) button. Next fill in the below fields:
- BTU start date: The effective date from which the entered BTU rate will apply.
- BTU end date: The last date on which the entered BTU rate will remain valid. if no end date is specified, the rate continues indefinitely until updated.
- BTU rate: The actual conversion factor used to convert gas volume (e.g., MCF) into energy units (e.g., MMBTU).
- LCD ID: The identifier number of the selected LDC.
- LCD pooling ID: Displays the ID of the LDC pool when configuring pool-level BTU rates. This remains blank when creating a global LDC BTU rate.
- LDC BTU rates ID: The system-generated unique identifier for the BTU rate record.
- Date updated: The date on which the BTU rate was last created or modified.
- Facility: The name of the facility. This is applicable only for pool-level BTU rates.
Once saved, the BTU rate record will show the Specific pool field as Global LDC BTU.
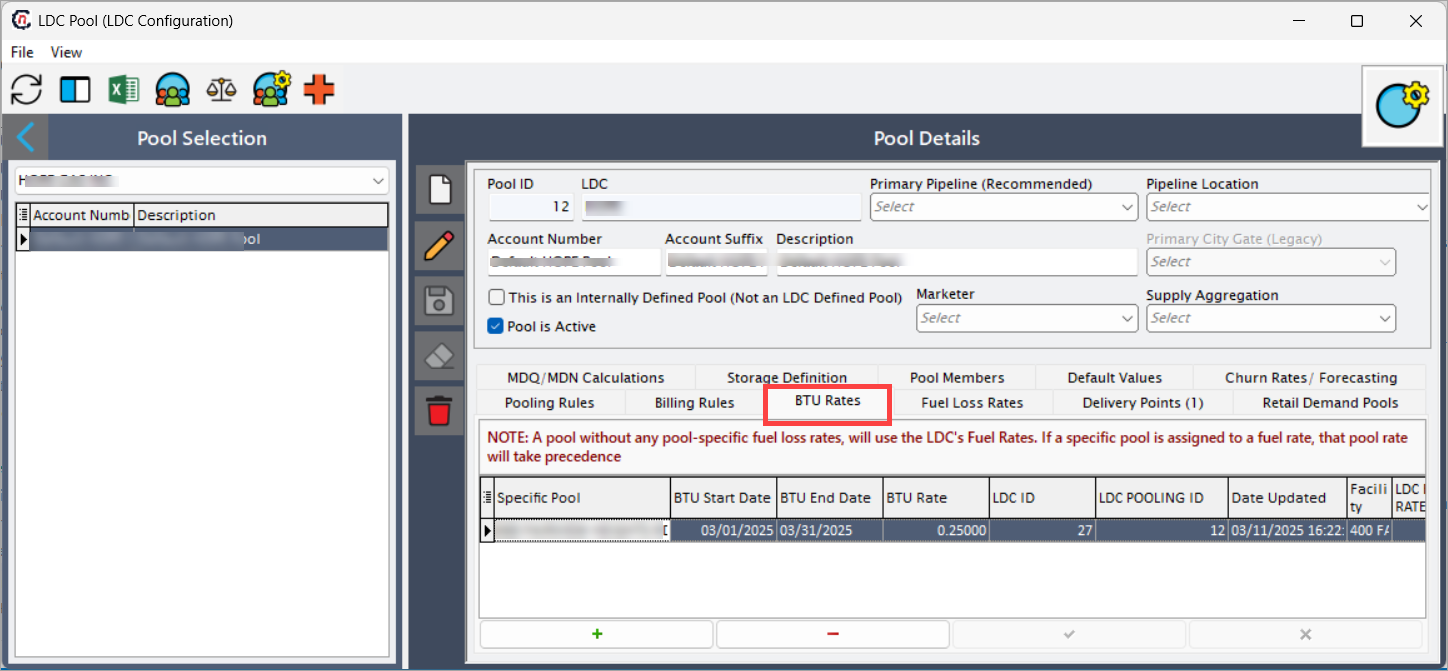
To configure a pool-specific BTU rate, navigate to the LDC pool screen and navigate to the BTU rates tab. After configuration, the BTU rate details are fetched in the LDC configuration screen.
Example scenario
Let’s assume an LDC has a default BTU rate of 1.025 for all pools. However, a marketer has a specific pool, called NorthPool, which has historically measured higher energy content gas.
Here’s how the setup would look in the BTU rates tab:
| Specific pool | BTU start date | BTU end date | BTU rate | Date updated |
|---|---|---|---|---|
| Global LDC level | 01-Jan-2025 | 31-Dec-2025 | 1.025 | 01-Jan-2025 |
| NorthPool | 01-Jan-2025 | 30-Jun-2025 | 1.035 | 01-Jan-2025 |
| NorthPool | 01-Jul-2025 | 31-Dec-2025 | 1.038 | 01-Jul-2025 |
Explanation of example
- For all pools without a defined BTU rate, the system will use the LDC’s default BTU rate of 1.025.
- For NorthPool, from 01-Jan-2025 to 30-Jun-2025, the BTU conversion will be 1.035.
- Starting 01-Jul-2025, the NorthPool BTU rate updates to 1.038, overriding both the LDC rate and the earlier pool rate.
Billing implication example
If a customer in NorthPool consumes 10,000 MCF of gas in March 2025:
- Using LDC default (if no pool rate applied): 10,000 MCF × 1.025 = 10,250 MMBtu
- With NorthPool-specific rate: 10,000 MCF × 1.035 = 10,350 MMBtu
The difference of 100 MMBtu would directly affect billing, reporting, and balancing.
3. Fuel % rates tab
The Fuel % rates tab is used to configure and manage the percentage of fuel loss applied during gas transportation. Fuel rates account for the volume of gas consumed as fuel while transporting gas through pipelines. These rates directly impact cost allocation, balancing, and customer billing.
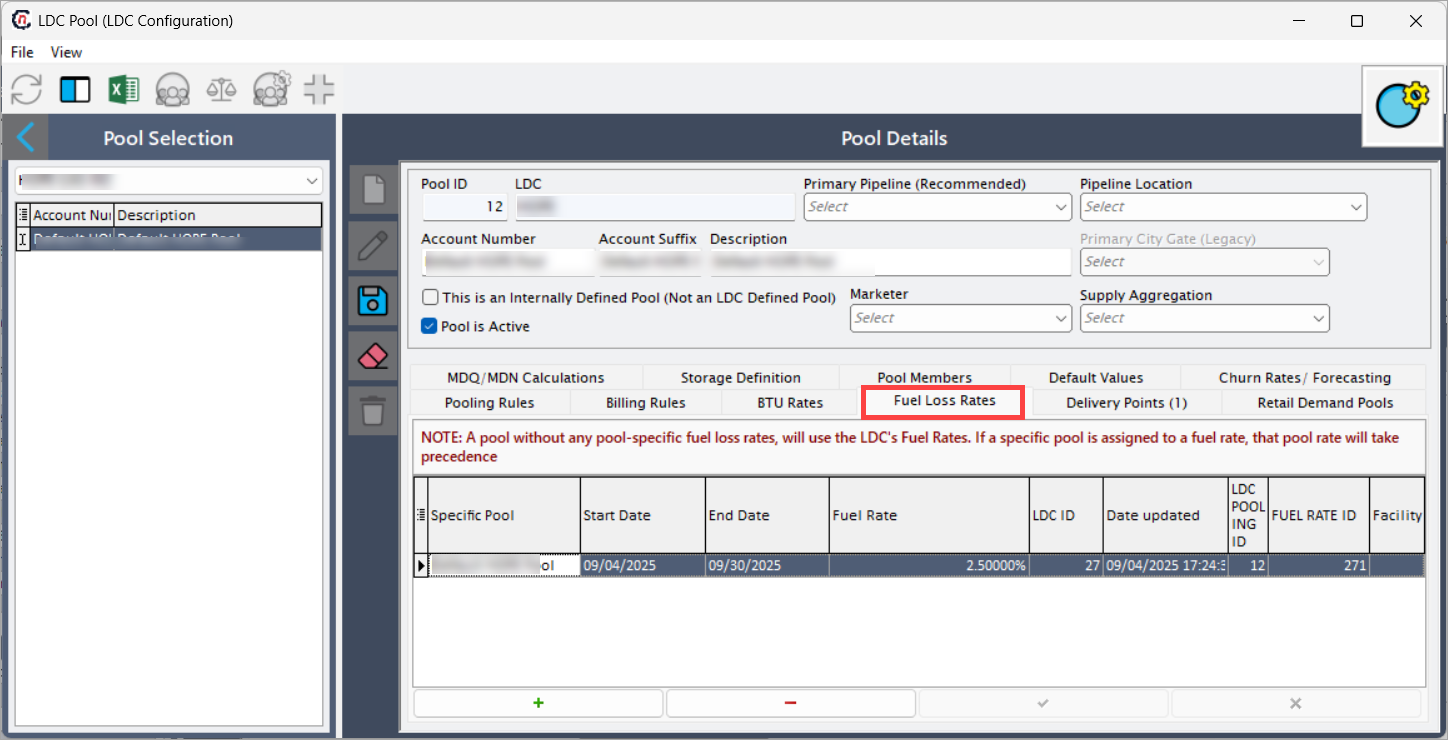
If a pool-specific fuel % rates is not defined, the default LDC fuel % rate will automatically apply. However, if a pool-specific fuel % rate is configured, it overrides the default LDC rate for that pool.
To add a global LDC fuel % rate, click on the Insert record (+) button and complete the following fields:
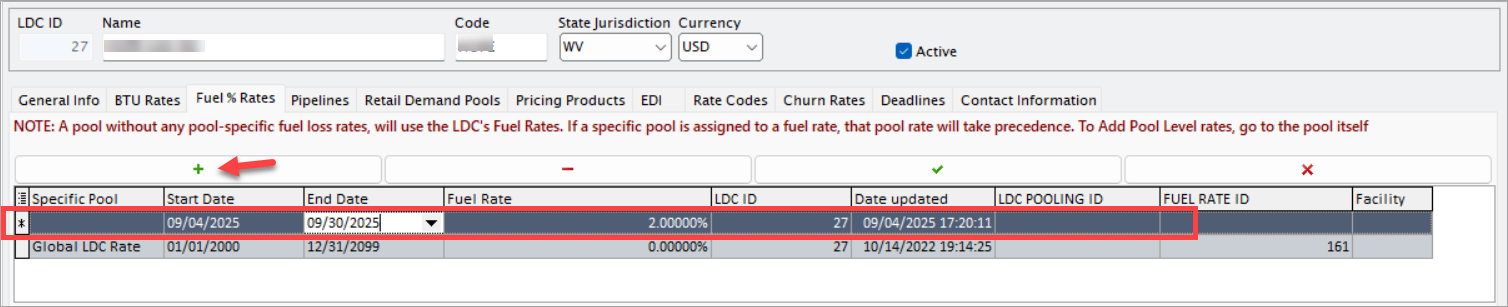
- Start date: The date from which the fuel % rate becomes effective.
- End date: The date until which the fuel % rate remains valid.
- Fuel rate: The percentage of gas lost as fuel during transportation (for example, 2.5%).
- LDC ID: The identifier number of the selected LDC.
- LDC pooling ID: Displays the ID of the LDC pool when configuring pool-level fuel % rates. This remains blank when creating a global LDC fuel % rate.
- Fuel rates ID: The system-generated unique identifier for the fuel % rate record.
- Date updated: The date on which the fuel % rate was last created or modified. This may be system-generated or manually entered.
- Facility: The name of the facility. This is applicable only for pool- or pipeline-level fuel % rates.
Once saved, the fuel % rate record will display the Specific pool field as Global LDC fuel.
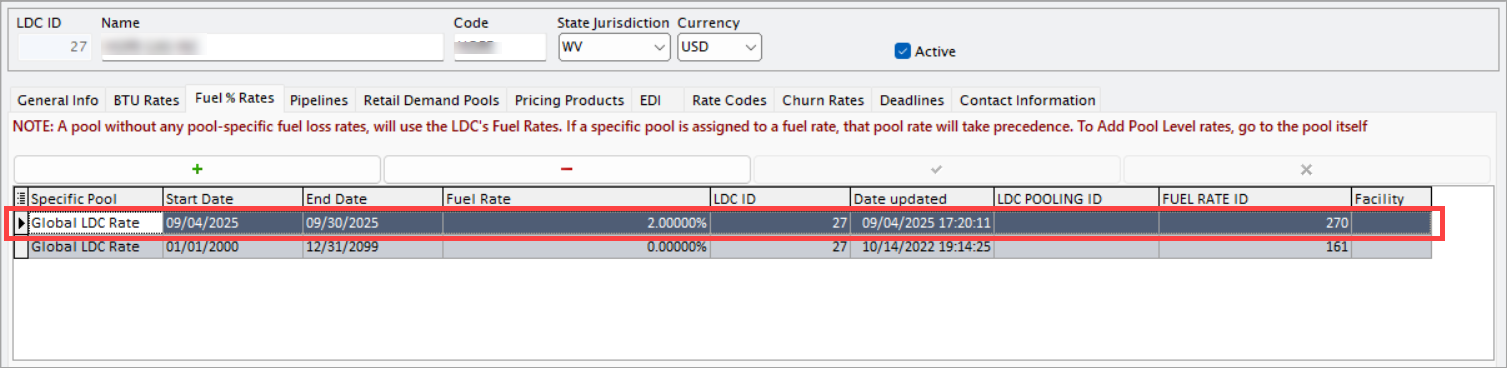
To configure a pool-specific fuel % rate, navigate to the LDC pool screen and open the Fuel loss rates tab. After configuration, the fuel % rate details are fetched in the LDC configuration screen.
Example scenario
Let’s assume an LDC has a default fuel % rate of 2.00% for all pipelines. However, a specific pool, Eastpool, has higher compression fuel usage.
Here’s how the setup would look in the Fuel % rates tab:
| Specific pool | Effective date | End date | Fuel % rate | Date updated |
|---|---|---|---|---|
| Global LDC level | 01-Jan-2025 | 31-Dec-2025 | 2.00% | 01-Jan-2025 |
| Eastpool | 01-Jan-2025 | 30-Jun-2025 | 2.50% | 01-Jan-2025 |
| Eastpool | 01-Jul-2025 | 31-Dec-2025 | 2.75% | 01-Jul-2025 |
Explanation of example
- For all pool without a defined fuel % rate, the system will apply the LDC’s default fuel % rate of 2.00%.
- For Eastpool, from 01-Jan-2025 to 30-Jun-2025, the applicable fuel loss will be 2.50%.
- Starting 01-Jul-2025, the Eastpool fuel % rate updates to 2.75%, overriding both the default LDC rate and the earlier pool rate.
Billing implication example
If a customer ships 10,000 MCF of gas through Eastpool in March 2025:
-
Using the LDC default fuel % (2%):
10,000 Mcf × (1 - 0.02) = 9,800 MCF delivered -
With Eastpool-specific fuel % (2.5%):
10,000 Mcf × (1 - 0.025) = 9,750 MCF delivered
The difference of 50 Mcf represents additional fuel, which directly affects billing and allocations.
4. Meter read cycles tab
The Meter read cycles tab defines how frequently meter readings are collected, enabling accurate billing cycles and usage tracking.
Key fields:
- Cycle name/code: Identifier for the meter reading cycle.
- Frequency: Monthly, bi-monthly, quarterly, or custom.
- Start/End dates: Defines the cycle duration.
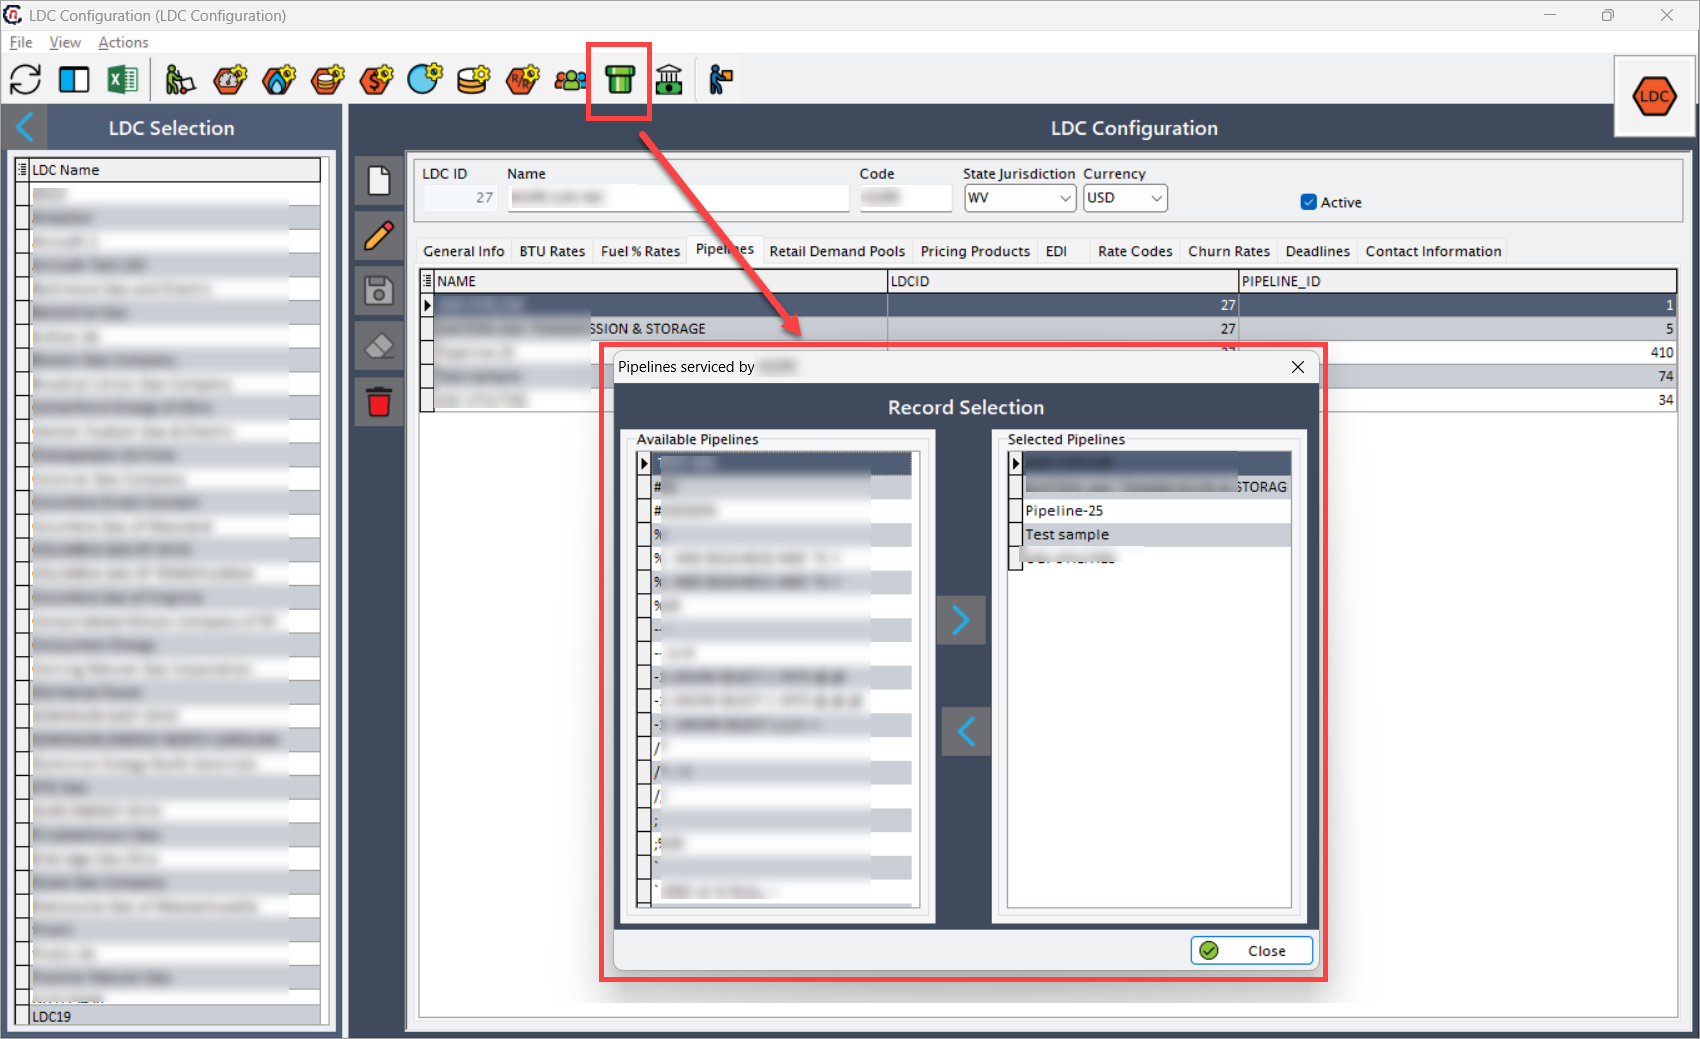
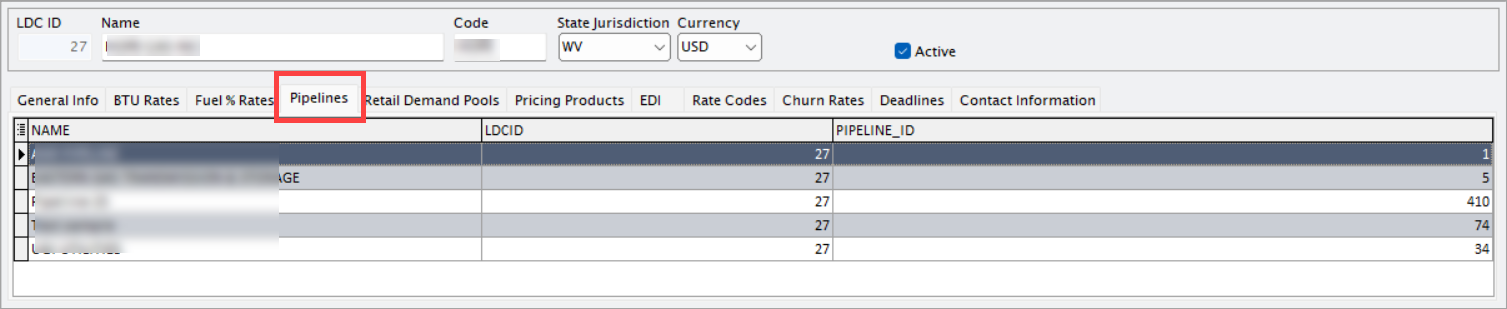
5. Pipelines tab
The Pipelines tab displays the list of pipelines associated with the LDC. To associate a new pipeline with the current LDC, click the
![]() icon in the header of the LDC configuration page. Use the arrow keys (< and >) to select or de-select pipelines. The pipelines you select will appear in the Pipelines tab.
icon in the header of the LDC configuration page. Use the arrow keys (< and >) to select or de-select pipelines. The pipelines you select will appear in the Pipelines tab.
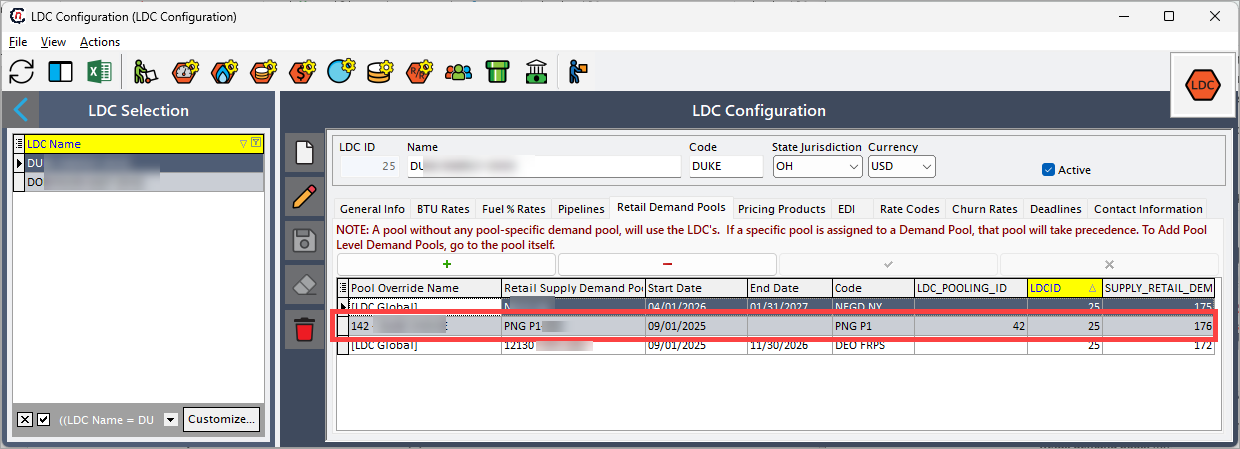
6. Retail demand pools tab
The Retail demand pools tab is used to configure and manage the demand pools associated with a LDC. A retail demand pool groups customers together (for example, residential, commercial, or industrial) to simplify supply planning, balancing, billing, and forecasting.
If a pool-specific demand configuration is not defined, the default LDC retail demand pool will automatically apply. However, when a pool-specific configuration exists, it overrides the default for that pool.
To add a new retail demand pool, click on the Insert record (+) button. Next fill in the below fields:
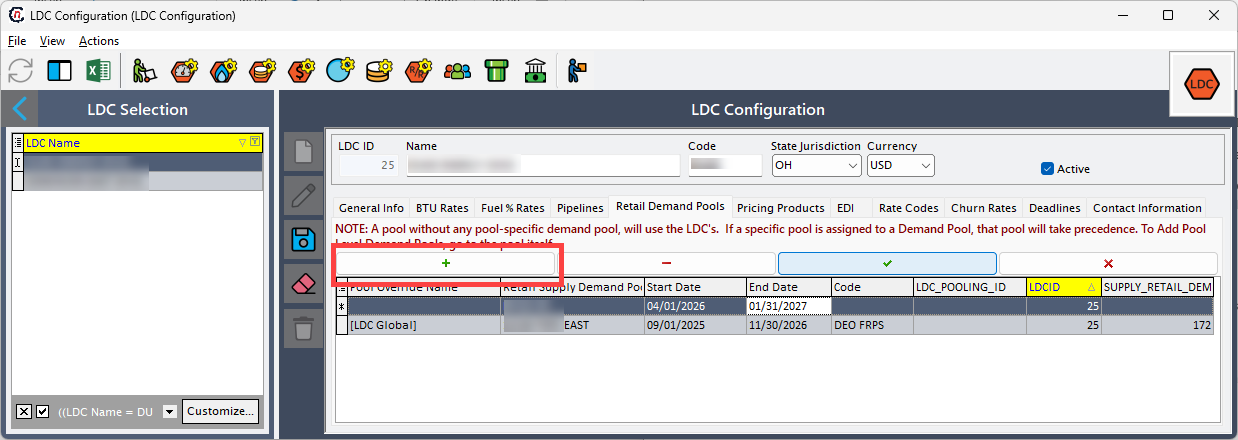
- Retail supply demand pool: Select the retail supply demand pool from the dropdown available in the nGenue application.
- Start date: The effective date from which the demand pool configuration will apply.
- End date: The last date on which the demand pool will remain valid. If no end date is specified, the pool continues indefinitely until updated.
- LDC ID: The identifier number of the selected LDC.
- LDC pooling ID: The identifier of the retail demand pool within the LDC system.
Once saved, the demand pool record will display the Pool override name field as [LDC Global].
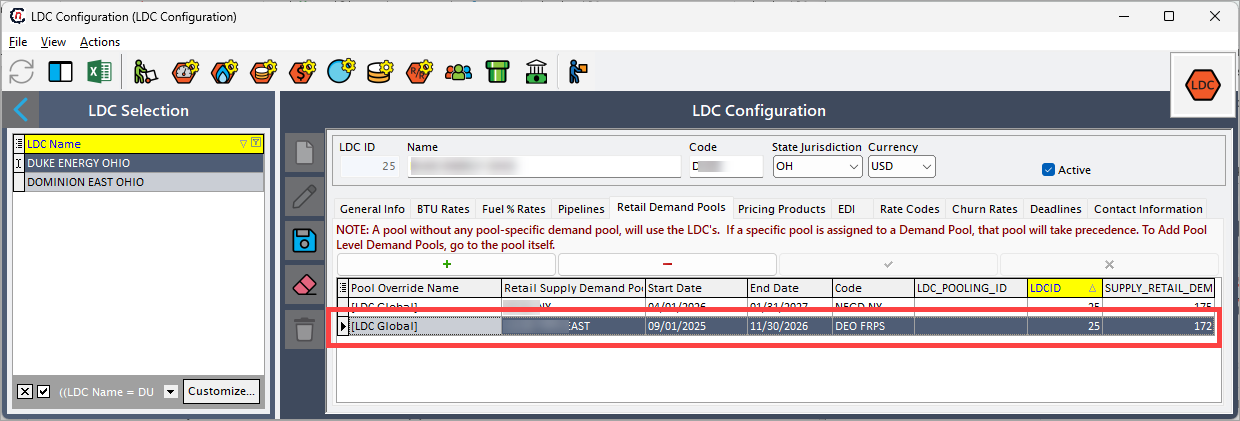
To configure a pool-specific retail demand pool, navigate to the LDC pool screen and navigate to the Retail demand pools tab. Insert a pool record in this tab.
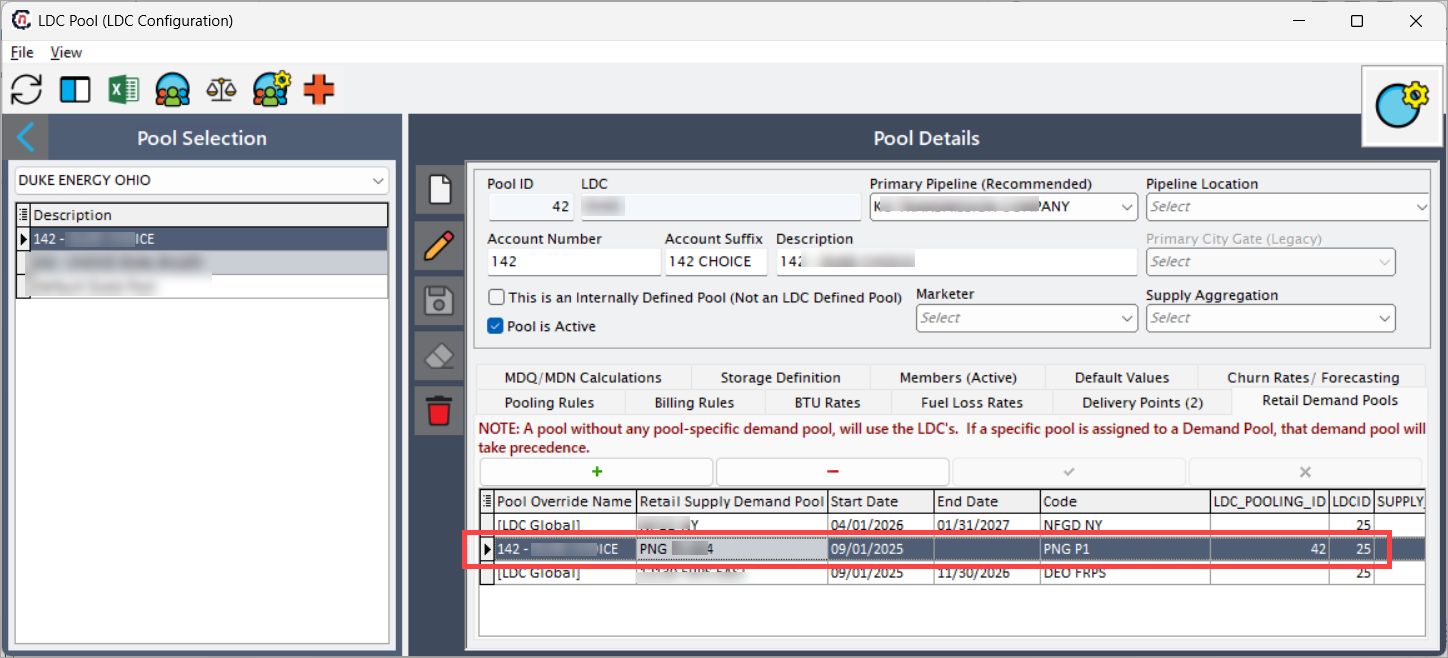
Once configured, the details are fetched and displayed in the LDC configuration screen.
Example scenario
Let’s assume an LDC has a default retail demand pool for all customers. However, to improve forecasting, the LDC creates two pool-specific groups: Residential Pool and Industrial Pool.
Here’s how the setup would look in the Retail demand pools tab:
| Pool name | Start date | End date | Pool type |
|---|---|---|---|
| [LDC Global] | 01-Jan-2025 | 31-Dec-2025 | Mixed |
| Residential Pool | 01-Jan-2025 | 31-Dec-2025 | Residential |
| Industrial Pool | 01-Jan-2025 | Industrial |
Explanation of example
- For all customers without a specific pool, the system will use the LDC’s default retail demand pool.
- For Residential Pool, demand management applies only from 01-Jan-2025 to 31-Dec-2025.
- For Industrial Pool, the configuration has no end date, meaning it continues indefinitely until updated.
Load allocation example
If total demand for March 2025 is 50,000 MCF across all customers:
- Using LDC default (if no pool segmentation applied):
50,000 MCFassigned to default pool. - With pool-specific setup:
- Residential Pool =
30,000 MCF - Industrial Pool =
20,000 MCF
- Residential Pool =
This segmentation ensures more accurate load forecasting, supply sourcing, and billing for different customer groups.
Billing implication example
Suppose the LDC charges $6.00 per MCF for residential customers and $5.50 per MCF for industrial customers.
-
Without segmentation (default pool only):
50,000 MCF × $6.00 = $300,000. -
With pool-specific segmentation:
- Residential Pool:
30,000 MCF × $6.00 = $180,000 - Industrial pool:
20,000 MCF × $5.50 = $110,000 - Total =
$290,000
- Residential Pool:
Result: Segmentation reduces the overall billing by $10,000, while reflecting a fairer cost distribution across customer groups.
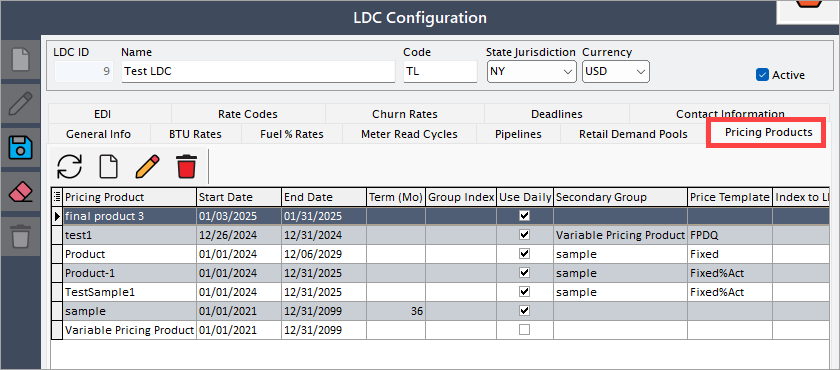
7. Pricing products tab
The Pricing products tab is used to define, configure, and manage the pricing structures offered by the LDC. A pricing product specifies how customers are billed for gas usage, based on factors such as fixed rates, variable rates, contract term length, or market indices.
This tab plays a key role in billing, revenue management, and contract administration, as it determines how natural gas costs are calculated and applied to end users.
To create a new LDC pricing product, click the Add new price group button. The step-by-step details for configuring each field are explained in a separate article: Create a new pricing product.
Once a pricing product is created from the LDC pricing products screen, its details are automatically fetched and displayed in the Pricing products tab.
You can further edit, or delete pricing products from this tab. Each pricing product record is tied to a specific validity period (start date and end date) and may be associated with one or more pools.
Key fields in the Pricing products tab
| Fields | Description |
|---|---|
| Pricing product | The name of the pricing product (e.g., Fixed pricing product, variable pricing product). |
| Start date | The effective date from which the pricing product becomes valid. |
| End date | The last date on which the pricing product remains valid. If set far into the future (e.g., 12/31/2099), the product is considered ongoing until updated. |
| Term (Mo) | The term length in months. For example, a value of 36 indicates a 3-year fixed-term pricing plan. |
| Group index | The index or grouping identifier used for categorizing or linking pricing products (e.g., to a market rate index). |
| Use daily | A checkbox that indicates whether daily pricing applies. This is typically enabled when prices are tied to daily market indices. |
| Secondary group | A checkbox that links the product to a secondary group of rates or conditions, if applicable. |
| Price term | The description of the pricing term. For example, "Month-to-month rate" describes a variable monthly rate applied by the LDC. |
Example scenario
Let’s assume an LDC defines the following pricing products:
| Pricing product | Start date | End date | Term (Mo) | Group index | Use daily | Price term |
|---|---|---|---|---|---|---|
| Fixed pricing product | 01-Jan-2021 | 31-Dec-2099 | 36 | 36 | ✔ | Fixed 3-year plan |
| Variable pricing product | 01-Jan-2021 | 31-Dec-2099 | Month-to-month rate | ✖ | Variable monthly rate | |
| Pricing product-3 | 01-Jun-2025 | 30-Jun-2025 | ✔ | Custom short-term pricing |
Explanation of example
- The Fixed pricing product locks the customer into a fixed rate for 36 months, ensuring billing predictability.
- The Variable pricing product applies a month-to-month rate tied to Duke’s published index, making billing dependent on market fluctuations.
- The Pricing product-3 product represents a short-term promotional or custom product, valid for only one month.
8. EDI tab
The Electronic Data Interchange (EDI) tab facilitates automated data exchange between your system and the LDC. Proper EDI setup ensures that transactions, nominations, and invoices are transferred electronically without manual intervention. For more detailed information on how EDI transaction works in nGenue, please refer to EDI documentation
9. Rate codes tab
The Rate codes tab is used to configure, manage, and maintain the rate codes defined by the LDC.
A rate code represents a specific pricing arrangement, tariff, or billing schedule that determines how gas usage is billed to end customers.
Rate codes can be fixed or variable, and they are often tied to indices, pools, or aggregation groups.
This tab is critical for billing, revenue recognition, and compliance, since the selected rate code directly drives how a customer’s gas usage is priced.
You can create a new rate code by clicking on the Add new rate button. Next, fill in the below details as mentioned in the table below:

Fields in the Rate codes section
| Fields | Description |
|---|---|
| ID | Unique system-generated identifier for the rate code record. This gets generated once you save the rate code record. |
| Code | The short unique code for the rate (for example, SN01, SN02). This code is often referenced in contracts, billing systems, or LDC documentation. |
| Display name | The descriptive label for the rate code. Usually identical to the Code, but may be customized for clarity. |
| Is Agg (Is Aggregated) | Checkbox indicating whether the rate code is part of an aggregation group. Aggregated rate codes allow multiple customers to be combined under a common pricing arrangement. |
| Agg Code (Aggregation Code) | Enter the grouping code to ensure the rate code belongs to an aggregation. Helps to manage billing and balancing for grouped customers. |
| Pricing type | Defines how the rate is calculated: 1. Fixed – A constant rate applies for the period. 2. Variable – The rate may change, often linked to a market index. |
| Index (if applicable) | If the pricing type is variable, this field specifies the market index or reference (for example, Columbia Gas, App. Gas). This ensures that billing reflects market price fluctuations. |
| LDC Pool (if required) | Identify the pool and link them to the rate code. This ties the rate to a specific retail demand pool, ensuring accurate allocation of usage and billing. |
| UOM ID | The unit of measure for the rate code (for example, Dth, MCF, MMBtu). This ensures that billing is based on the correct unit. |
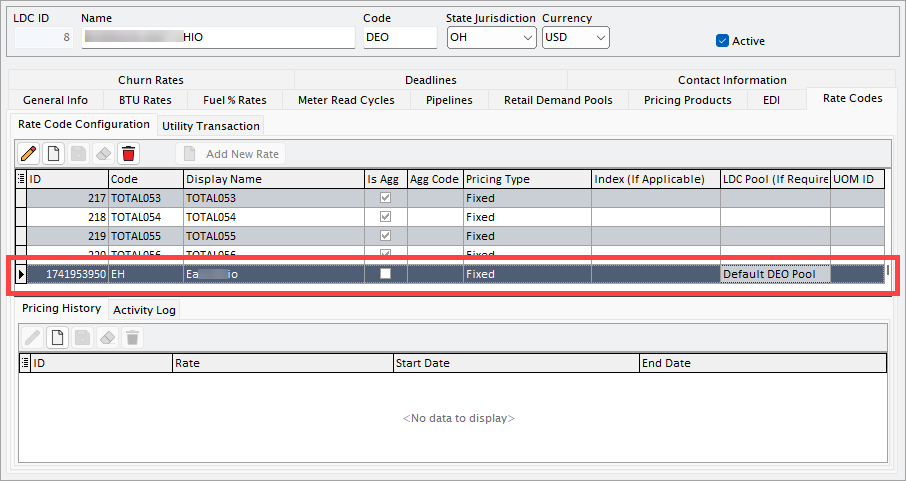
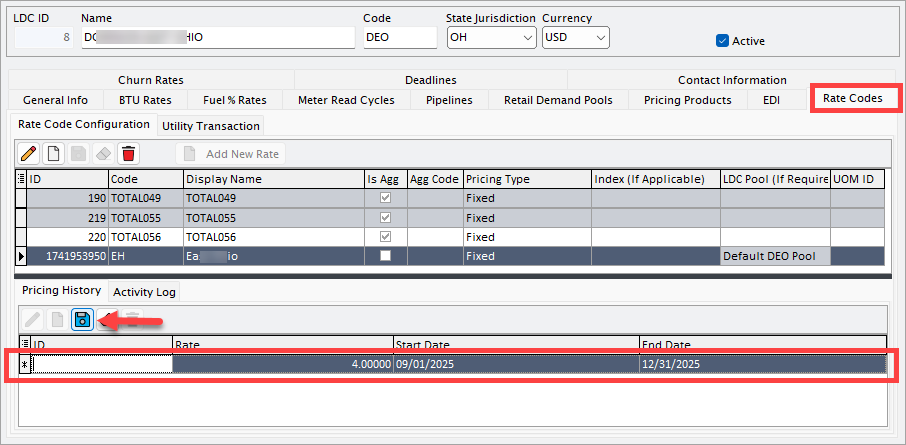
Each rate code may have multiple rates defined for different validity periods. The bottom section of the screen maintains the Pricing History. Click on Add new button.
Fields in the Pricing history tab
| Fields | Description |
|---|---|
| ID | Unique system-generated identifier for the rate history record. |
| Rate | The numeric value of the rate (for example, 4.0000). |
| Start date | The effective date from which this rate applies. |
| End date | The final date for which this rate remains valid. If blank, the rate applies indefinitely until updated. |
Click on the Save rate history button to save the record.
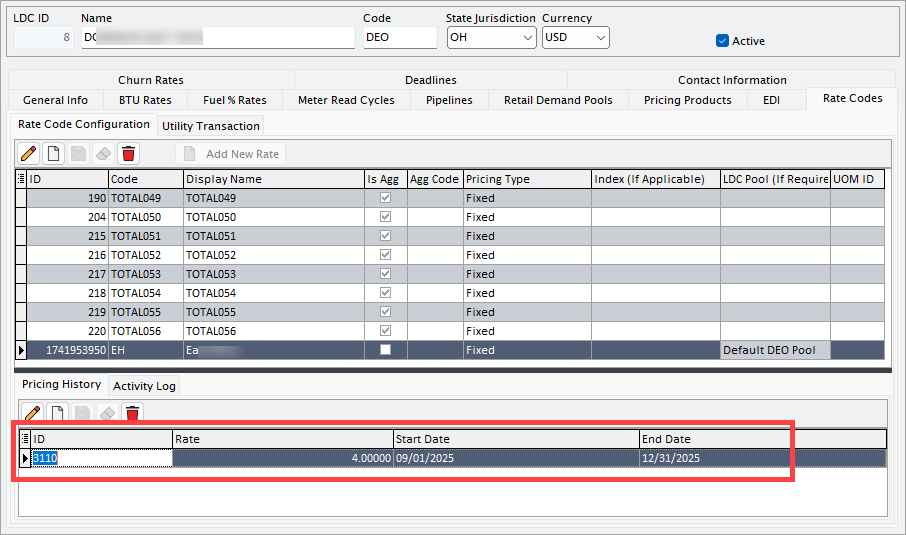
Any modifications made to the pricing history, such as a change in the rate amount, start date, or end date, are automatically recorded in the Activity log tab. This log provides a complete audit trail, allowing you to track when changes were made, what specific fields were updated, and by whom. This ensures transparency and accuracy in monitoring historical and current pricing agreements.
When setting up a price agreement for an LDC or its associated pool in the End user pricing agreement screen, you must configure and assign the correct rate details. In the Rate code field, you can select from the list of predefined rate codes that have already been configured in the system. Once you select a rate code, the corresponding rate price associated with that code is applied. This ensures consistency across all agreements and prevents manual errors in entering pricing details.
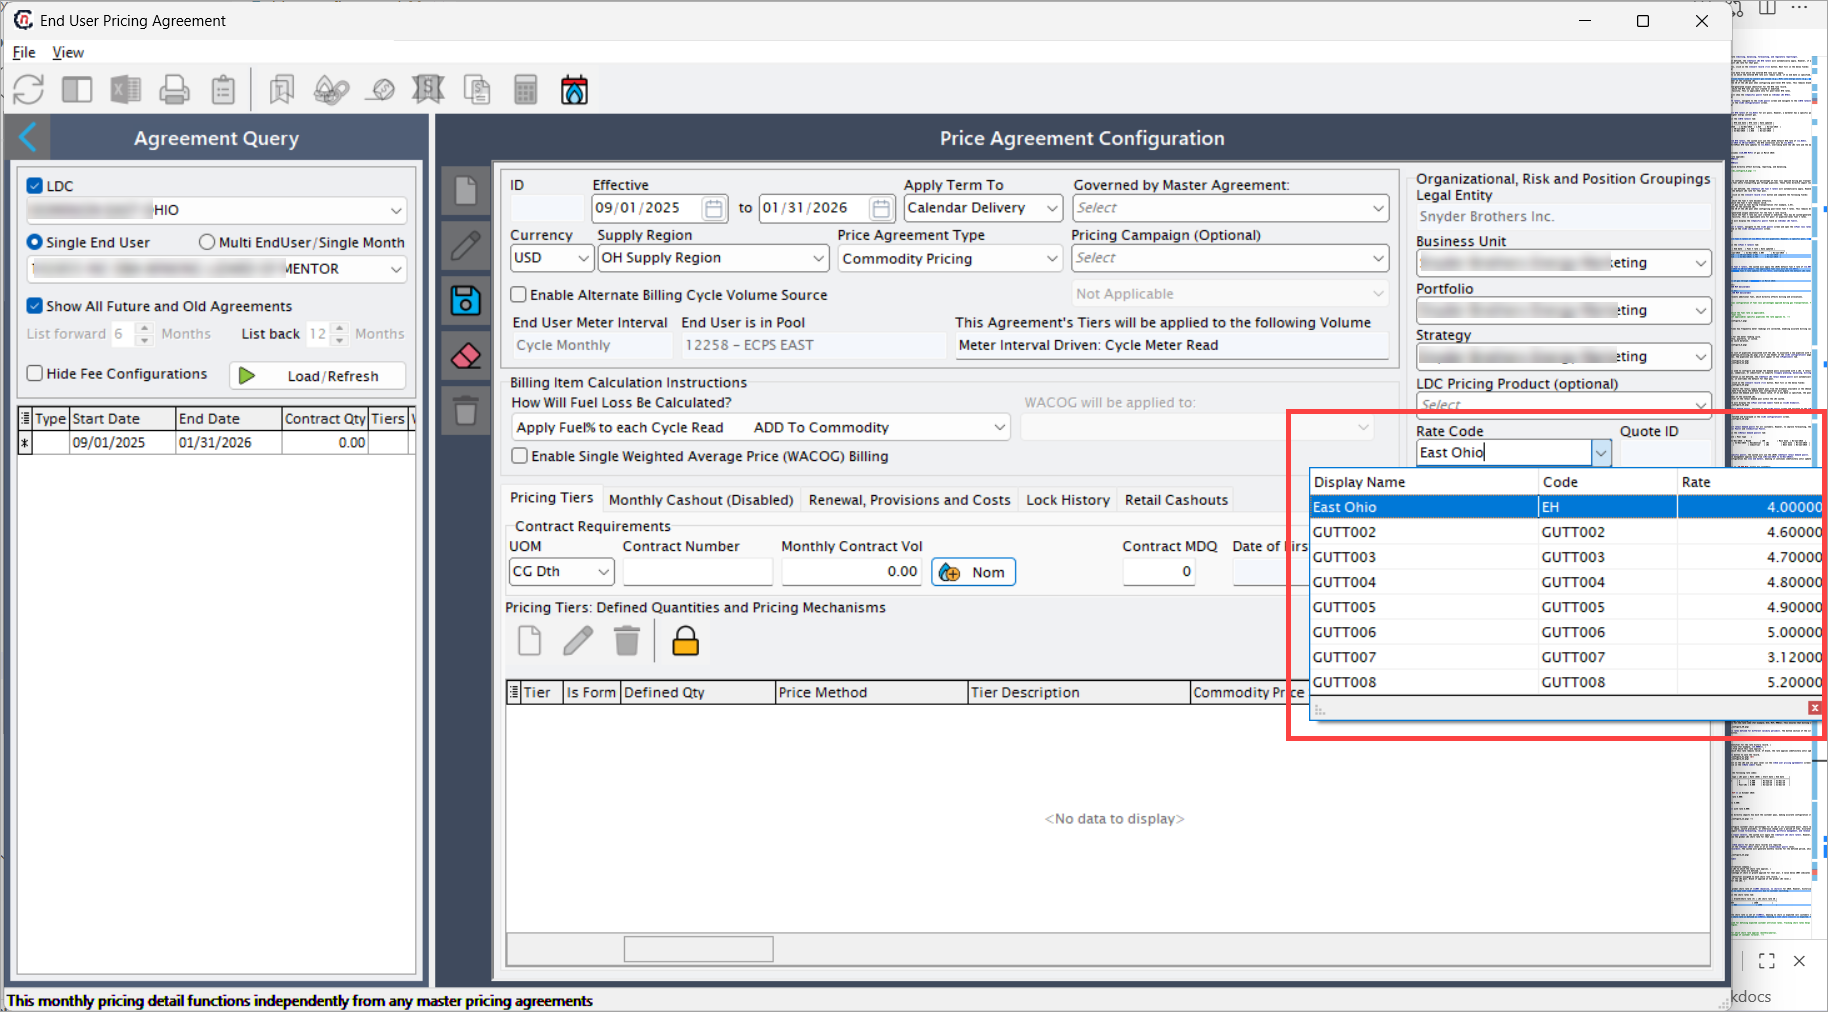
Example scenario
Let’s assume XYZ LDC defines the following rate codes:
| Code | Display name | Pricing type | LDC pool | Rate (USD) | Start date | End date |
|---|---|---|---|---|---|---|
| SN01 | SN01 | Variable | – | 4.000 | 01-Sep-25 | 31-Dec-25 |
| SN02 | SN02 | Fixed | – | 5.500 | 01-Jan-25 | 31-Dec-25 |
| SN10 | SN10 | Fixed | Pool-101 | 6.000 | 01-Jan-25 | 31-Dec-25 |
Billing implication example
If a customer consumes 10,000 MCF in October 2025:
-
Under SN01 (Variable) with rate 4.000:
10,000 × $4.00 = $40,000 -
Under SN02 (Fixed) with rate 5.500:
10,000 × $5.50 = $55,000 -
Under SN10 (Fixed, Pool-101) with rate 6.000:
10,000 × $6.00 = $60,000
Result: The selected rate code directly impacts how much the customer pays, making accurate configuration critical.
10. Churn rates tab
The Churn rates is used to configure customer churn percentages for an LDC or its associated pools. Churn rate represents the percentage of customers (or load) expected to leave, switch providers, or otherwise change over a period of time. Accurately defining churn rates is important because they directly impact load forecasting, resource planning, portfolio management, and revenue projections.
If churn rates are not set at the pool level, the system will apply the default LDC churn rate. However, when pool-specific churn rates are configured, they override the global LDC churn rate for that pool.
To set up churn rates:
- Select the Start year and End year for which churn records are required.
- Choose whether to apply rates at the Global LDC level or at an Individual pool level.
- Click Create monthly churn records. The system will generate monthly records for the defined period, which are displayed in the churn rates table.
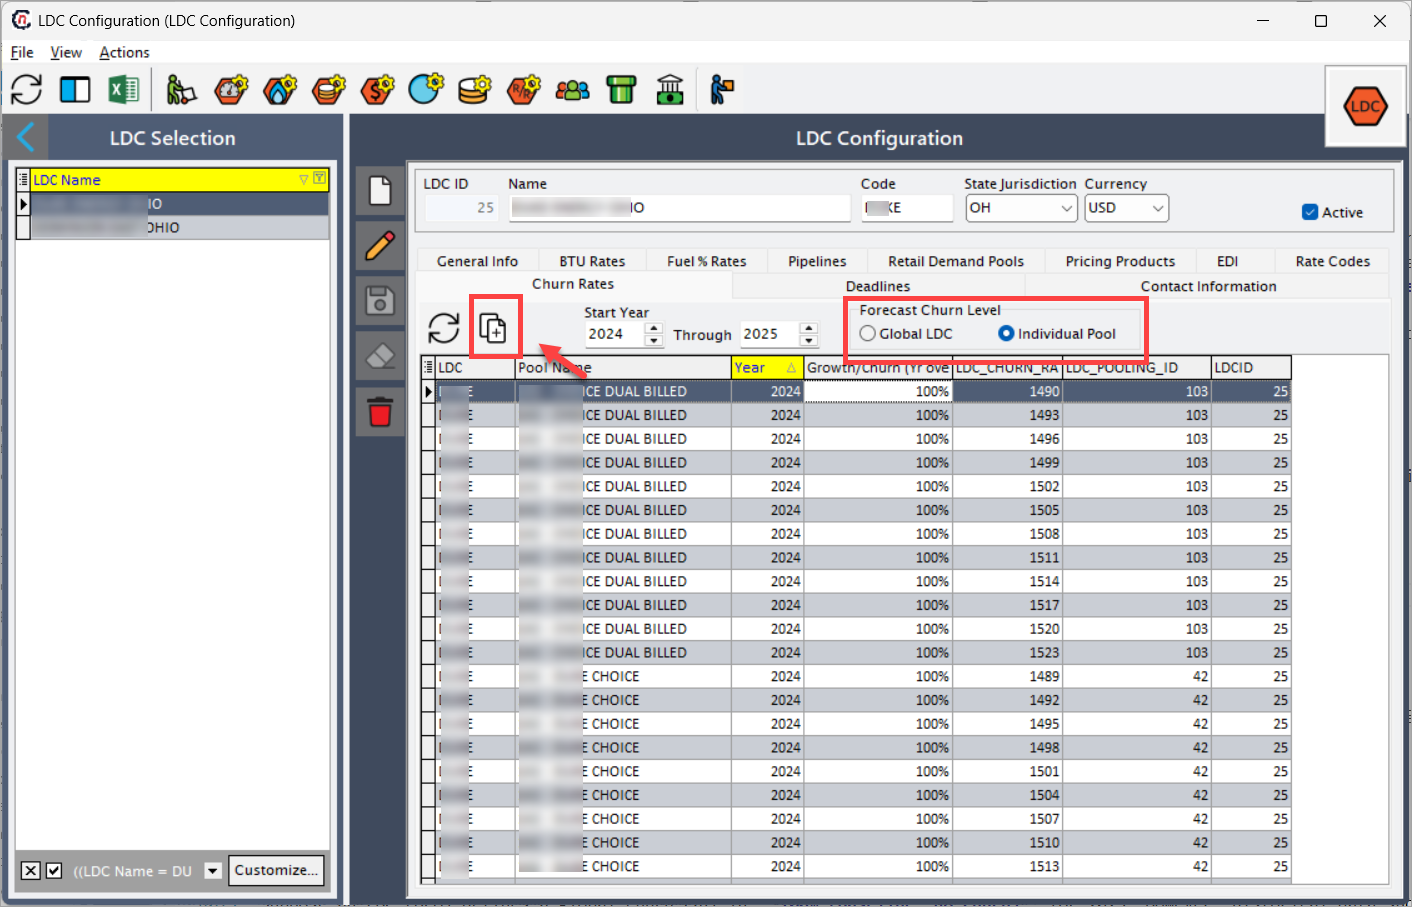
Key fields in the Churn rates tab
| Fields | Description |
|---|---|
| LDC | The name of the local distribution company. |
| Pool name | The pool within the LDC to which the churn rate applies. |
| Year | The calendar year for which churn rates are defined. |
| Growth/Churn rate (%) | The percentage of churn or growth applied for that year. A value below 100% indicates churn (loss), while a value above 100% indicates growth. |
| LDC churn rate ID | The unique identifier assigned to each churn rate record. |
| LDC pooling ID | The identifier of the LDC pool. Blank if applied at the global LDC level. |
| LDC ID | The unique identifier for the LDC. |
Example scenario
Suppose an LDC XYZ defines a global churn rate of 100% (baseline, no churn) for 2025. However, historical data shows that a specific pool (19192 – ECPS West) tends to lose 2% load annually due to customer switching.
Here’s how the setup might look in the churn rates tab:
| LDC | Pool name | Year | Growth/Churn rate (%) | LDC churn rate ID |
|---|---|---|---|---|
| XYZ | Default pool | 2025 | 100% | 1560 |
| XYZ | 19192 – ECPS West | 2025 | 98% | 1598 |
Explanation of example
- For the Default XYZ pool, the churn rate is set at 100%, meaning no churn is expected (all customers remain).
- For the ECPS West pool, the churn rate is defined as 98%, meaning a 2% churn (loss) is expected. This overrides the default LDC churn rate.
11. Deadline tab
The Deadlines tab is used to configure and manage important operational or contractual deadlines associated with the LDC. These deadlines ensure that key activities such as nominations, confirmations, scheduling, balancing, or reporting are completed on time in compliance with LDC requirements.
This tab is critical for operational planning, compliance, and avoiding penalties. Each deadline record defines what the deadline is for (description) and the exact cutoff time or date.
Users can add new deadlines using the “+” (Add) button, modify existing ones, or delete unnecessary records.
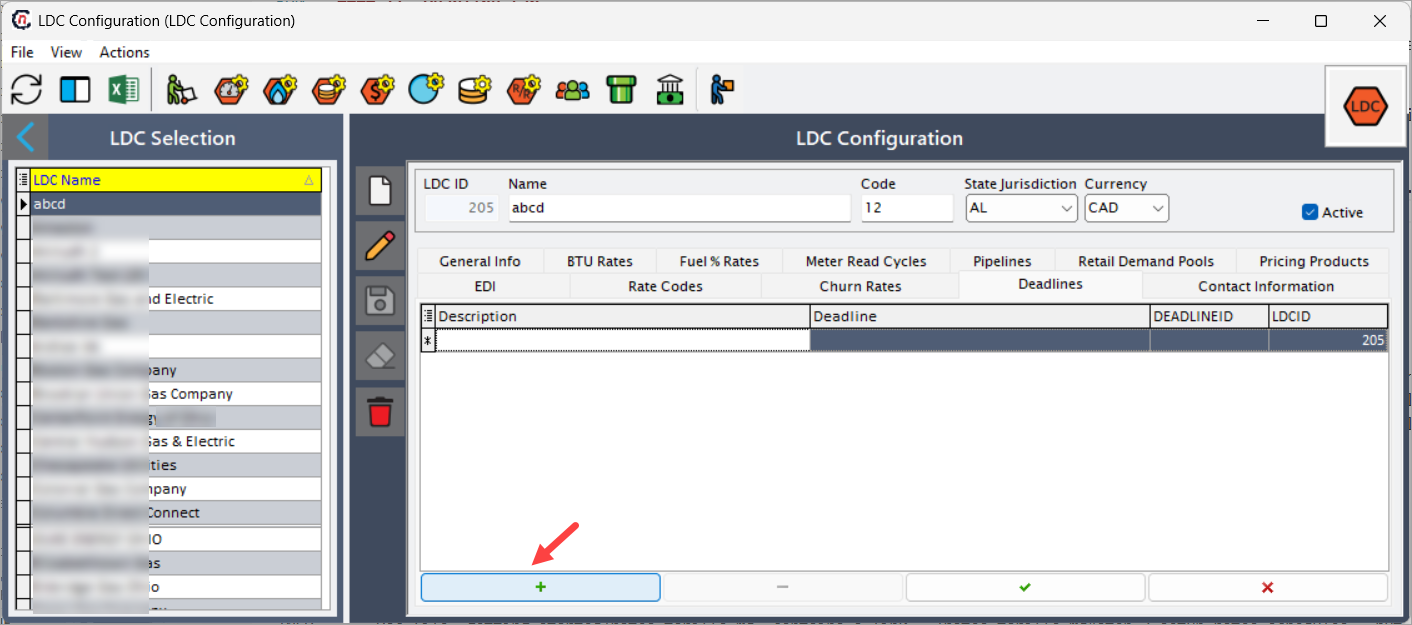
Fields in the Deadlines tab
| Fields | Description |
|---|---|
| Description | Specifies the purpose of the deadline (e.g., nomination submission, invoice dispute, balancing cutoff). |
| Deadline | Defines the cutoff time/date by which the activity must be completed (can be daily, monthly, or contract-specific). |
| Deadline ID | System-generated unique identifier for the deadline record, used internally for reference and linking. |
| LDC ID | Unique identifier of the LDC to which the deadline applies. Ensures mapping to the correct utility. |
Example scenario
Suppose the LDC has the following requirements:
| Description | Deadline | Deadline ID |
|---|---|---|
| Nomination submission cutoff | Daily by 11:00 AM | 101 |
| Monthly balancing deadline | 15th of every month | 102 |
| Invoice dispute submission | Within 10 days of invoice receipt | 103 |
Explanation
- For nominations, marketers must submit daily volumes before 11:00 AM EST.
- For balancing, all monthly imbalance corrections must be submitted by the 15th.
- For invoice disputes, customers must raise disputes within 10 days, otherwise charges are considered final.
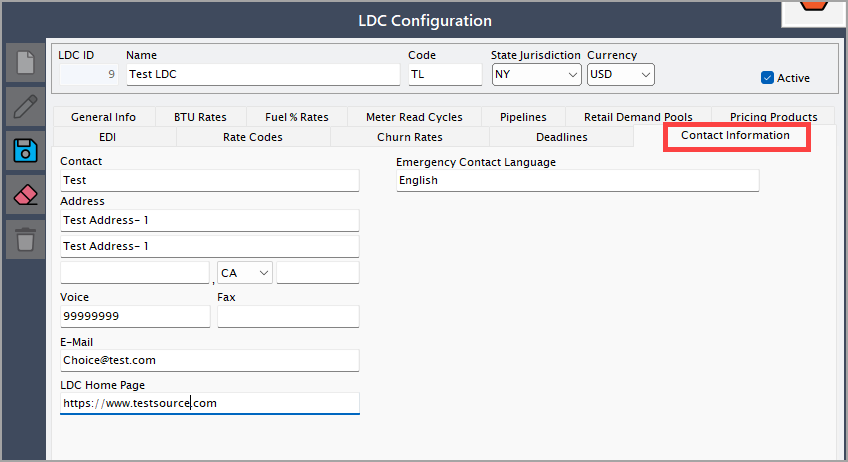
12. Contact information tab
The Contact information tab captures essential contact details of key LDC representatives such as LDC address, phone number and email address. Having up-to-date contact details is crucial for addressing operational, billing, and emergency issues.
These tabs together provide a comprehensive framework for configuring LDC in the system. Accurate and complete data entry in each tab is critical for successful operation, compliance, and customer satisfaction.
Step 3: Validate and save the LDC configuration
Review all details to ensure accuracy and click on Save button to finalize the LDC creation.
What’s next
At this stage, you should have a clear understanding of how to add a new LDC record or update an existing one in nGenue. Beyond record creation, the LDC configuration screen provides additional features that allow you to extend and fine-tune LDC setup. The screen header includes a series of icons that serve as shortcuts to related features. These options let you manage representatives, configure meter types, define charges, view pipelines, and more—all without leaving the LDC record.
After adding or updating an LDC record, you can continue configuring it using the available options from the LDC configuration screen:
- Configure LDC representatives – Manage contact and role details of LDC representatives for communication and compliance.
- Define meter types – View or update the types of meters associated with the LDC.
- Set daily factors – Define or edit daily factor values used in allocation and balancing calculations.
- Manage storage types – Configure different storage options available for the LDC.
- Configure LDC charges – Set up charges such as service fees, tariffs, or additional cost components.
- Review pool definitions – View how pools are structured and linked to the LDC for supply and demand management.
- Set storage targets – Establish default storage targets to meet seasonal or peak usage needs.
- Define tariffs and riders – Create or adjust rates, tariffs, and riders applicable to the LDC.
- View end users – Access the list of customers or entities associated with the LDC.
- Check pipelines – Review which pipelines service the current LDC.
- Configure LDC taxes – Set up and maintain tax rules applied to the LDC tariff structure.
- Add counterparties – Create new counterparties that can transact with the LDC.
At this point, you have a fully understanding of how to add a new LDC record or configure an existing record in nGenue. Also, explore additional features like adding a new counterparty to a LDC, viewing pipelines servicing current LDC, and many more from LDC configuration screen. You will find icons that has specific features available on the top header of the screen.
Summary
Configuring a LDC in nGenue is a critical step that directly impacts nominations, allocations, billing accuracy, compliance, and financial reporting.
By completing the setup, you:
- Establish the identity and jurisdiction of the LDC through core details like name, code, and regulatory authority.
- Enable accurate billing and forecasting by defining conversion factors such as BTU rates and fuel % rates.
- Improve operational efficiency by segmenting customers into retail demand pools and associating them with pipelines.
- Ensure compliance and financial integrity by mapping LDC transactions to the correct GL accounts.
- Provide flexibility by aligning system terminology with business language using naming conventions.
- A well-configured LDC ensures that all downstream processes—ranging from meter reads to invoice generation—run seamlessly, reducing errors and improving transparency in customer and regulatory reporting.