Configuring sales tax definition
The Sales tax definition screen in nGenue is used to define, configure, and maintain sales tax settings applicable for various taxing jurisdictions such as counties or cities. The sales tax configuration process ensures that accurate and legally compliant tax amounts are applied to customer invoices based on their geographic location and applicable jurisdiction rules.
This configuration is crucial for:
- Ensuring compliance with local, state, and federal tax regulations
- Applying the correct tax rates on gas-related charges
- Managing partial or full tax exemptions for specific customer types (e.g., military, non-profit)
- Automating tax calculations across invoicing, thus reducing manual errors and administrative overhead.
This configuration links sales tax rules to rate plans, charge codes, and customer locations, enabling seamless and accurate billing.
This article provides a detailed overview of how to configure the sales tax definition along with an explanation of all available fields.
Prerequisites
Before configuring sales tax definitions, ensure the following prerequisites are met:
- The Local Distribution Company (LDC) is already created and configured.
- You must have the add or modify permissions for the Sales tax definition screen.
- All necessary tax jurisdiction and GL A/P code information is available.
- You are aware of applicable tax rates, calculation methods, and effective dates.
Procedure to configure sales tax definition
Step 1: Navigate to the Sales tax definition screen
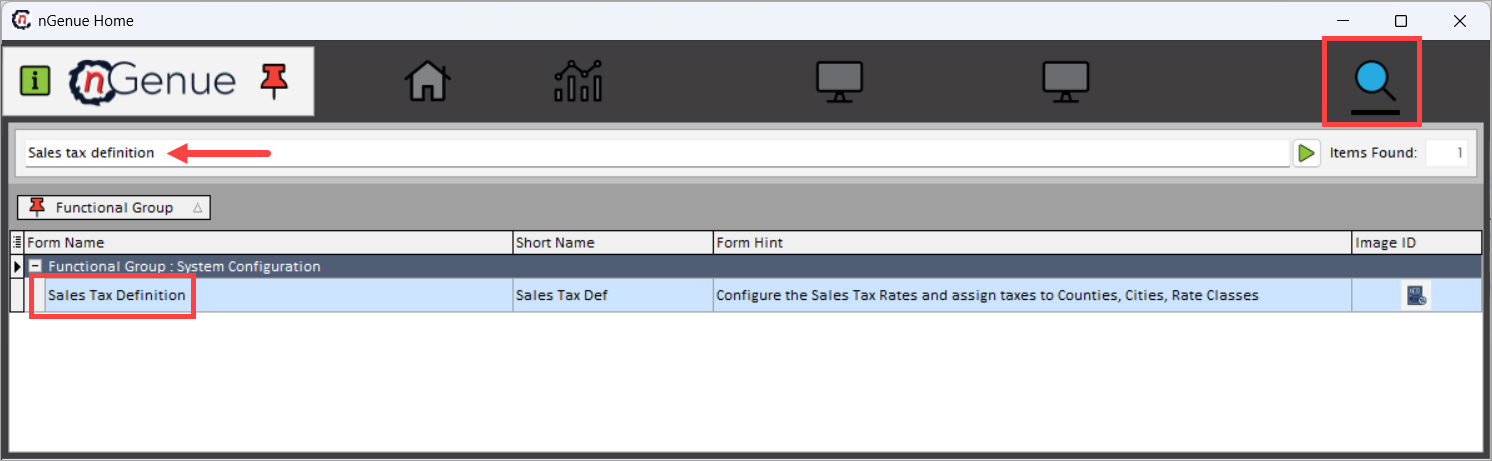
- Log in to the nGenue application.
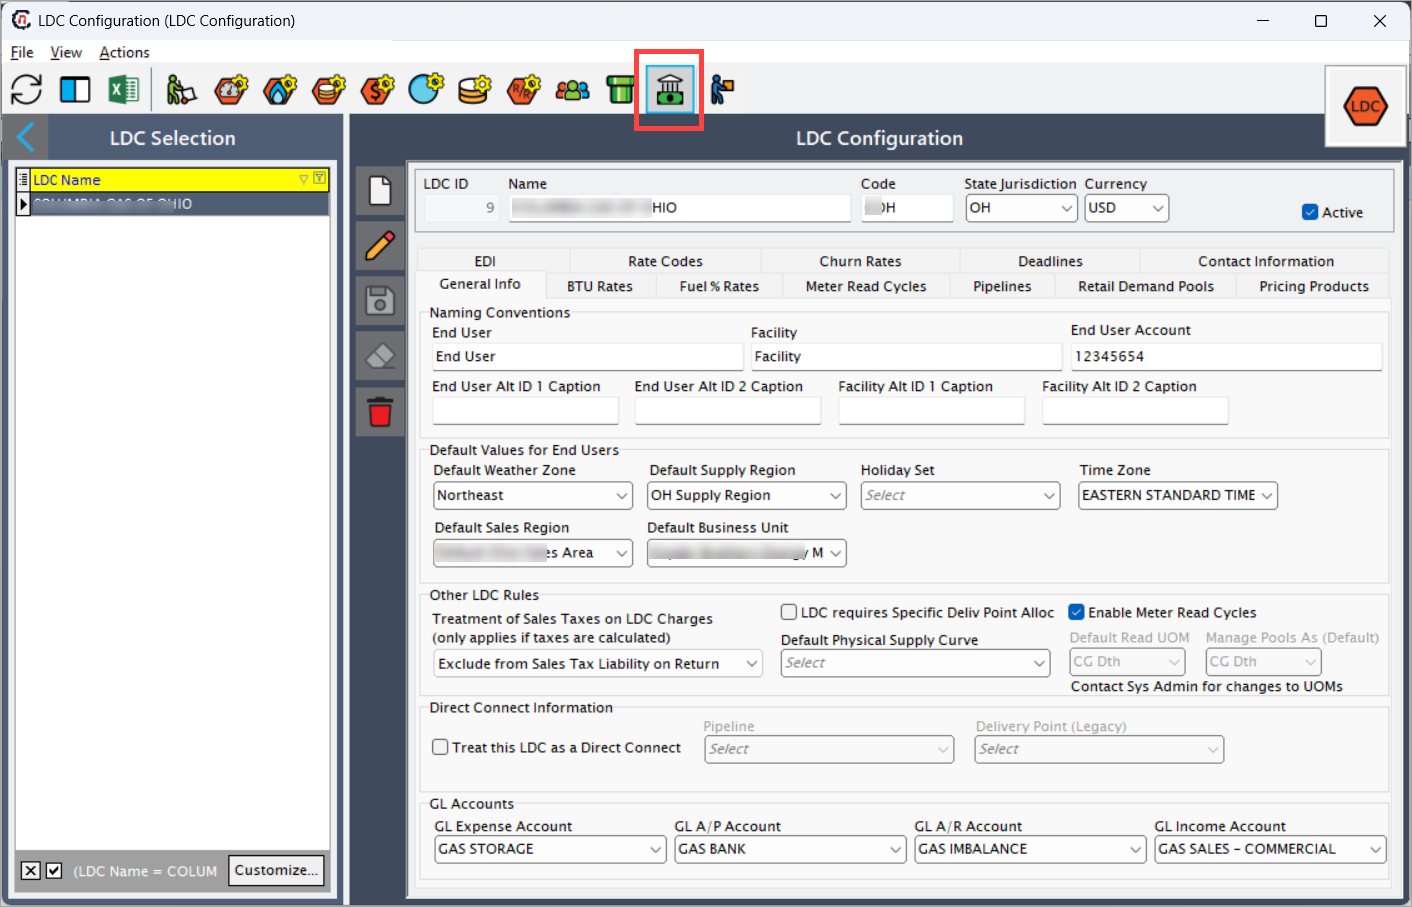
- Search for Sales tax definition in the search bar or navigate via LDC Configuration screen > Taxes for LDC tariffs icon.
-
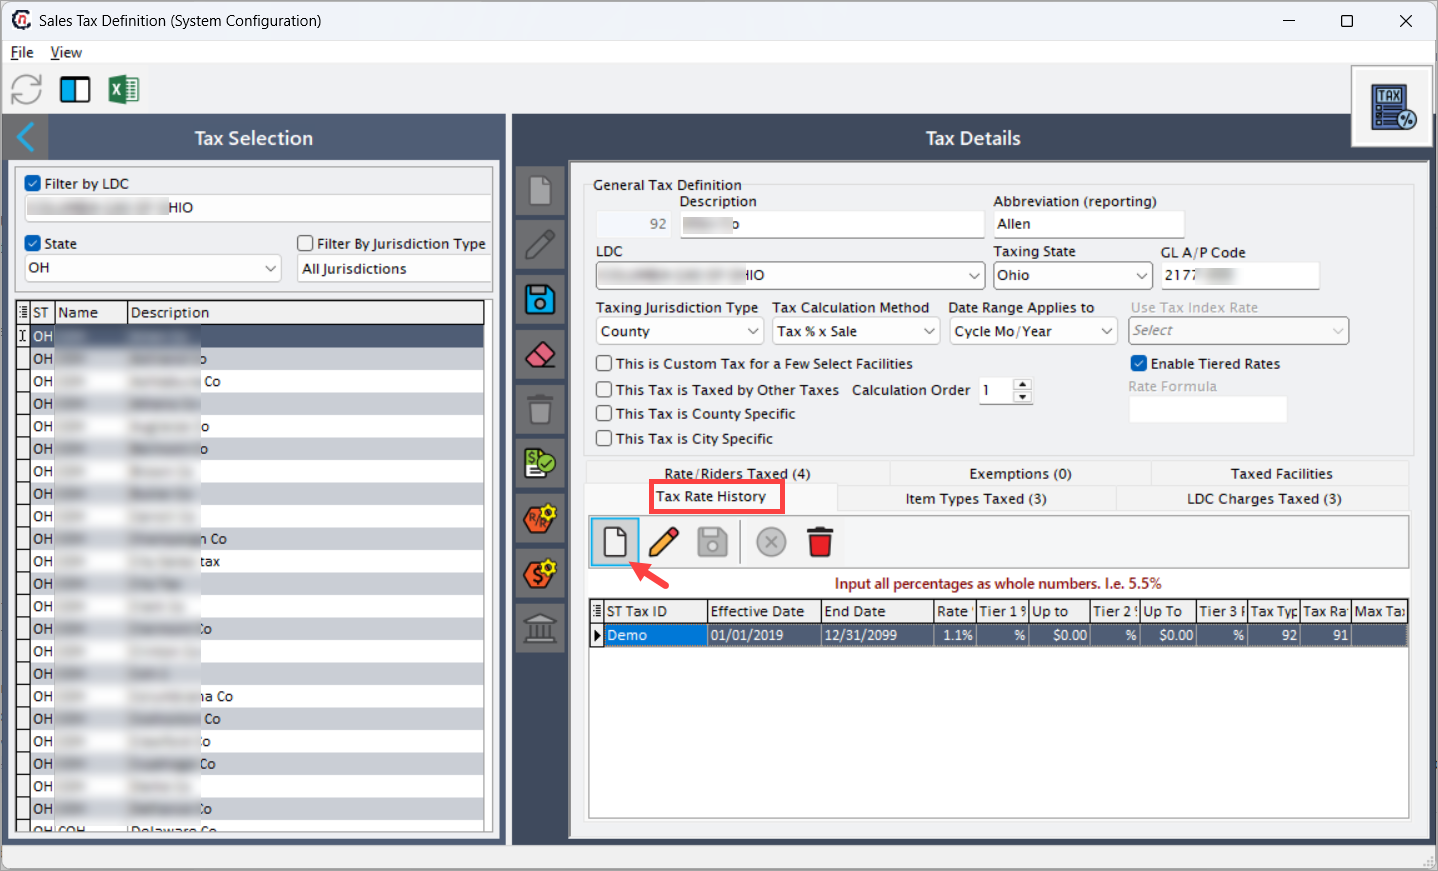
The Sales tax definition screen is divided into two main sections:

-
Tax selection: The Tax selection section enables filtering of tax definitions for a specific LDC. You can select the required LDC to view or configure sales tax definitions associated with it. The different filters include:
- Filter by LDC: Enables filtering of tax definitions for a specific LDC.
- State: Allows filtering tax definitions by state.
- Filter by jurisdiction type: Choose between All Jurisdictions, State, County, Local.
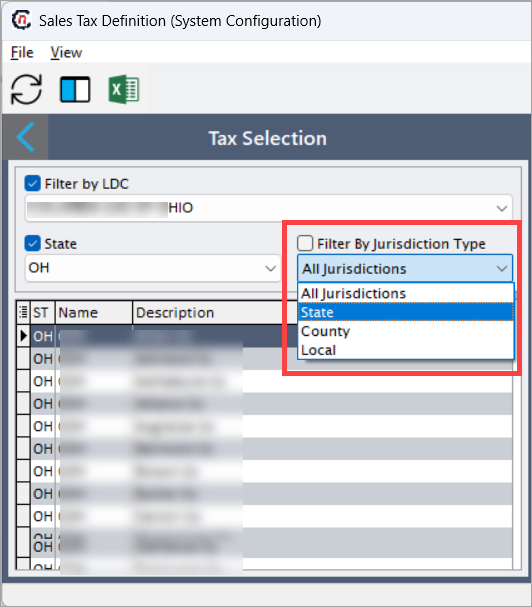
Select a record to view its tax configuration details in the Tax details section.
-
Tax details: The details of the tax configuration is displayed in the Tax details section.
The table below describes the available icons and their functions:Icons Description 
Add a new sales tax definition record. 
Edit the sales tax definition record detail. 
Save the sales tax definition record. 
Cancel the updates being made to the sales tax record. 
Delete a sales tax definition record. 
Apply this taxes to multiple invoices items types 
When you click on this icon, you'll' redirected to the LDC rate configuration screen where you can configure a new rate rider 
Tax definition for LDC charges. 
Configure what taxes tax this tax. This feature is enabled only if This tax is taxed by other taxes checkbox is selected. 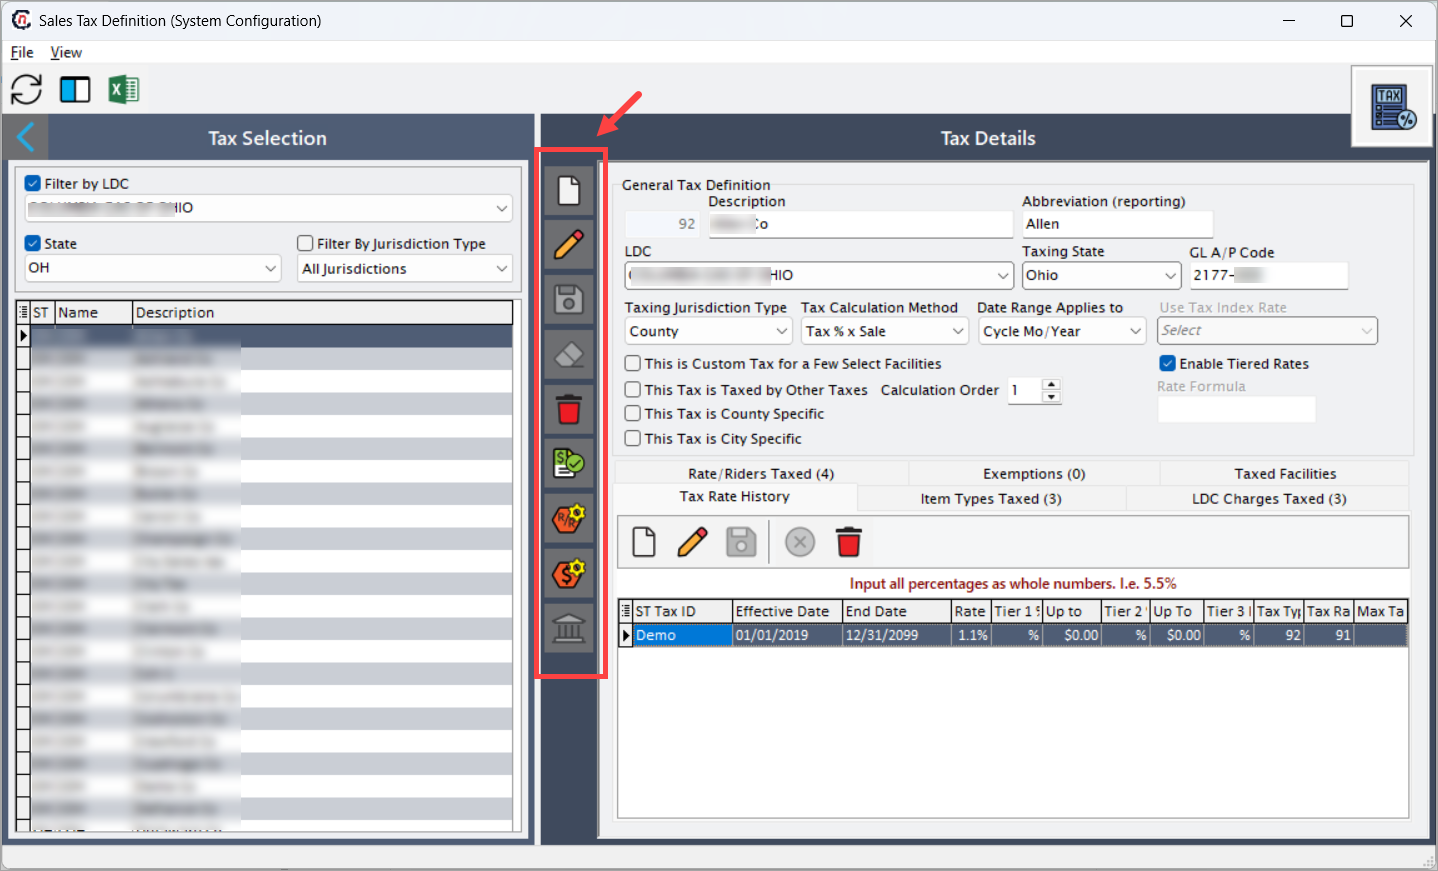
-
Step 2: Add a sales tax definition record
- In the Tax selection section, select the desired LDC from the Filter by LDC dropdown.
- In the Tax details section, click the Add button.
- Enter a descriptive name for the tax jurisdiction in the Description field and add abbreviations code. For example, Texas State Tax, TXST.
- The LDC dropdown displays the LDC name selected in the left panel. It indicates which LDC the record is associated with.
- Select the state for which the tax definition applies in the Taxing state dropdown. By default, this field is auto-generated based on your LDC selection.
- GL A/P code displays the General Ledger Accounts Payable Code that is associated with LDC tax postings. This is auto-generated based on the LDC selection.
-
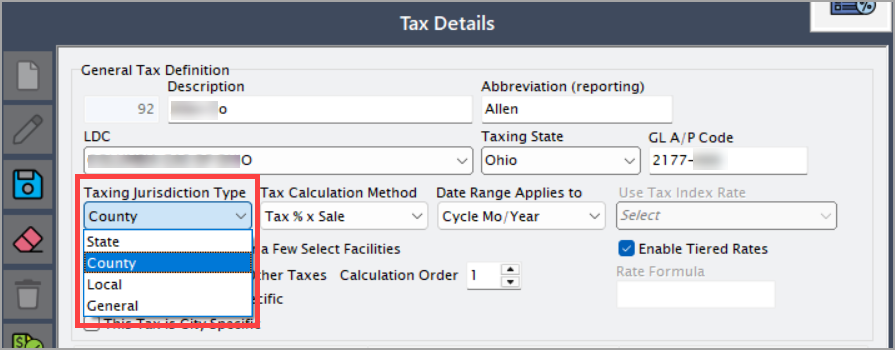
Choose the level of taxation jurisdiction in the Taxing jurisdiction type dropdown. The options include:
- State: Imposed by the state government
- County: Imposed by a county authority
- Local: Imposed by city/municipality
- General: Non-geographic or internal use
-
The Tax calculation method dropdown defines how the system should calculate the sales tax amount for a given jurisdiction. The selected method determines the tax computation logic that applies during billing and invoice generation. Each option represents a distinct calculation model used by LDCs or marketers depending on contractual and jurisdictional rules.
Dropdowns Description Tax % x sale Calculates the tax as a percentage of the total sale amount. This is the most commonly used method for standard sales-based taxation. The formula applied is: Tax Amount = (Sale Amount × Tax%).
Example: If the total sale is $1,000 and the tax rate is 5%, the tax amount =1,000 × 5% = $50.
Use case: Applied in most state and local sales tax jurisdictions where taxes are calculated based on the total sale value before exemptions or discounts.Flat Rate Applies a fixed tax amount per transaction or unit, regardless of the sale value. This rate does not vary with the sale price or usage.
Example: If the flat rate is defined as$3per transaction, the tax will always be$3, whether the sale is$100or$10,000.Rate x Usage Calculates tax based on the customer’s consumption (usage volume), where the tax rate is multiplied by the number of units consumed. The formula applied is: Tax Amount = (Usage × Rate).
Example: If a customer uses 500 MCF (thousand cubic feet) of gas and the tax rate is$0.02per MCF, then the tax =500 × 0.02 = $10.Rate x Delivery Calculates the tax based on the volume of gas or commodity delivered to the customer. This is similar to usage-based calculation but specifically applies to delivery metrics rather than total consumption.
Example: If 1,000 MCF is delivered and the tax rate is$0.01per MCF delivered, tax =1,000 × 0.01 = $10.Tax % x (Usage x Index) Computes tax as a percentage of the product of usage quantity and index price (usually a market-based rate like NYMEX). The formula applied is: Tax Amount = (Usage × Index Price × Tax%).
Example: If 1,000 MCF is consumed, the index price is$2.50per MCF, and the tax rate is5%, then tax =(1,000 × 2.50) × 5% = $125.Tax % x (Usage x Formula) Calculates tax as a percentage of a derived value based on a predefined formula, which may include usage, delivery, cost, or additional custom parameters. The formula is defined in the Rate formula field when applicable. The formula applied is: Tax Amount = (Usage × Formula Output × Tax%).
Example: Suppose the formula calculates a weighted delivery cost of$3.00per MCF for 1,000 MCF usage, and the tax rate is 4%, thentax = (1,000 × 3.00) × 4% = $120.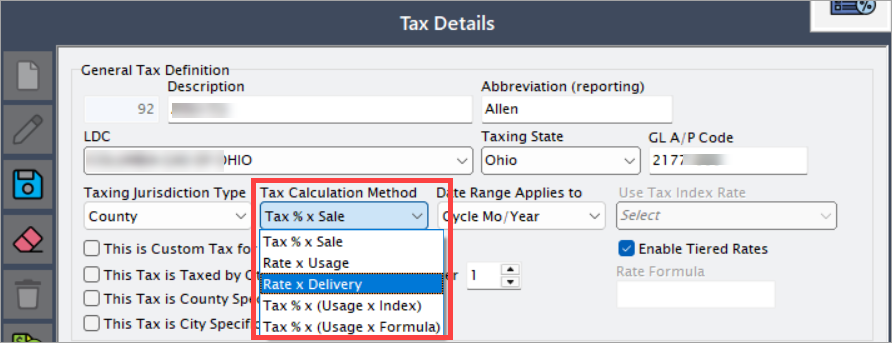
-
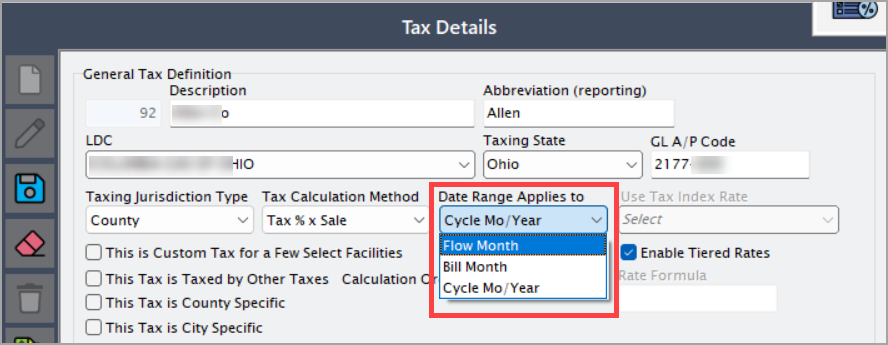
Choose how the tax period applies:
-
Flow month: Applies tax based on the month in which the commodity or service physically flowed or was consumed.
- Use this when tax liability should be recognized according to actual usage, independent of the billing schedule.
- Common scenario: Natural gas or electricity usage where tax is applied for the month the energy was consumed, even if the bill is generated later.
-
Bill month: Applies tax based on the month in which the invoice or bill is generated.
- Use this when tax liability is recognized according to the billing date rather than the consumption date.
- Common scenario: Subscription services or utilities that invoice at the end of the month, regardless of when the service was consumed.
-
Cycle mo/year: Applies tax according to a specific billing cycle defined by month and year.
- Use this when the billing cycle does not align exactly with calendar months, for example, if your cycle runs from the 15th of one month to the 14th of the next month.
- Ensures that taxes are calculated consistently for each defined cycle, which is useful for reporting and reconciliation purposes.
-
-
Fill in the remaining optional fields. These optional fields provide additional controls for applying taxes accurately based on specific scenarios such as facility, location, calculation priority, or tiered rates. Configuring these correctly ensures precise tax computation and reporting.
Fields/Checkboxes Description This is custom tax for a few select facilities Check this if the tax should only apply to specific facilities. Use this when certain locations have unique tax requirements that differ from the standard tax rules. This tax is taxed by other taxes Enable this to allow multi-level taxation, where this tax is calculated on top of another tax. Useful in jurisdictions where taxes are compounded or layered on one another. This tax is county specific Check this if the tax applies only at the county level. This ensures that taxes are calculated correctly for transactions based on the county in which the facility or customer is located. This tax is city specific Check this if the tax applies only at the city level. This is important for cities that impose local taxes in addition to state or county taxes. Calculation order Defines the sequence in which multiple taxes are applied. Proper calculation order is critical when taxes are interdependent or when multi-level taxation is enabled. Enable tiered rates Check this to define multiple tax tiers based on usage, amount, or other criteria. Useful when tax rates vary for different ranges of consumption or transaction value. Rate formula Allows a formula-based tax calculation, if applicable. This field when enabled, it provides flexibility to calculate tax based on complex rules beyond standard fixed or percentage rates.
Step 3: Validate and save the details
- Click on Save button to save the Sales tax configuration screen.
-
When you save the configuration, the following information gets generated under the Tax selection selection.
Fields Description ST Displays the state abbreviation based on the Taxing state selection. Name Displays the short name or abbreviation for the tax jurisdiction. Description Describes the tax jurisdiction, e.g., Allen Co, Ashland Co.
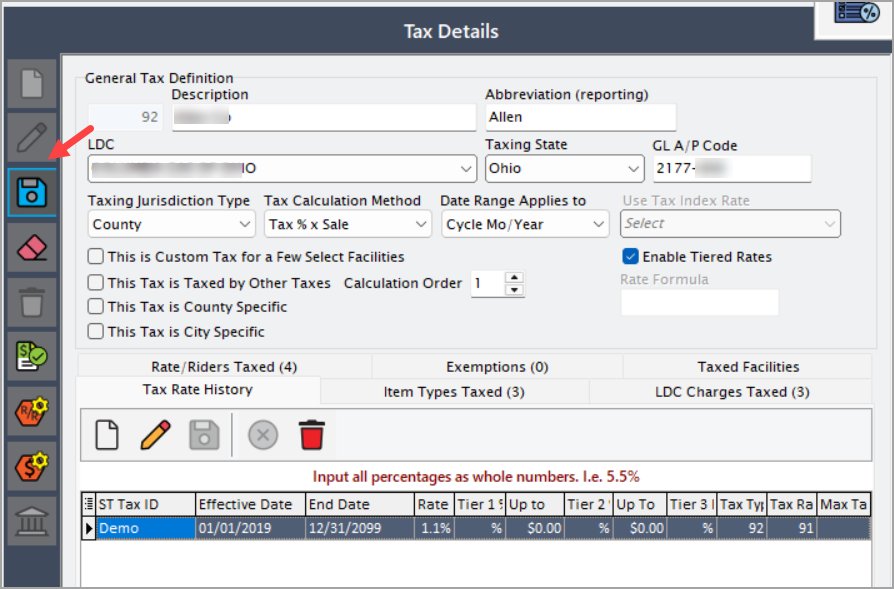
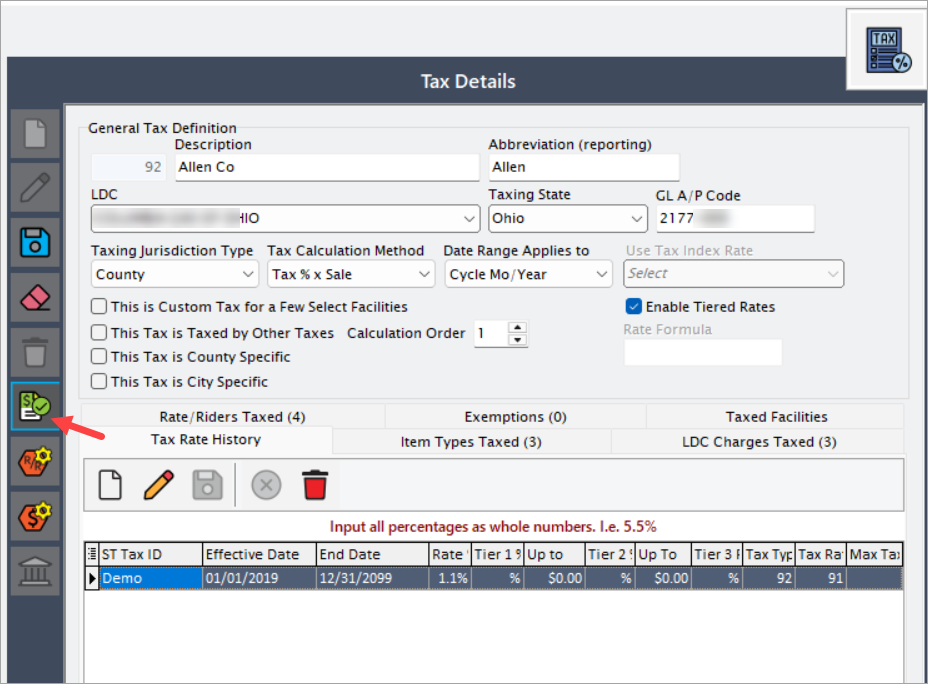
Step 4: Defining the tax rate
To define a new tax rate, go to the Tax history tab. Then, do the following:
- Click on the Add new tier button.
-
Fill in the following details:
Fields Description ST Tax ID System-generated tax identifier for the record. Effective date The start date when the tax rate becomes active. End date The end date after which the tax rate is no longer valid. Rate Enter the tax rate percentage as a whole number (e.g., 1.1% should be entered as 1.1). Tier 1 / Tier 2 / Tier 3 Define tiered rate values if Enable Tiered Rates is selected. Up to Defines the limit for each tier. Tax Ty / Tax Ra / Max Ta Internal references used for tax type, rate, and maximum tax configurations. -
Click Save. The details are saved under the Tax rate history tab.
Key points to remember
- Input all percentages as whole numbers. For example, to enter 5.5%, type 5.5.
- You can define multiple rate changes with different start dates.
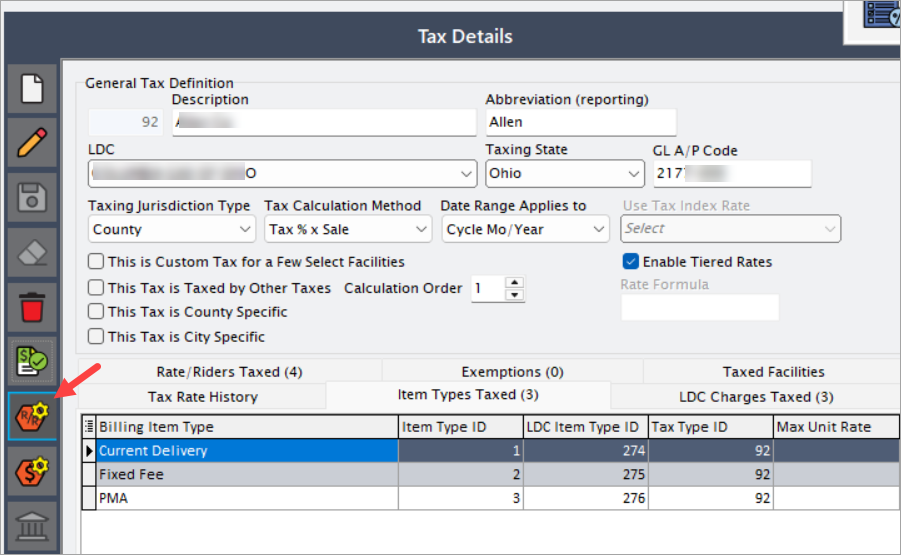
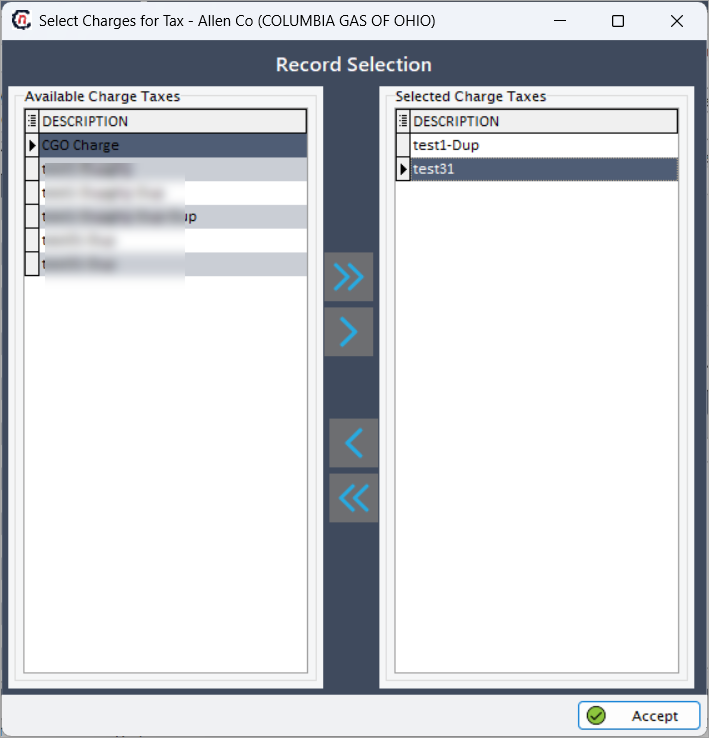
Step 5: Assign sales tax to charge types
- Click the Apply this tax to multiple invoice item types icon.
-
Move relevant taxes from the Available charge taxes to the Selected charge taxes section using > or >> icons.
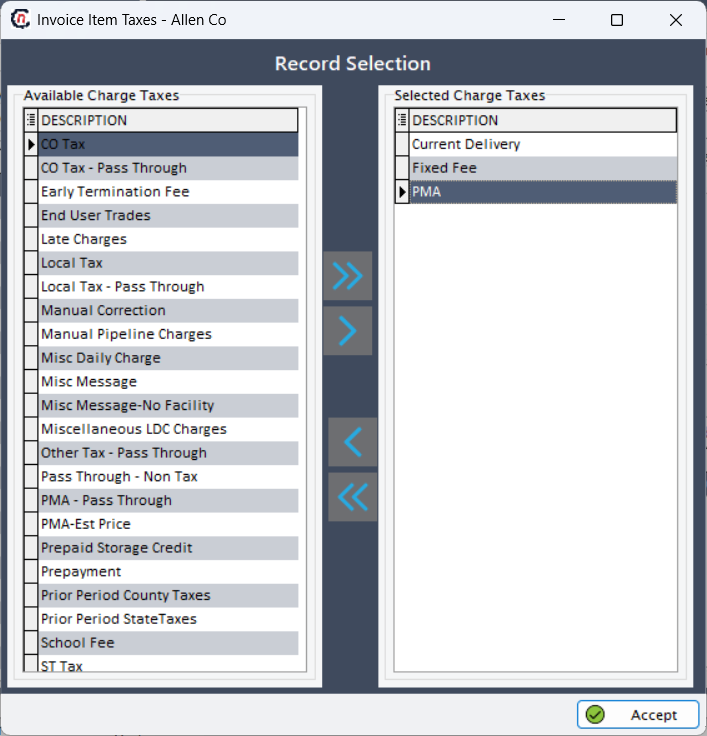
Note
The data under Available charge taxes are pre-configured in the nGenue application.
-
Include all applicable charges (e.g., Current delivery, Late charges, Fixed fee).
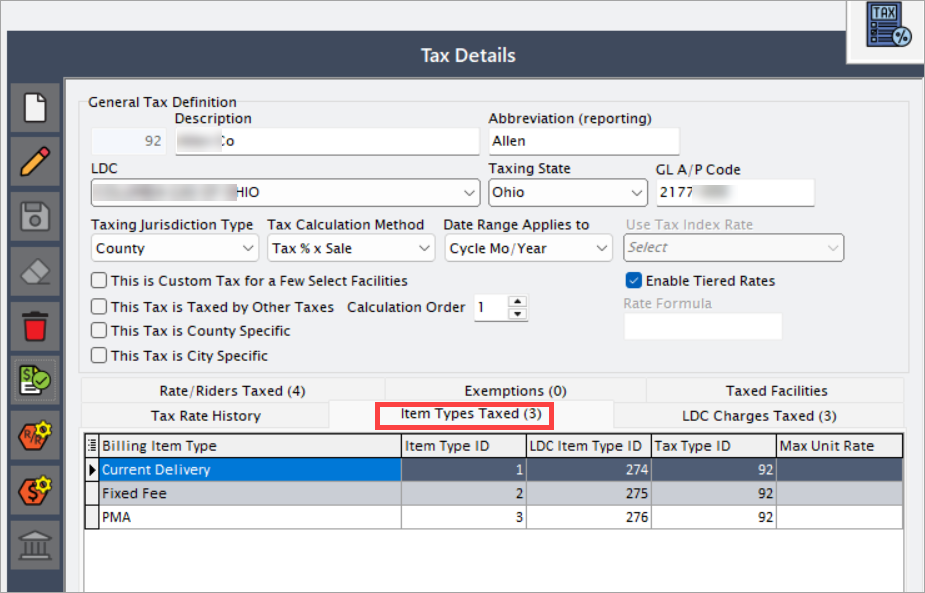
- Click Accept. The applicable charges can be seen in the Item types taxed tab.
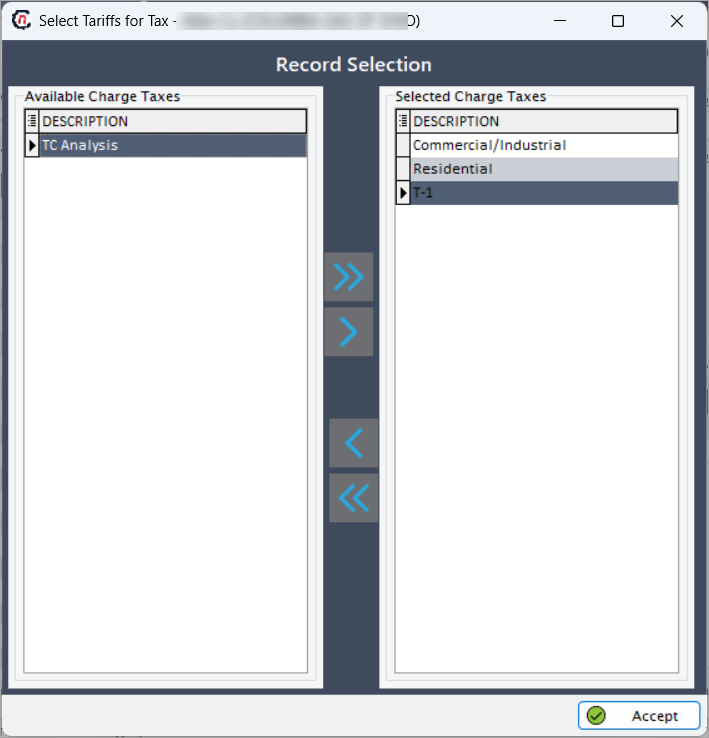
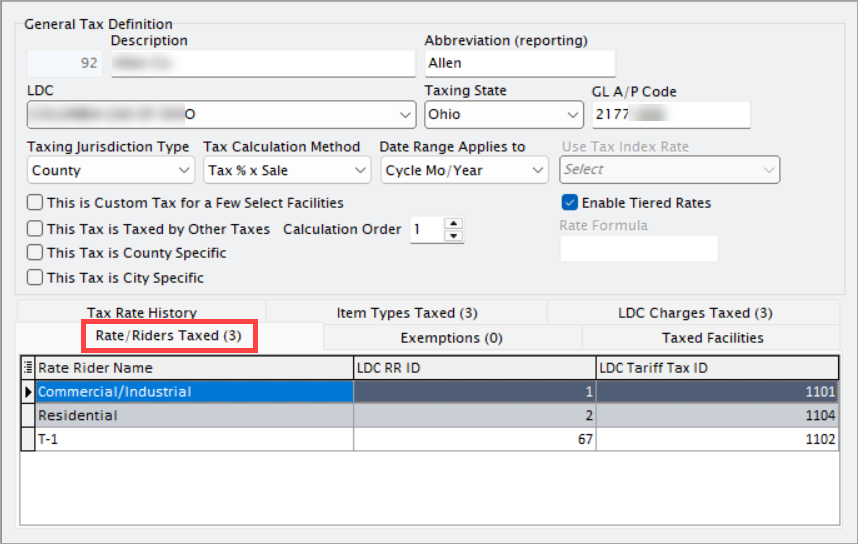
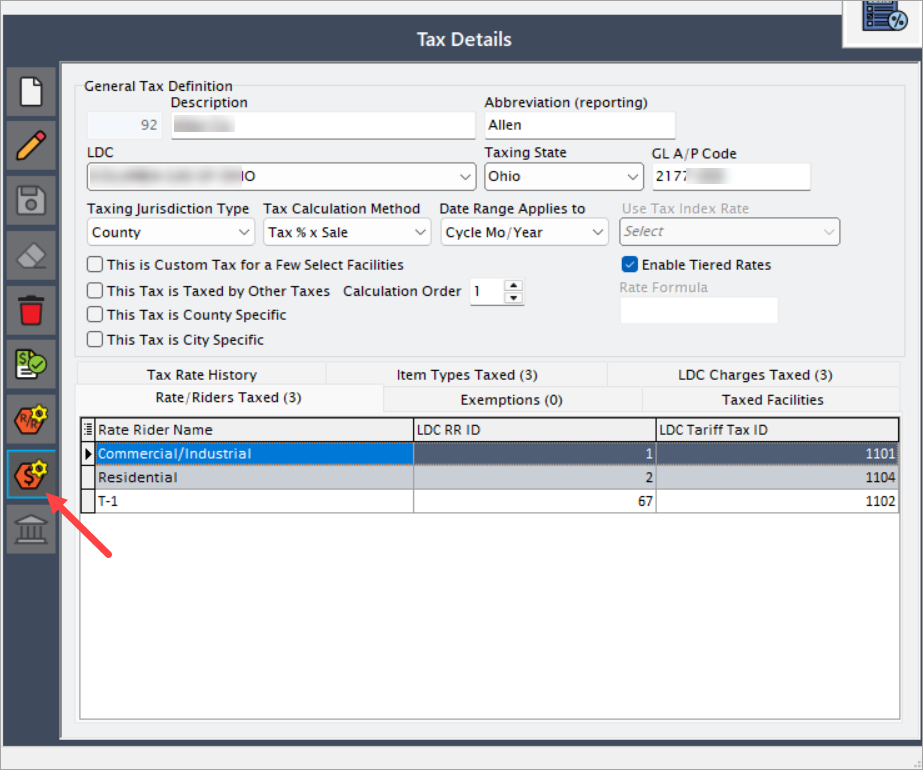
Step 6: Assign sales tax to rate riders
- Click on the Apply this tax to rate rider icon.
-
In the next popup window, move the taxes applicable for the rate riders from the Available charge taxes to the Selected charge taxes using > or >> icons.
Note
The data under Available charge taxes are configured in the LDC rate configuration screen of the nGenue application.
-
Click Accept.
- The selected tax are displayed under the Rate/Riders taxed tab.
Step 7: Select LDC charges for sales tax
- Click on the Tax definition for LDC charges icon.
-
In the next popup window, choose LDC-specific charges where the tax should apply from the Available charge taxes to the Selected charge taxes using > or >> icons.
Note
The data under Available charge taxes are configured in the Open LDC charge definitions screen of the nGenue application.
-
Click Accept.
- The selected LDC charges are displayed under the LDC charges taxed tab.
Step 8: Define tax exemptions (if applicable)
Some customers may qualify for partial or full tax exemptions depending on their classification or the governing state or local regulations. Configuring these exemptions ensures that taxes are calculated correctly for billing, reporting, and compliance purposes. This step is particularly important for facilities or customers who are legally exempt from certain sales taxes or eligible for reduced rates.
Tax exemptions are typically governed by state or local laws and are often applicable to specific customer categories. Setting up these exemptions accurately helps maintain compliance and prevents incorrect billing.
Common examples include:
- Military facilities: Often 100% exempt from state and local taxes.
- Non-profit organizations: Exempt based on their registered status.
- Educational institutions: May qualify for partial or complete exemption depending on jurisdiction.
- Senior citizens: In some states, may receive special tax exemptions.
Failure to configure exemptions correctly can lead to overcharging exempt customers or underpaying taxes to authorities, both of which can cause compliance issues and require corrections later.
To define tax exemptions;
-
Navigate to the Applicable sales taxes section within the Facility screen.
Note
You can access the Facility screen from the End user configuration screen
-
Right-click on a listed tax entry and choose one of the following options based on the requirement:
- Add exemption for selected tax: Applies exemption to the chosen tax item only.
- Add exemption for all taxes: Applies exemption settings across all applicable tax types.
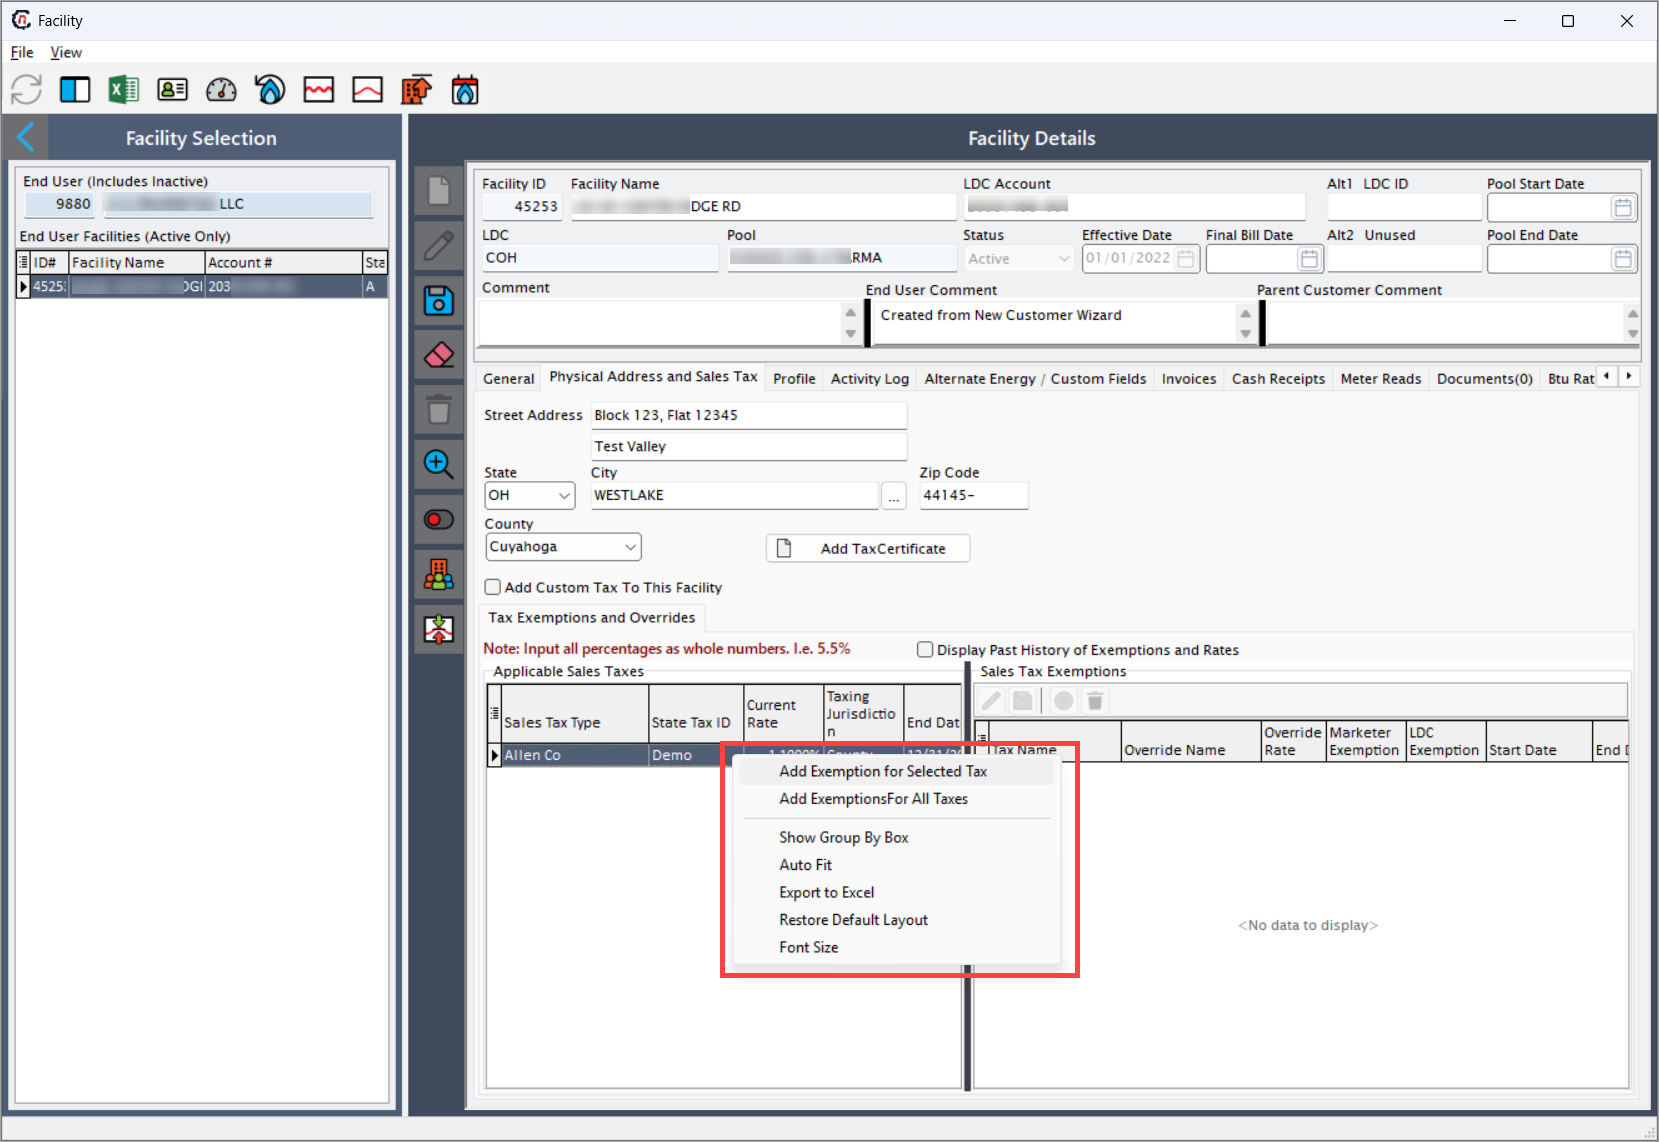
-
The selected tax will now appear in the Sales tax exemptions section.
-
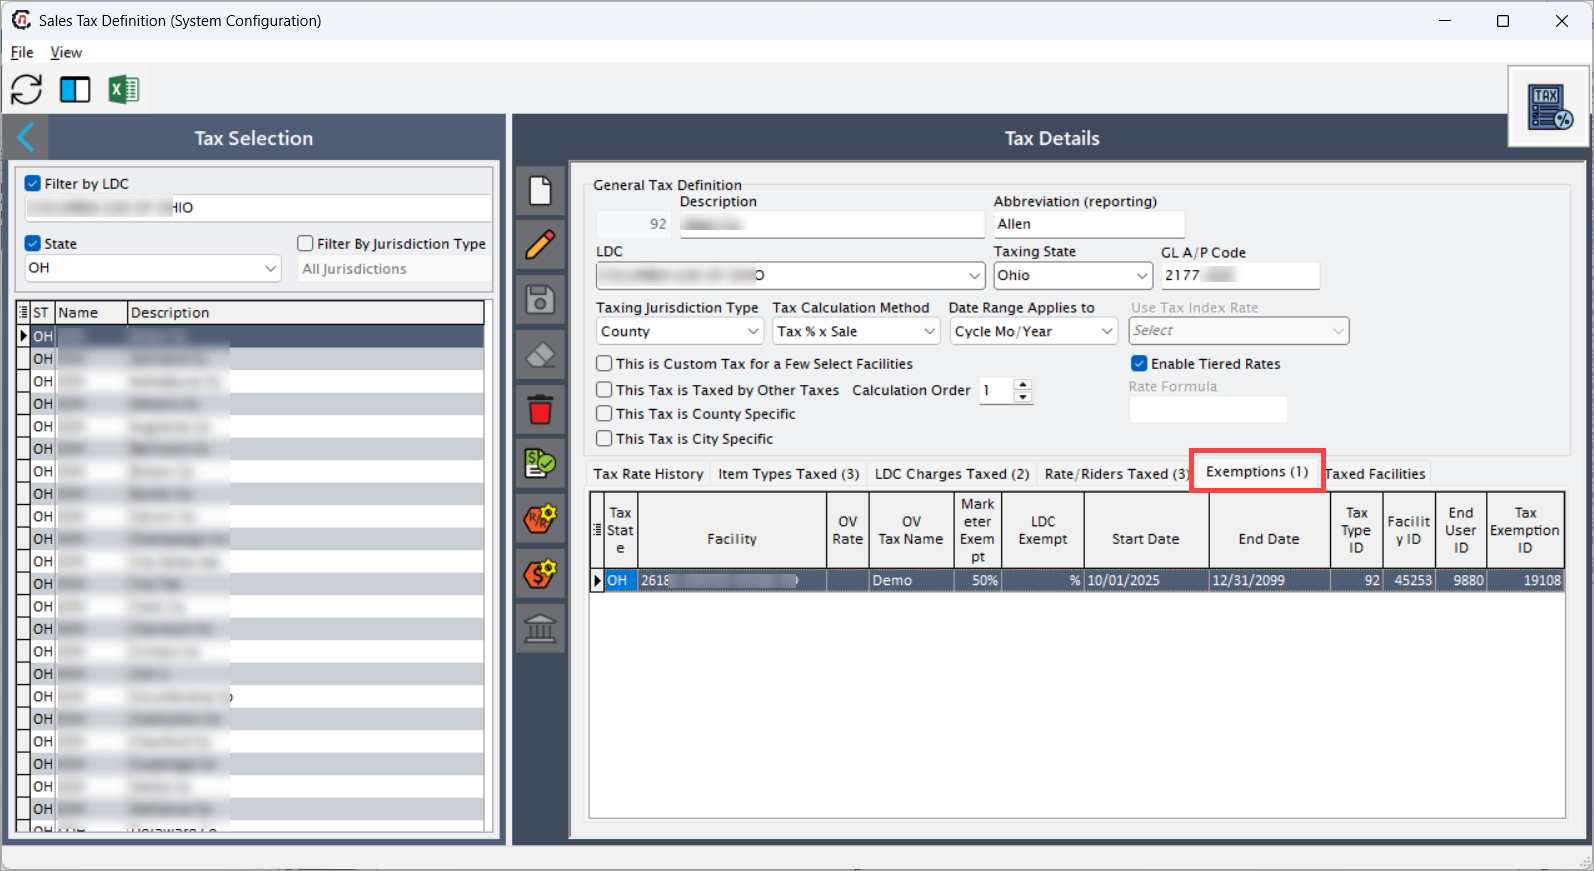
Specify the exemption details by entering:
- Marketer exemption percent: Defines the portion of the tax exempted for the marketer.
- LDC exemption percent: Defines the exemption percentage applicable from the LDC side.

-
Enter the effective period for both the tax rate and the exemption, ensuring alignment with the legal or contractual exemption duration.
- The exempted tax defined for the facility should reflect under the Exemptions tab.
What's next
Verify the sales tax at the facility level
Let's verify the sales tax that you've configured at the facility level. To do so;
- Navigate to the Facility screen.
- Go to the Physical address and sales tax tab.
- Ensure the Applicable sales taxes section lists the correct taxes for the customer's location.
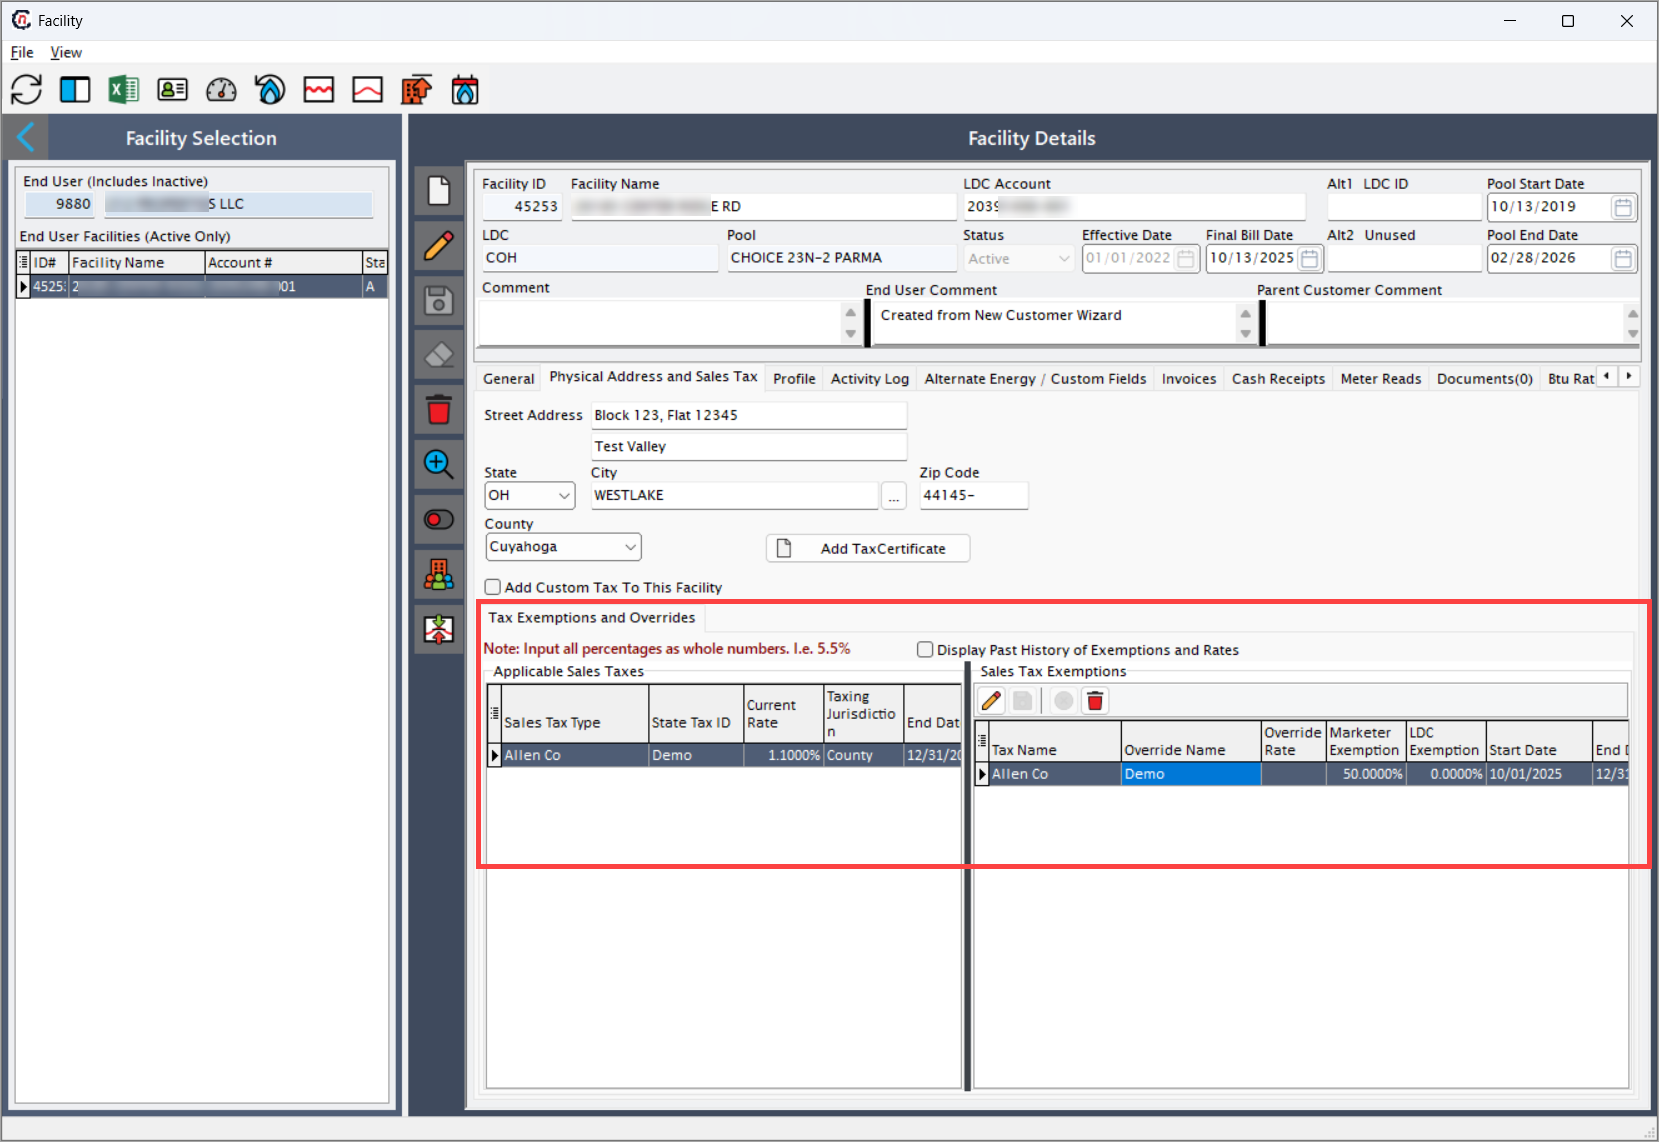
This confirms that the system is applying tax rules correctly at the Facility level.
Summary
The Sales tax definition configuration helps ensure accurate and compliant tax application for different jurisdictions. Proper setup of tax rates, jurisdictions, and applicable facilities supports automated billing and reporting within the system.