Configuring pipeline path definitions
The Pipeline Path Definition screen is used to create and manage receipt-to-delivery paths for a selected pipeline. These paths define how natural gas flows from a receipt point to a delivery point and are foundational for:
- Pipeline scheduling
- Nomination processing
- Transportation imbalance tracking
- Fuel loss calculations
- Downstream settlement and billing workflows
A pipeline path represents a directional link between:
Receipt Point → Delivery Point
Optionally, a fuel loss percentage is applied to the path to represent compressor fuel, shrinkage, or system losses.
Prerequisites
Before using the Pipeline Path Definition screen, ensure the following prerequisites are met:
- The user have the add or modify permissions for the Pipeline Path Definition screen.
- Pipeline, Receipt Points, and Delivery Points are configured in the PZL Configuration screen.
- Each receipt and delivery point belongs to the selected pipeline.
- Fuel loss rules or percentages are predefined if they are applied at the contract or system level.
- No conflicting path definitions exist for the same receipt-delivery combination.
Procedure to configure pipeline paths
Step 1: Navigate to the Pipeline Path Definition screen
- Log in to the nGenue application.
- Click the Search icon and enter Pipeline path.

- Double-click Pipeline Path Definition to open the Pipeline Path Definition (Pipeline Scheduling) screen.
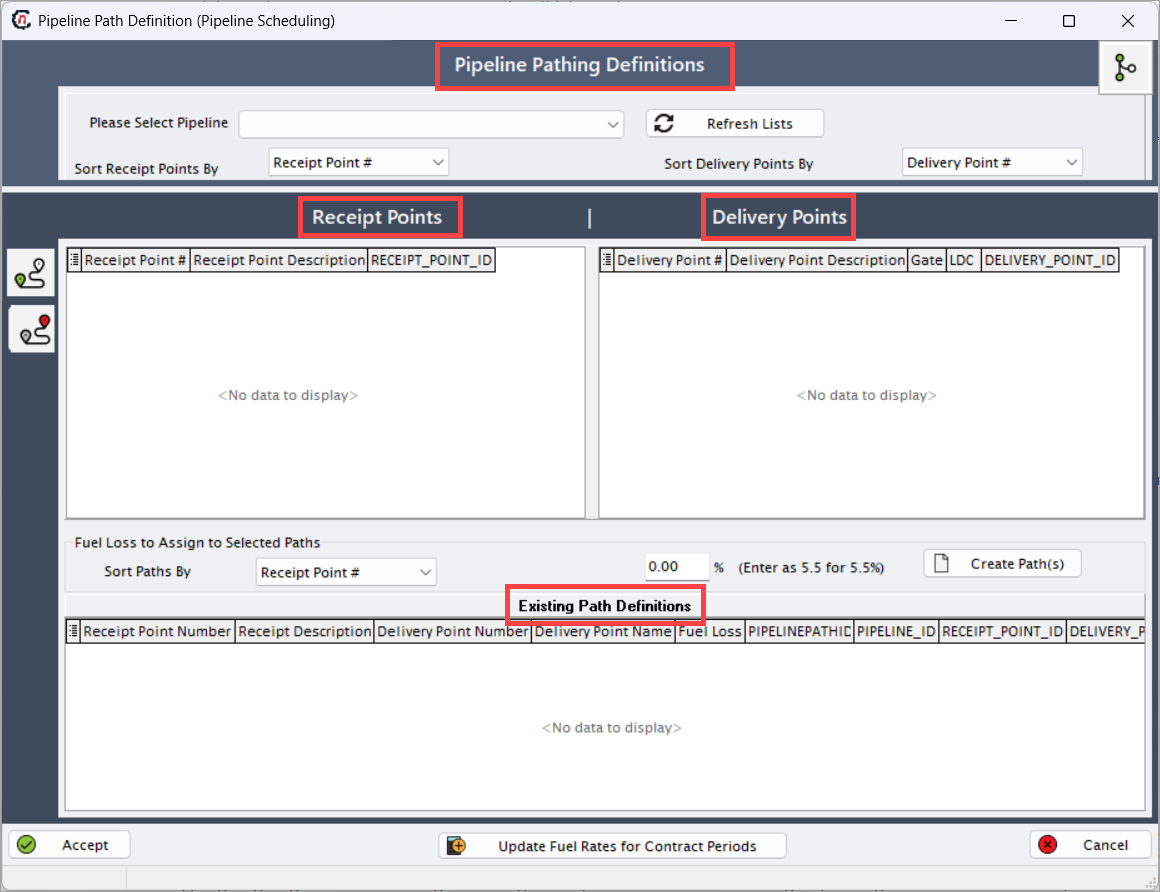
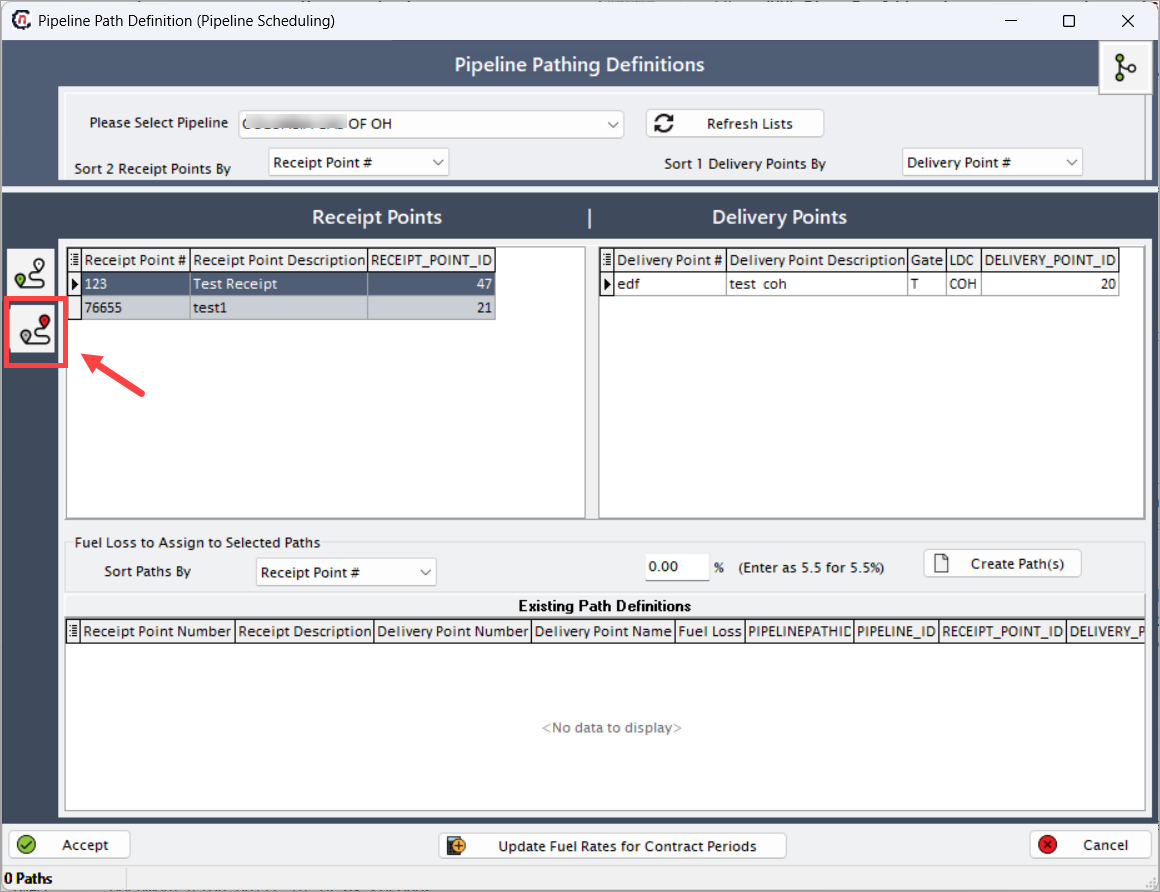
- The Pipeline Path Definition (Pipeline Scheduling) screen contains several sections:
- Pipeline Pathing Definitions section
- Receipt Points panel
- Delivery Points panel
- Fuel Loss Assignment section
- Existing Path Definitions grid
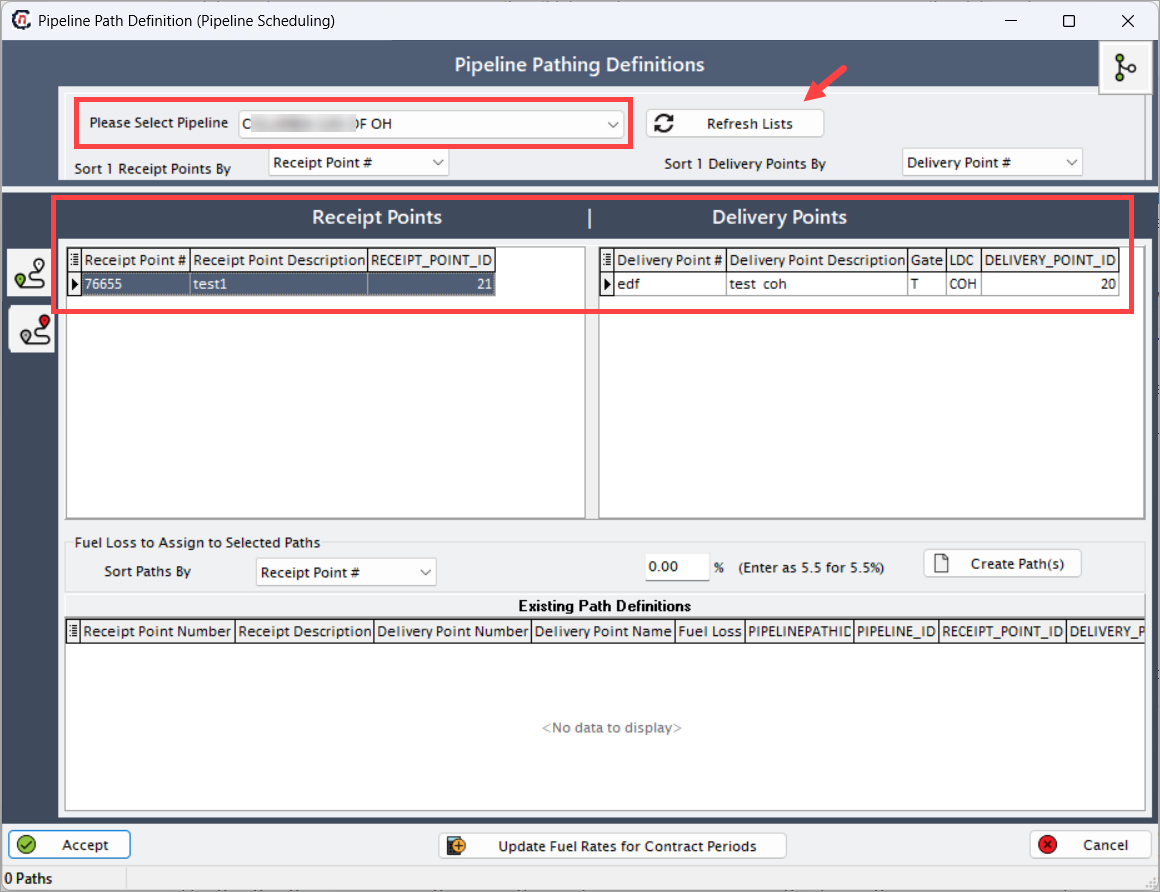
Step 2: Select pipeline and refresh lists
Selecting the pipeline loads all Receipt Points and Delivery Points that belong to that pipeline. This ensures that path creation is restricted to valid pipeline locations. Refresh Lists is used when new points have been added in the PZL (Pipeline-Zone-Location) screen and must appear on this page.
- In the Please Select Pipeline dropdown at the top of the screen, choose the pipeline for which you want to define paths.
- Once the pipeline is selected, the system automatically loads all Receipt Points and Delivery Points associated with that pipeline.
-
If you recently added or edited pipeline points in the PZL screen, click Refresh Lists to reload the latest updated points into the grids.
-
You may optionally use the Sort 1 Receipt Points By and Sort 1 Delivery Points By dropdowns to reorder the lists by number or by description for easier navigation.
Step 3: Add and manage receipt points
Receipt Points represent entry locations where gas is received into the pipeline. To create a pipeline path, at least one Receipt Point must be selected.
- Review the Receipt Points grid on the left panel after choosing the pipeline.
-
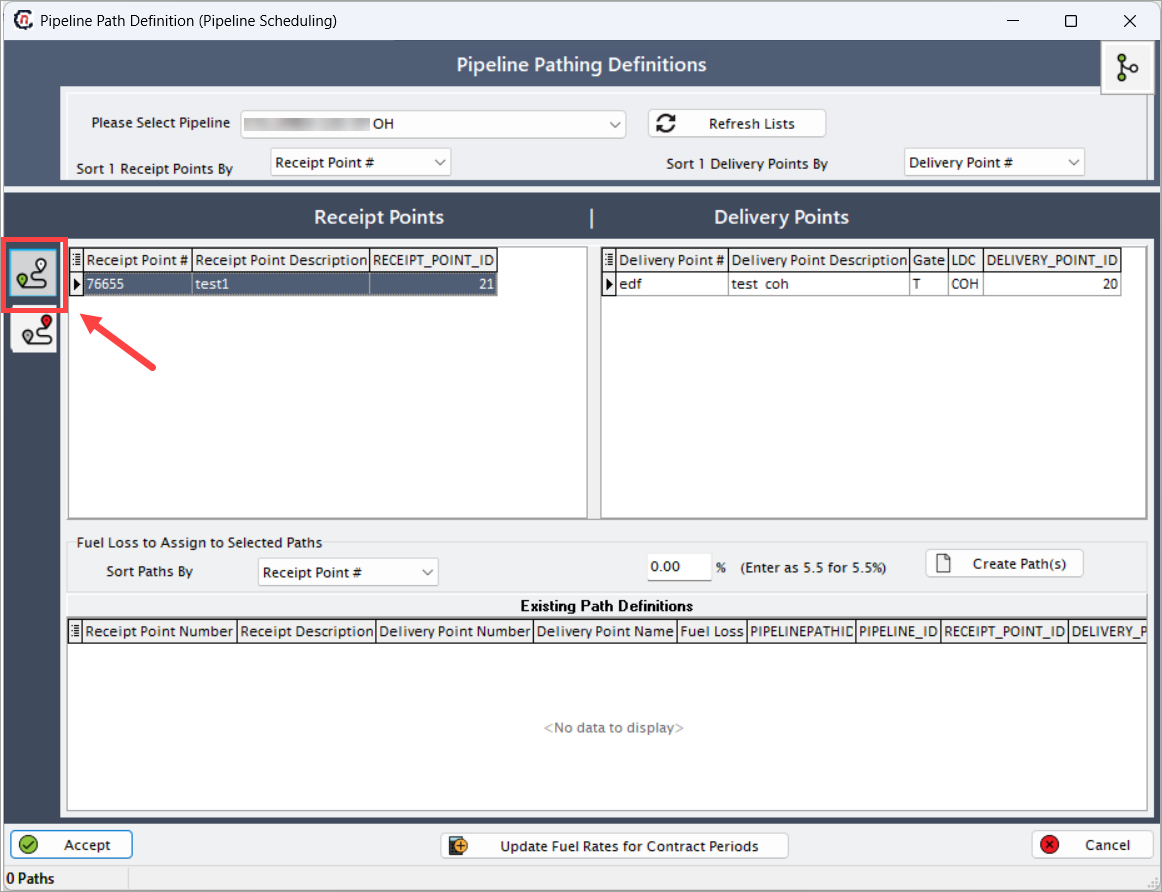
To add new receipt points for the pipeline, click the Add Receipt Points icon.
-
In the Receipt Point Configuration section, fill in the following details:
Fields Description Name The descriptive name of the receipt point. Used in nominations, pathing, and reporting. Must be unique within the pipeline. Point Number The numeric identifier assigned by the pipeline. Often corresponds to pipeline-published receipt meter or location ID. This value is critical for EDI, scheduling, and integration. EDI DRN Optional Delivery/Receipt Number used for EDI transactions. If the pipeline uses DRN-based identification, this field must match the published ID. City/County The geographical city or county where the receipt point is located. Used for operational metadata and audits. State The U.S. state where the point physically resides. Dropdown values reflect system-configured state codes. This point is a Pipeline Interconnect Indicates whether the receipt point represents an interconnect between two pipelines. If selected, select the interconnect pipeline from the dropdown and click on Add Pipeline button. This allows attaching a second pipeline that intersects at this receipt point. This is required for interconnects and dual-pipeline receipt locations. Enable Pool Transactions When checked, the receipt point participates in pool-based commercial transactions. This is required for pooled supply, index trades, and aggregation logic. Valuation Pool (Optional) Links the receipt point to a valuation pool used for pricing, settlement, and value assignment. Optional but recommended when point-specific valuation rules apply. It intersects with the following Pipeline(s) Displays pipelines that connect physically or commercially to this receipt point. Used for pathing, scheduling, and building inter-pipeline routes. Pipelines listed here are added previously using Add Pipeline. 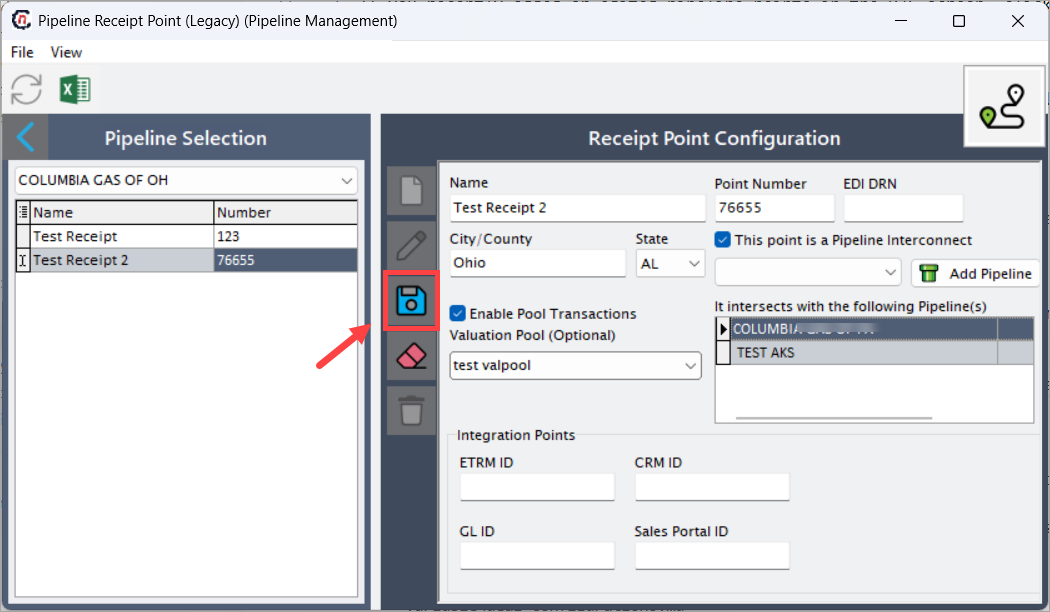
About Integrations Points
These fields allow integration with external systems. If your organization uses ETRM, CRM, GL, or Sales Portal systems, these IDs ensure data synchronization.
-
Click Save to save the changes.
- Navigate back to the Pipeline Path Definition (Pipeline Scheduling) screen.
- Click on Refresh Lists icon to find your latest receipt point added within the Receipt Points panel.
- The Receipt Points grid is populated with fields such as Receipt Point #, Receipt Point Description, and RECEIPT_POINT_ID.
-
If you need to re-sort the grid for visibility, use the Sort 1 Receipt Points By dropdown.
Note
- Only receipt points associated with the selected pipeline can be added.
Step 4: Add and manage delivery points
Delivery Points represent exit locations where gas leaves the pipeline. Every created path must have at least one delivery point selected as the destination.
- Review the Delivery Points grid on the left panel after choosing the pipeline.
-
To add new delivery points for the selected pipeline, click the Add Delivery Points icon.
-
In the Delivery Point Configuration section, fill in the following details:
| Fields | Description |
|---|---|
| Name | The descriptive name of the delivery point. Used in scheduling, reporting, balancing, and pipeline transactions. |
| Station # | A pipeline-designated identifier representing the physical meter station or delivery location. Required for interconnects and for mapping to pipeline operator documentation. |
| EDI DRN | The Electronic Delivery Receipt Number used when communicating nominations via EDI. This must match the DRN used by the pipeline for automated transaction exchange. |
| City/County | The jurisdictional location for the delivery point. Used for regulatory reporting and aligning with LDC service territories. |
| State | The U.S. state where the delivery point resides. Impacts tax rules, regulatory jurisdiction, and certain LDC interactions. |
| This point is a Pipeline Interconnect | Enables tagging the delivery point as an interconnect between two pipelines. This activates the intersecting pipelines section. |
| It intersects with the following Pipeline(s) | Displays pipelines that physically or contractually interconnect at this delivery point. Used for tracking upstream/downstream flows and inter-pipeline balancing. |
| Add Pipeline | Allows users to attach an additional intersecting pipeline to the delivery point. |
| LDC City Gate? | When checked, identifies the delivery point as the official city gate for an LDC. This impacts how volumes are allocated and passed through for billing and balancing. |
| LDC | Specifies the Local Distribution Company associated with the city gate. Determines where deliveries flow in downstream measurement and balancing modules. |
| Allow Imbalance Injections | Allows users to apply imbalance adjustments (positive or negative) at the delivery point. Used for balancing after actualizations or cashed-out imbalances. |
| Imbalance Is Contract Specific | Dictates whether imbalance rules apply globally or vary by contract. Enables granular control for multi-contract shippers. |
| Enable Pool Transactions | Allows the delivery point to participate in pool-based allocation, pricing, and balancing. Required if the LDC or pipeline uses pooling structures. |
| Valuation Pool (Optional) | Assigns a pool used for cost/price valuation of deliveries. Highly relevant for gas cost accounting, pool-level settlements, and retail pricing. |
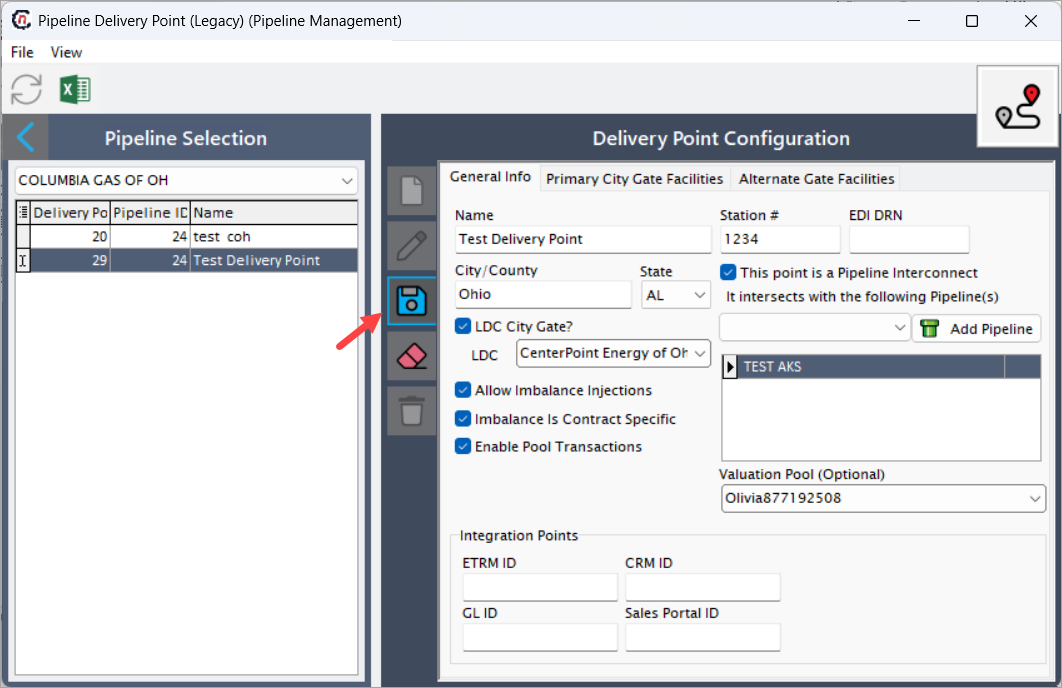
!!!note "About Integrations Points"
    These fields allow integration with external systems. If your organization uses ETRM, CRM, GL, or Sales Portal systems, these IDs ensure data synchronization.
- Click Save to save the changes.
- Navigate back to the Pipeline Path Definition (Pipeline Scheduling) screen.
- Click on Refresh Lists icon to find your latest receipt point added within the Delivery Points panel.
- The Delivery Points grid displays Delivery Point #, Delivery Point Description, Gate, LDC, and DELIVERY_POINT_ID.
- Use the Sort 1 Delivery Points By dropdown to reorganize the list based on Delivery Point # or Delivery Point Description.
Step 5: Assign fuel loss to selected paths
Fuel Loss represents the percentage of gas consumed or lost while traveling from the receipt point to the delivery point. Assigning a fuel loss at this step allows the system to automatically apply shrinkage or compressor fuel deductions to path volumes.
- Go to the Fuel Loss To Assign To Selected Paths section below the main grids.
-
Use the Sort Paths By dropdown to organize how the newly created path combinations will be displayed. This sorting feature makes it easier for schedulers, analysts, and configuration users to review and validate large sets of path combinations. The following sort options are available:
-
Receipt Point: Sorting by Receipt Point arranges the path rows based on the numeric Receipt Point # assigned to each receipt location.
- Receipt Points are typically numeric identifiers assigned during pipeline configuration.
- Sorting by this field groups all paths starting from the same receipt point together.
- Within each receipt point group, the delivery points remain in their default order.
- When to use it:
- When you want to review all paths originating from a specific meter, station, or upstream supply point.
- Useful for verifying that all expected delivery combinations were generated from each receipt point.
- Example: If you selected three receipt points (100, 105, 200), all paths from 100 will appear first, followed by 105, followed by 200.
-
Receipt Point Name: Sorting by Receipt Point Name arranges the paths alphabetically based on the descriptive name of each receipt point.
- Sorting alphabetically improves readability when the numeric identifier does not convey operational meaning.
- When to use it:
- When reviewing paths by operational or business terminology rather than numeric IDs.
- When searching for a receipt point with a long or descriptive name.
- Example: Names such as “Auburn Receipt”, “Midwest Upstream”, “Zane Gate” are sorted alphabetically: A → M → Z.
-
Delivery Point #: Sorting by Delivery Point # arranges the paths based on the numeric identifier of each delivery point.
- Delivery Points are also assigned numeric identifiers in the pipeline configuration.
- Sorting by this field groups all paths that deliver to the same point together, regardless of which receipt point they originate from.
- When to use it:
- When validating delivery-side completeness.
- When ensuring that a specific delivery meter has all expected receipt pairings.
- When checking fuel loss uniformity across delivery points.
- Example: If delivery points 50, 60, and 75 were selected, paths will appear grouped in this order: 50 → 60 → 75.
-
Delivery Point Name: Sorting by Delivery Point Name arranges the paths alphabetically based on the descriptive name assigned to the delivery location.
- Delivery point names often reflect customer meters, downstream systems, or exit zones.
- Sorting alphabetically is useful when numeric identifiers are not intuitive.
- When to use it:
- When validating paths for customer delivery locations.
- When grouping paths by end-user or downstream entity.
- Example: Delivery names such as “Alpha Delivery”, “Midstream Plant”, “Z-Exit Gate” will display in alphabetical order: A → M → Z.
-
Fuel Loss Rate: Sorting by Fuel Loss Rate arranges the paths based on the applied fuel percentage assigned during the path creation process.
- When to use it:
- When auditing fuel loss changes across multiple new or existing paths.
- When verifying consistency and identifying paths with unusual or incorrect fuel rates.
- When preparing to update fuel rates for contract periods.
- Example: If paths have fuel loss of 0.00%, 2.50%, 5.00%, sorting will list them in numeric order: 0.00 → 2.50 → 5.00.
- When to use it:
-
-
Enter the desired fuel loss percentage in the fuel input box (for example, enter 5.5 for 5.5%).
- If no fuel loss applies, leave the value as 0.00.
- Review the entered percentage to ensure accuracy before creating paths.
- The Create Path(s) button becomes fully active when at least one receipt and one delivery are selected.
Step 6: Create paths and review existing path definitions
Creating paths generates the official Receipt → Delivery combinations used by scheduling, nominations, and transportation accounting. Each created path is stored with an assigned Fuel Loss and unique identifier.
- Select one or multiple Receipt Points.
- Select one or multiple Delivery Points.
- Enter the Fuel Loss percentage as needed.
- Click Create Path(s) to generate all applicable combinations.
- Review the newly created paths in the Existing Path Definitions grid at the bottom of the screen.
- Validate the Receipt Point Number, Delivery Point Number, Fuel Loss, and assigned IDs.
- If everything is correct, click Accept to save the created paths permanently.
- If you want to discard the operation, click Cancel.
Step 7: Review existing path definitions
All paths created appear in the Existing Path Definitions grid.
| Fields | Description |
|---|---|
| Receipt Point Number | Receipt point identifier selected during path creation. |
| Receipt Description | Full description of the receipt point. |
| Delivery Point Number | Delivery point identifier mapped to the receipt point. |
| Delivery Point Name | Full description of the delivery point. |
| Fuel Loss | Percentage fuel loss assigned to the path. |
| PIPELINEPATHID | System-generated internal ID for path. |
| PIPELINE_ID | Pipeline identifier associated with the path. |
| RECEIPT_POINT_ID | Internal mapped receipt point ID. |
| DELIVERY_POINT_ID | Internal mapped delivery point ID. |
Step 8: Save or cancel actions
- Click the Accept button to save the created paths or click Cancel to discards unsaved changes and exits the screen.
- You can also click on Update Fuel Rates for Contract Periods icon to open a screen to bulk-update fuel percentages for existing paths across contract periods.
Example scenarios
Scenario 1: Create a single pipeline path
Requirement: Gas flows from Receipt Point #1 to Delivery Point #12 with no fuel loss.
- Select Pipeline: Pipeline ABC
- From Receipt Points → select Receipt Point #1
- From Delivery Points → select Delivery Point #12
- Enter Fuel Loss = 0%
- Click Create Path(s)
- Click Accept
Result: One path is created linking RP #1 → DP 12 with 0% loss.
Scenario 2: Create multiple paths with different receipt points
Requirement: Delivery Point #12 receives gas from Receipt Points 1, 2, and 3.
- Select Receipt Points 1, 2, 3
- Select Delivery Point #12
- Enter Fuel Loss = 2.5%
- Click Create Path(s)
- Accept changes
Result:
Three paths created:
- RP1 → DP12
- RP2 → DP12
- RP3 → DP12
All with 2.5% loss.
Key points to remember
- At least one receipt and one delivery point must be selected to create paths.
- Receipt and delivery points must belong to the selected pipeline.
- Fuel loss is optional, but recommended for accurate forecasting.
- Sorting helps manage large pipelines with many nodes.
- Paths are used downstream in nominations, scheduling, and imbalances.
Summary
The Pipeline Path Definition screen allows users to configure flow paths between receipt and delivery points for a given pipeline. These paths are critical for: * Scheduling gas movements * Applying fuel loss rules * Accurate modeling in market and pipeline operations * Downstream cost allocation and balancing
By following the steps above, users can create single or multi-point paths, assign fuel loss, and manage pipeline configuration efficiently.